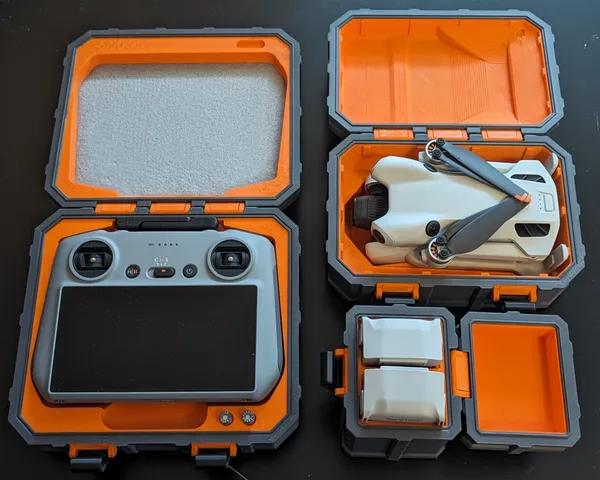
Box for DJI Mini 4 Pro and accesories
prusaprinters
IntroducionThe compact and lightweight design of the Mini 4 Pro makes this drone great for travelling. Sadly, there was no safe way to transport it - until now! The Basics:The complete set contains three types of boxes. They are designed to fit all essential components of the fly more combo kit. There is……a Box fitting the Drone (DJI Mini 4 Pro)…a Box fitting the Remote (DJI RC2) and the DJI ND Filter set…a Box fitting the two remaining flight batteries Update logUpdate #1 Added the .STEP files (as requested by @JeanBrito). Printing and Assembly You have the choice:There are three options available for printing. Option 1: You are here for functionality and simplicity? This is the option for you! Both halves of the boxes are printed as a single piece. This option is the easiest to print while using less time and material.Option 2: You are ready to accept using a bit more effort and material to get a great looking part? You might want to go for this option! Both halves of the boxes consist of two parts. That allows a multicolored part - without using an multi-material printer. (You can find detailed informations on how to print below.)Option 3: You want to go all in for that extra bit of detail? You are ready to dive into the advanced settings? Here comes option three! This option is basically the same as option two. Additionally there is a littel symbol “engraved” on the top of each box that shows whats inside of it. (Informations on how to print are also listed below.)You found an option that fits you? Great! Let's start printing! PrintingRequired parts:If you use 1.75mm filament you already have everything you need. If not, I'm sure you can find something with that diameter at home or in your local hardware store.Here's an overview of which parts you need, depending on your chosen option:Main Parts by optionOption 11xbox-XXX-bot_SINGLE.stlBox; bottom1xbox-XXX-top_SINGLE.stlBox; topOption 21xbox-XXX-bot_2-PARTS.stlBox; bottom1xINLAY-XXX-bot.stl1xbox-XXX-top_2-PARTS_BLANK.stlBox; top1xINLAY-XXX-top.stlOption 31xbox-XXX-bot_2-PARTS.stlBox; bottom1xINLAY-XXX-bot.stl1xbox-XXX-top_2-PARTS_ENGRAVED.stlBox; top1xINLAY-XXX-bot.stl1xbox-XXX_engraving.stlAdditional parts by type of box clip.stllever.stlhinge.stlbushing.stlDrone2x2x3x16xRemote2x2x3x16xBattery1x1x1x6x Print settings:Layer heights over 0,2mm are not recommended, everything else is up to you. There are no supports needed. Printing the 2-part version:Slicing:As mentioned above, in this option the boxes consist of two parts. First, print the parts INLAY-XXX-bot and INLAY-XXX-top. Later the inlay parts are going to get embedded when printing the parts box-XXX-bot_2-PARTS and box-XXX-top_2-PARTS. Using the Prusa Slicer, the process is pretty simple:Slice the box-XXX-bot_2-PARTS.stl or box-XXX-top_2-PARTS.stl as usual.Go to the slicer preview.Search for the layer, where the overhangs start getting printed. Thats the height at wich the inlay parts are embedded.Right-click on the + icon next to the layer height slider and chose Add pause print (M601) (see picture below)Re-Slice the part and export the .gcode file. You are now ready to print.Embedding the part:Start with printing the parts INLAY-XXX-bot and INLAY-XXX-top. Then you can start with the box-XXX-bot_2-PARTS and box-XXX-top_2-PARTS. You can print them like every other part. At the pre-defined layer height the printer stops printing. Using the example above this would happen at the beginning of layer 246 (height 49.2mm). Now it's time to insert the Inlay parts. There is probably a good amount of play between the two parts. I recommend using some tape around the Inlay parts to get a tighter fit. Before resuming the print, check if both top surfaces are more or less flush with each other. In my experience it is more forgiving than expected. Print the last few remaining layers - and you are done! Printing the engraved version:Slicing:Im going to describe the process using the PrusaSlicer. If you are using different software: Good luck - you are on your own. Use following settings: (Note: Expert mode is required)Printer settings - General - Capabilities - Extruders: 2Printer settings - General - Capabilities - Single Extruder Multi Material: OnPrinter settings - Custom G-code - Tool change G-code: M600Printer settings - Extruder 1 (+ Extruder 2) - Preview - Set extruder color (Note: I recommend setting extruder 1 to the color of the engraving)Print settings - Multiple Extruders - Wipe tower - Enable: OffLoad the models box-XXX-top_2-PARTS_ENGRAVED and box-XXX_ENGRAVING. (Note: If slicer detects Multi part object it does the next step for you. Just confirm the pop-up)Check the allignment of the parts (and correct if needed). The engraving should fit perfectly into the groves of the Box part.Assign the colors to the objects (see picture below).Add pause print as mentioned above (2-part version).Slice the model. You are now ready to print.Printing:Load the Filament for the engraving. The Printer starts printing the ENGRAVING part of the gcode. When finished, the filament gets ejected. Load the new filament and resume print. Again, the printer should start with the first layer - just without homing the axes.The rest works like described above with the embedded part. AssemblyAll parts printed? Now it's time for assembly. Connect the two parts of the box: First, insert the bushings [1] into the holes of box-top and box-bot. Then insert the pins [2] into the main body of the hinge and slid them out and into the bushings [1]. Finally, complete the hinges by clipping the lid onto the main body. (Note: See pictures belowUsing the same mechanic, connect the levers to the front of the box-bot parts.Lever and clip are connected with a pice of 1.75mm filament. Insert it from the right. (The hole on left is slightly smaller for a better fit)Optional: Add a felt inlay in the remote-top part. And… You're finished!
With this file you will be able to print Box for DJI Mini 4 Pro and accesories with your 3D printer. Click on the button and save the file on your computer to work, edit or customize your design. You can also find more 3D designs for printers on Box for DJI Mini 4 Pro and accesories.
