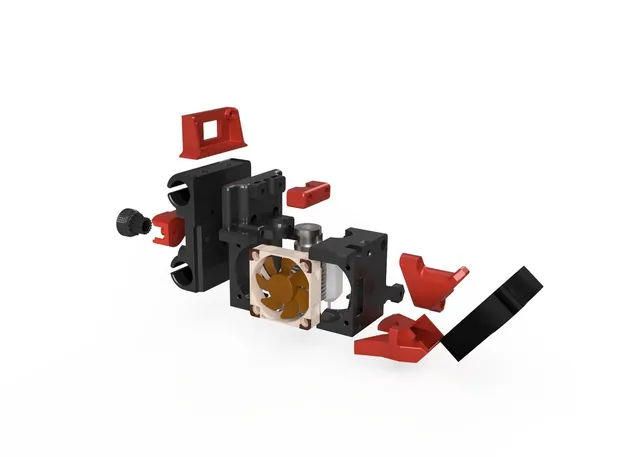
Bowden MK3 R3 X-carriage for the Anycubic I3 Mega
prusaprinters
UPDATE 15.02.19:Relaxed tolerances for X_Carriage files and added the old style Belt mount versions. Be sure to flip the X direction for those (V2). Thanks to Lukasz Mach on Facebook for the help ### So what is it?This is a redesigned X-carriage for the Anycubic I3 Mega. It was remixed mainly from the Prusa I3 MK3 R3 extruder, Bowden X-Carriage Mount for E3D V6 and Anycubic I3 Mega Prusa i3 X-Carriage Converter. Why should I use it?It was designed in such a way that you can use pretty much any Prusa I3 MK3 fan mounts and fan ducts, it's compatible with the new (R3) and old (R2) styles so you aren't locked into just one design. This newest R3 revision also has more air going to the heatsink and you won't have problems with heat creep or clogging. I've been using it for a 2 years now and I can say it works great. So what do I need?An E3D V6 hotend, or a clone4x LM8UU bearings, Igus RJ4JP-01-08 bushings or RJMP-01-08 bushingsBLTouch or a clone if you want to use auto bed levelingMostly M3 screws and nutsSome M4 screws and nuts ### Why are the parts oriented the way they are?I see, you're wondering about those X-Carriage files. That's to make them last longer. If you printed them flat, there's a high chance the bushing clamps would snap. Just print them with a brim and you'll be good to go. Anything else I need to print?Of course!You're still missing a few parts that I either didn't modify or I made them separate.As for the fan mount and fan duct, use whatever you like or head here to see what I'm using: Prusa Mk3 fan duct (Includes double mount adaptor)Ratcheting Belt Tensioner modified knobBowden MK3 R3 Cable Chain for the Anycubic I3 Mega not mandatory but will make it look a lot cleaner. ### How do I assemble it?The hardest part is getting the X-Carriage plate on the printer. That means loosening the screws that hold X smooth rods in place, moving the rod a bit to a side, sliding on the new part with bearings in place and put everything back together. Remember to only do one rod at a time.Other than that I'd say that the assembly is pretty straight forward. take a look at the assembly render, that should explain everything.I don't think anything more is necessary to say, but if you have any questions I'll be happy to help. Now the big question. How do I install the BLTouch?Thankfully I don't have to explain that since there already is a tutorial. You don't need to print anything from that tutorial, but you will need to use a different firmware, one that has the correct offsets. You can find that here. There are both uncompiled and compiled versions. Use the fast version if you have Igus bearings and TMC2208 drivers since it would get pretty loud.Both versions have Thermal runaway protection and bed PID tuning enabled. There is no need to change the firmware if you don't plan on adding the BLTouch. UPDATE 15.02.19: Relaxed tolerances for X_Carriage files and added the old style Belt mount versions. Be sure to flip the X direction for those (V2) It's possible that it's compatible with other printers and if not, I believe just a redesign of X-Carriage plate files would be needed.
With this file you will be able to print Bowden MK3 R3 X-carriage for the Anycubic I3 Mega with your 3D printer. Click on the button and save the file on your computer to work, edit or customize your design. You can also find more 3D designs for printers on Bowden MK3 R3 X-carriage for the Anycubic I3 Mega.
