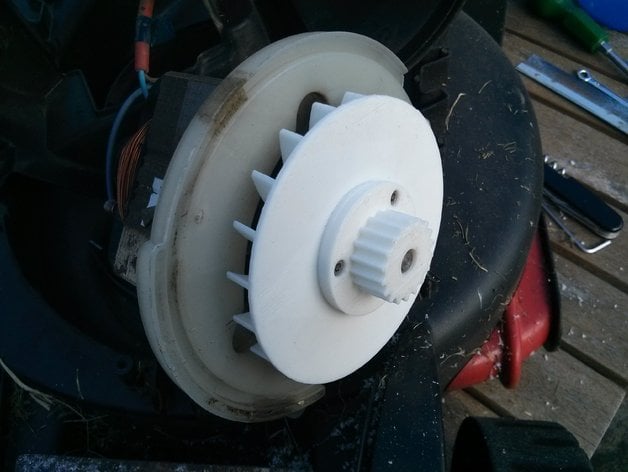
Bosch Rotak 32R Lawnmower Pulley/Fan - Version 2.3
thingiverse
My trusty Bosch lawnmower stalled and destroyed its drive pulley, which forced me to design and print a brand new one in record time. Update 21 June 2016: It finally gave up on life - the mower chewed through a piece of wood and severely damaged the pulley and tension bearing assembly, making them totally unusable. These parts kept my old mower running for over two years, but now that I have a shiny new one, I'll be keeping this project alive out of obligation rather than interest. Update 4 June 2016: This week has been pretty eventful, but not exactly what I'd call fun - installing it was an ordeal due to several design changes intended to improve the pulley but ultimately backfired. They resulted in more friction between parts and added weight which eventually proved catastrophic. Going forward, the new model uses an interference fit on the fan with provision for tapped holes to mount the pulley. I also made some adjustments - including a protection ring around the blades of the fan to avoid them flying off when it makes contact with the casing. Update 29 May 2016: Second breakdown, melted pulley and fan damaged but luckily not ruined completely - the design had too many weaknesses which came to light far sooner than I'd like. I've identified some flaws that can be rectified to make future upgrades less complicated. Update 11 August 2015: Well this is exciting news - first signs of wear! Five months into operation and it's only starting to fail now due to the pulley's friction fit on the motor shaft weakening, causing a minor slippage on start-up but not stopping the lawnmower dead in its tracks. However this gives me time to design improvements and try something better for my next upgrade - namely moving away from interference fits and opting instead for clamping bolts. Update 1st September 2015: This updated model now provides an improved friction fit between pulley and motor shaft while introducing three additional M3 bolts which can be tapped in. If you've made the mistake I did then these simple design changes may save your precious machine, otherwise you may want to follow suit once you get it on paper. The old mower stopped working after a couple of years with not a single issue - my wife was operating it and I happened to walk outside to take a glance at its progress but noticed the funny noise which promptly shut everything down for good. Upon examination it turned out that friction between motor shaft and pulley melted away some vital plastic and got bent right out of alignment. It wasn't available online or on other places (if you have enough cash then they might consider parting you from nearly $250 - over the entire mower), but one solution was in designing the part. OpenSCAD proved to be an ideal platform as it can model real-world parts very effectively and measure them properly for print in 3D with much precision. It took about two weeks, printing every night until my 8-year-old was asleep. As you would do on your own house or at any DIY task this should need quite a bit of fiddling around but all depends - I used 50% PLA which can get very rough but if that is how strong the pulley needed to be it also may just help it out more than I anticipated when printing. After printing it's necessary to attach the three screws holding together fan and pulley; one way you do this is by first enlarging each M3 threaded hole in 9 mm of size until an interference fit on the shaft that still remains can't be reached. If not doing this could lead to your machine to break down due to no resistance - if I were still building DIY mowers and it had worked for me, my model wouldn't last more than several weeks before giving up completely because you will lose control fast with the speed on which pulley loses traction with motor once every single start or sometimes right during. To avoid such inconvenience I advise everyone having access to an appropriate screw set that also offers M3 threaded rods which match in size for use in your print, as these allow users of all skill levels who would benefit from learning how it operates easily while allowing novice users sufficient safety and reliability since only interference fits left give no extra room to adjust further parts if needed at any stage of work so they come handy for many purposes but won't let them fail before finishing each job. Once installed just place both items together ensuring all three bolts line up correctly, followed by hand tightening those in sequence so tension bearing does apply its maximum value against what happens while also being mindful not causing excessive heat or warping at point where things tend go slightly wrong under strain since you still got some ways left before having completely secure hold required otherwise this won't give much use out either
With this file you will be able to print Bosch Rotak 32R Lawnmower Pulley/Fan - Version 2.3 with your 3D printer. Click on the button and save the file on your computer to work, edit or customize your design. You can also find more 3D designs for printers on Bosch Rotak 32R Lawnmower Pulley/Fan - Version 2.3.
