 Thingiverse
Fallout Shelter Sign
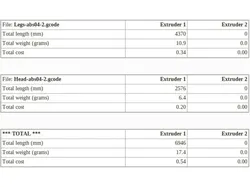
Remixed version of [Fallout Shelter] sign(https://www.thingiverse.com/thing:2762141) by Tech Outreach. I basically just move the text and resize the sign. Please, share your makes, it makes my day to see that anyone prints me models.Tutorial for the multicolor print using any printerIt might sound strange, but every 3D printer is capable of layer-based multicolor print by spliting the generated GCode file into multiple (one file for each color). GCode files containing the instructions for the printer such as movement of the motors or the temperature of the heatbed. You should never changes any value in the GCode if you don't know the result. But let's move on.Firstly you need to download Slic3r or Slic3r PE (recommendet) in order to see the comment ;AFTER_LAYER_CHANGE in the generated GCode file. These comments are added by Slic3r and determines where in the GCode the printer is moving from one layer to another. Secondly you choose the cut layer using Slic3r then you open the generated file in text editor such as a regular Notepad. You are looking for comment ;AFTER_LAYER_CHANGE followed by the ;XX.X where XX.X is desired layer.For example: you want to print first 2mm of the model in one color and the rest in the second color. You are going to print the model at 0.2mm resolution. Open generated GCode and look for:;AFTER_LAYER_CHANGE;2.2For printing at 0.1mm resolution you are looking for lines:;AFTER_LAYER_CHANGE;2.1etc.You just found the place where to split the Gcode file!Now you copy the lines of GCode into separated file and modify the GCode as follows. Last line before the comment ;AFTER_LAYER_CHANGE tells the printer to move in the Z axis therefore in order to simplify the process of the filament replacement I recommend increase that value a bit (add e.g. 50 mm).For example: we have following file with the comment ;AFTER_LAYER_CHANGE somewhere in the middle:[BEGIN]......G1 E-0.04000 F2100.00000G1 Z2.600 F10800.000 move in Z axis to position 2.6mm;AFTER_LAYER_CHANGE;2.2G1 X107.365 Y144.542 move in to new XY positionG1 Z2.200 move in Z axis to position 2.2mm......[END]So we split the GCode into two files and we modify the Z position in the first file in order to make the filament change easierpart1.gcode:[BEGIN]......G1 E-0.04000 F2100.00000G1 Z52.600 F10800.000 move in Z axis to position 52.6mm;AFTER_LAYER_CHANGE;2.2part2.gcode:G1 Z2.600 F10800.000 reverting the changes from file1.gcode;AFTER_LAYER_CHANGE;2.2G1 X107.365 Y144.542G1 Z2.200......[END]The last step of the process is just to print splited files and viola you have your mutlicolor print. If you have any questions regarded to this tutorial or generally to the topic of 3D printing, write me an email at [email protected] and warning: Watch your printer durring the first mutlicolor print. Also, I have no responsibility for possible damage on your print.
Direct link to the original creator's page
Also Available On
More from Kvant



Similar Models
 Thingiverse
 Thingiverse
 Thingiverse
 Thingiverse
 Thingiverse
 Pinshape
 Thingiverse
 Thingiverse
Model Specifications
Frequently Asked Questions
How do I download Fallout Shelter Sign?
Click the "View on Thingiverse" button above to visit the original model page on Thingiverse. You can download the STL file directly from the creator's page for free.
What 3D printer can I use for this model?
This model is compatible with most FDM 3D printers (Creality Ender 3, Prusa MK3S+, Bambu Lab, etc.) and resin printers (Elegoo, Anycubic). Check the original page for recommended print settings and materials.
Is this 3D model free to download?
Yes, this model is available as a free download on Thingiverse. Some creators accept tips or donations.
Can I modify this file?
Check the license (see original page) on the original Thingiverse page. Most STL files can be modified using free software like Blender, TinkerCAD, or Meshmixer.