Bobby Pin Porcupine
prusaprinters
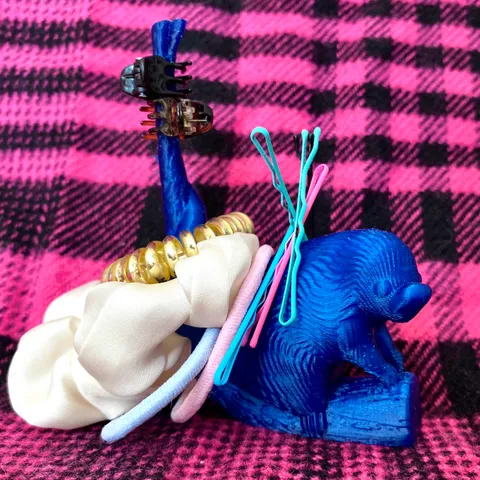
Edit 6/27/21: I am hoping to return to this to improve it at some point in the future. I think it would do better split in two for different print orientations, and I would like optimize the open, magnet-containing area a lot more, with an insert with much more precise fit. Also: Big thanks to Rowan, who gave me the idea of using a prehensile-tailed porcupine for this project.--A model of a porcupine on a branch to help you keep track of your hair accessories (or office supplies, or other ferrous bits and bobs.) This critter is based on the Brazilian porcupine, a species of prehensile-tailed porcupine. (Look at that snout!) Designed with hair accessories in mind, it can hold bobby pins via magnet, elastics and scrunchies around the tail and branch, and small clips on the thinner, upper part of the branch. (The branch widens at the very top so that clips are less likely to be pushed up and off when removing an elastic.)You could also use it for office supplies—paper clips, small binder clips, rubber bands—or as a place to gather any small iron-containing items that are easy to lose.If you’re not familiar with using bobby pins et al. in hair: essentially, you go to bed and realize you still have x number of pins and an elastic in your hair (or you thought you removed them all, but no, there’s two more in there—three?), and they have to go somewhere. And that somewhere often ends up being all over the place, because bobby pins are small and very easy to lose track of. Fortunately, they also tend to be nice and ferrous. In terms of organization, I think of this as that middle step where you keep bits and bobs gathered and kept track of for more responsible (and more awake, perhaps) storage later on. Very important, if you ask me!Technical information:What you will need in addition to printing materials:Small magnet(s)Adhesive (depending on preference)Small weight or filler material (optional)A note on magnets: remember to test their strength through the material of the porcupine before attaching them permanently. Depending on what you have and their size, you can add additional magnets to increase their pull.There is a vertical hole going up into the model, and a second, much faster piece (mine took 20 minutes) to print to insert magnets and weight. You can forego the insert entirely, if you want, but I wanted an easy way of attaching magnets to the top of a narrow space.Assembly is fairly simple, and I’ve included images to illustrate. Taking whatever magnets you have on hand, affix them into the insert—you can glue them, or even tape them if you prefer a less permanent setup. If there is space left in the insert, you may also want to add something you have laying around—a small marble, pennies, hex nuts, etc.—for weight, to improve stability. In lieu of weight, depending on your adhesive choice, you may want to add some filler to make sure the magnets stay put. After you slide the insert in (the taller part of the curve faces towards the head), you can use more glue or tape, etc., again by your preference, to make sure it stays inside.The porcupine:~10cm tall at the top of the branch0.12mm layer height, with raft, no supports beyond the inbuilt ones (for porcupine_presupported_final.stl) unless your printer or chosen filament struggles with 45º inclines or bridges.There is also an unsupported file if you want to add your own supports, or break the model into pieces.I can’t recommend smaller than 10cm tall for functionality and fitting magnets inside. If you wanted to test a bigger size, I’d love to see the results! The insert: 0.2mm layer height, no raft or supportsThe inside is a bit under 1cm wide, but about 4cm long. Bigger magnets are more likely to fit lengthwise/sideways.To be more specific: In print bed orientation (not inside-the-porcupine orientation), the inside of the insert is 0.85cm wide tapering to 0.57cm wide, 1.73 cm tall (excluding the curve), and 3.9cm tapering to 2.79cm long.If you have magnets on hand and they're just a bit too big, you can see if they'll fit without the insert (I gave it a lot of leeway and it's a fairly loose fit). Software I used for this design: Blender, OnShape, Meshmixer, Inkscape, SketchBookThe blue print of the porcupine shown in the photos is printed with Jessie PLA Blue Ice filament from Printed Solid. A translucent filament that's been printed thickly here, it looks a bit darker to the eye than to the camera, especially if it's not in sunlight.
With this file you will be able to print Bobby Pin Porcupine with your 3D printer. Click on the button and save the file on your computer to work, edit or customize your design. You can also find more 3D designs for printers on Bobby Pin Porcupine.