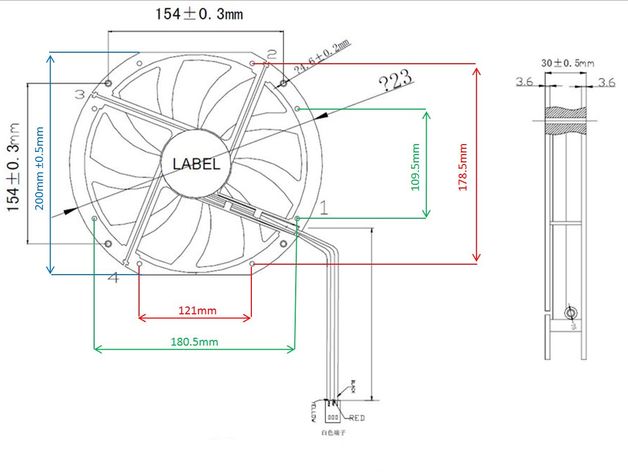
Bitfenix 230mm x 200mm Fan guard with Bitfenix symbol
thingiverse
Bitfenix 230mm x 200mm Fan Guard with Bitfenix Symbol I've never printed this out so I'm unsure of how to fit it, etc. ABS and stick together with Acetone. I added four quarters: left, right, top, and bottom parts of the fan guard. Each part should fit onto a 200x200 print bed. It could take about two hours to print each part. The Bitfenix logo for Phenom was created by Timo-chan on Tinkercad: https://www.tinkercad.com/things/jPS2AG8rdXL-bitfenix-logo-for-phenom I haven't done a test print, so I can't say if any parts will fit. I haven't printed or tried the finger guard for a Bitfenix 230mm x 200mm. ############# Old one complete model no Bitfenix symbol. A big printing area is required to print this. Note: This is a different model from the one shown in the video. When I actually printed the STL file, it would print outside of the build area even with the workaround shown in the video. So, I abandoned that file and used the one in the video instead. The hole positions on that one were incorrect, so I just attached it with Hot Glue. That's okay for me. Part too big in Cura Grey color It looks like Cura has a safety margin. So if the part should fit on the print bed but is shown in grey and Cura won't allow the G-code to be made... This is a workaround that I found online. This workaround may not work on all printers, and the part may still not fit or need moving in its position. It's really for parts that should fit but Cura won't print because it thinks they're too big and are shown in grey color. I tried this method with another model that was just "Too Big" in Cura, and that model would keep trying to print off the edge of the build plate. I think just a tiny position max X Max, Y Max in Cura impacts it a lot using the method in the video. There's an offset command in G-code, or a manual edit of the G-code may fix it. It seemed to work with this model but was cut off at the edge... Acknowledgement: For this method http://tinyurl.com/grey-in-Cura Part too big in Cura Grey color It looks like Cura has a safety margin. So if the part should fit on the print bed but is shown in grey and Cura won't allow the G-code to be made... This is a workaround that I found online. This workaround may not work on all printers, and the part may still not fit or need moving in its position. It's really for parts that should fit but Cura won't print because it thinks they're too big and are shown in grey color. I tried this method with another model that was just "Too Big" in Cura, and that model would keep trying to print off the edge of the build plate. I think just a tiny position max X Max, Y Max in Cura impacts it a lot using the method in the video. See the video for a workaround I had to use for a finger guard similar to this size: https://www.youtube.com/watch?v=b-DJQUpOW34 Print Settings: Printer: Protomaker Sprint Rafts: No Supports: No Resolution: 0.2 Infill: None Notes: The model showed Part too big in Cura Grey color. It looks like Cura has a safety margin. So if the part should fit on the print bed but is shown in grey and Cura won't allow the G-code to be made... This is a workaround that I found online. This workaround may not work on all printers, and the part may still not fit or need moving in its position. It's really for parts that should fit but Cura won't print because it thinks they're too big and are shown in grey color. I tried this method with another model that was just "Too Big" in Cura, and that model would keep trying to print off the edge of the build plate. I think just a tiny position max X Max, Y Max in Cura impacts it a lot using the method in the video.
With this file you will be able to print Bitfenix 230mm x 200mm Fan guard with Bitfenix symbol with your 3D printer. Click on the button and save the file on your computer to work, edit or customize your design. You can also find more 3D designs for printers on Bitfenix 230mm x 200mm Fan guard with Bitfenix symbol.
