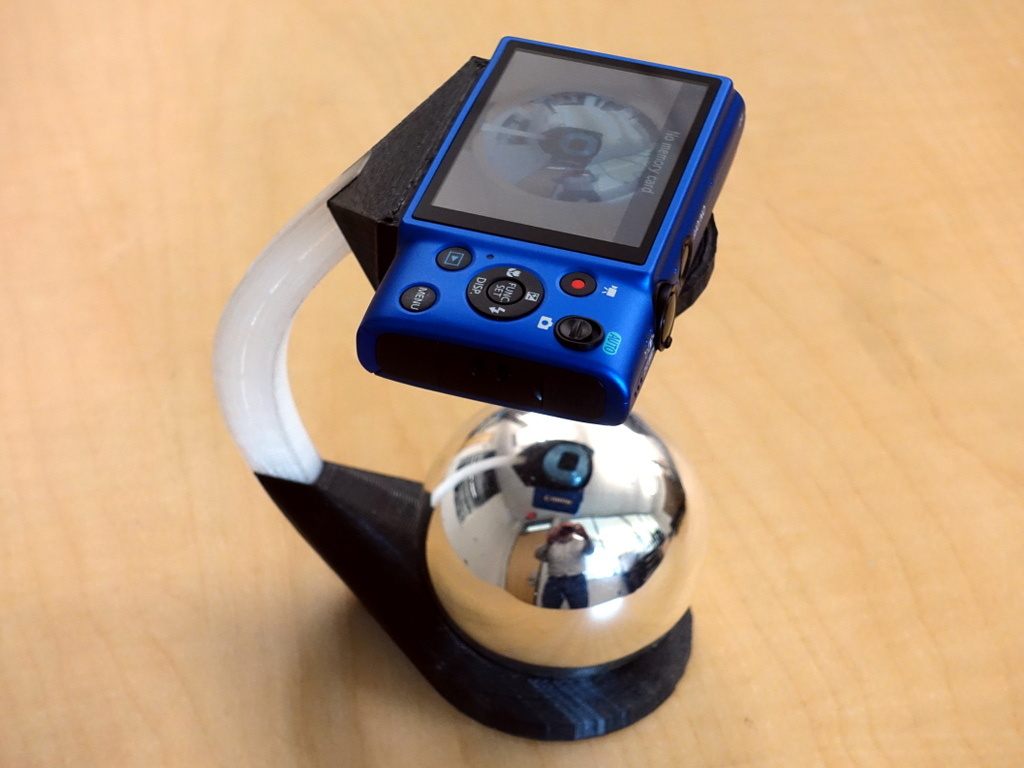
Bird's Eye Camera Stand
prusaprinters
<p>A bird's eye lens is a very close relative to a fisheye lens, but uses a reflective optic to provide a 360-degree view. This thing is a stand designed to implement bird's eye imaging by holding an $80 Canon PowerShot ELPH115IS centered over a reflecting element -- a standard silvered glass ornament like you can get around Christmas for $0.50. Because the ELPH115IS can be programmed using CHDK, the rig can be used as a stand-alone device to capture everything happening in a room, and it is even possible for the camera to be programmed to "unwrap" the images to a more convenient representation for viewing (e.g., cylindrical projection).</p> <h3>Print Settings</h3> <p><strong>Printer Brand:</strong></p> <p>MakerGear</p> <p class="detail-setting printer"><strong>Printer: </strong> <div><p>M2</p></div> <p><strong>Rafts:</strong></p> <p>No</p> <p class="detail-setting supports"><strong>Supports: </strong> <div><p>No</p></div> <p><strong>Resolution:</strong></p> <p>0.25mm</p> <p class="detail-setting infill"><strong>Infill: </strong> <div><p>5-25%</p></div> <p><strong>Notes:</strong></p> <p>Trivial print in PLA. I used black for the top and bottom, but natural clear for the connecting piece (which I also used a concentric fill pattern for); this makes the connecting piece less visually distracting in the 360-degree photos.</p> <h3>Post-Printing</h3> <p><strong>Assembly</strong></p> <div><p>The pieces go together in the rather obvious way, and can be just friction-fit or can be glued. However, the glass ornament takes a little preparatory work. First, remove the metal top with the hanger. This leaves the top open. To make the unit more stable, I filled the ball with sand and then sealed it in place with a little cement/glue. I then realized that the ball had a thin plastic coating over it (probably to prevent shattering if it is dropped) -- that coating degrades the reflected image a little, so I washed it off. Basically, with the ball under cool running water, the clear plastic coating simply slid off. Once dried, the ball is simply placed in the base with the top in the indentation shaped to hold it.</p></div> Custom Section ============== <p><strong>Unwarping the 360-degree image</strong></p> <div><p>There is lots of software that can unwarp the images into other projections. However, these balls are not mathematically precise, so reprojecting by a calibrated mapping works better than applying a simple function. In fall 2015, my students wrote CHDK code that performed this mapping in the camera, but I don't have a version in a nice, clean, releasable state yet... I'll post one when I get a chance....</p></div> </p></p></p> Category: Camera
With this file you will be able to print Bird's Eye Camera Stand with your 3D printer. Click on the button and save the file on your computer to work, edit or customize your design. You can also find more 3D designs for printers on Bird's Eye Camera Stand.
