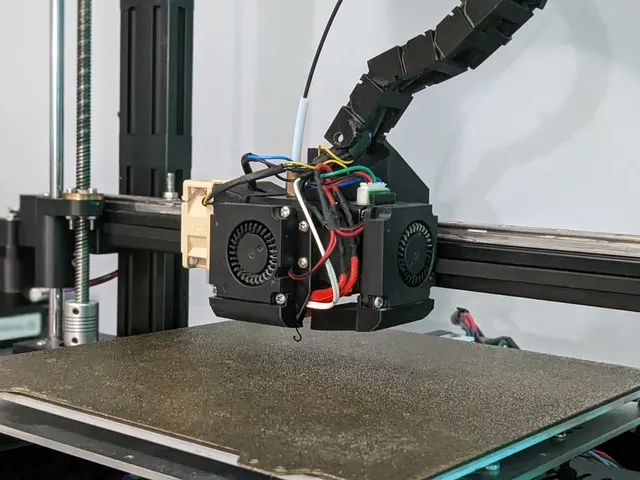
BIQU H2 Carriage, Linear Rail Version!
prusaprinters
Here it is, the final version of my BIQU H2 hotend carriage! I've been hard at work for a long time and have had the printer running many hours on this new version, and now the carriage is complete and final, ready for proper use! This is a carriage for the BIQU H2 extruder, made for a single MGN12 linear rail setup. Below are the specs, and here's the link to the regular A8/AM8-based version. Specs!BIQU H2 direct drive extruder2x 5015 blower fans, custom designed ductsPrusa SuperPINDA / 8mm inductive probe (of your choice!)Linear rail setup, MGN12Clean, no-belt-showing setupStress-tested for up to 250mm/s speed! No rattles or issues observed, amazing quality! Parts!1x 4020/10 case fan2x 4010 blower fanAn ample amount of filamentan H2 with 4 M3 screws for full mountingM3 screws for the MGN12H carriagea SuperPINDA (or any 8mm inductive probe)M3 screws for mounting the fans (may have to cut your own!) Assembly!Make sure to not attach the fan adapter yet - twist the adapter itself around the SuperPINDA until it's in a proper spot, then screw it in. This keeps the cables from twisting up.You'll want to do the belts before you put on the carriage. It's a bit tough, just be patient and you'll get it. Slide the belt into the front opening, then take a small screwdriver or rod and guide the belt so it wraps around the column and comes out the correct side. Make sure you've got a belt lock already slid into the belt before you insert it into the mount.Everything else is self explanatory! You'll figure it out. :) Special Note!For the second fan duct, you'll have to cut specific length screws; I've designed this duct so that you screw it into the motor. Take out the bottom two screws from the motor on the right, then grab some more M3 screws and cut them with about 2 more mm length than the ones that came out. The heads will sink just right so that they don't hit the fan (I made sure of that). Be patient and make sure your screws are not too long, or they will rattle out and the motor and fan duct could get some issues during a print!! Probe offset is X-21 and Y0, then the Z offset will be a negative number based on where you twist the SuperPINDA probe to. If you're on Marlin, run an M851 and make sure these numbers are correct before homing with your Z probe! Or simply configure properly in your firmware. :) BTW, the rather nice-looking photos of the printer were taken on my Google Pixel 6a - shout out to the always-incredible camera and Google's wonderful computational magic! Feel free to post a make, I love to see that my designs work out for others too… I'm always open by message and comment sections to help out a fellow 3d printing enthusiast!
With this file you will be able to print BIQU H2 Carriage, Linear Rail Version! with your 3D printer. Click on the button and save the file on your computer to work, edit or customize your design. You can also find more 3D designs for printers on BIQU H2 Carriage, Linear Rail Version!.
