Bike wheel powered Pea-Shooter
pinshape
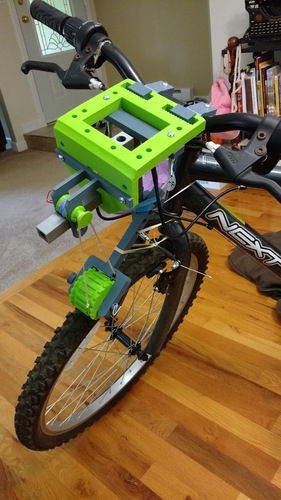
You'll need a bag of dried garbanzo beans as ammunition and some elastics to build this project, along with 2" 3/16th bolts to put it together. I also used two paperclips as pins to hold the axle pin and drivewheel pin from slipping out. Any projectile about the size of a chickpea will do, but I chose chickpeas because they are bio-degradable and tasty. The basic function of the peashooter is that the spinning of the front wheel powers the gun. When you drop a chickpea down the ammo tube, gravity pulls it to the flywheel where it's grabbed and flung forward. The faster you're traveling, the further the peashooter will shoot. When you're done playing with the peashooter, I used my standard handlebar mount as the basis for this project: https://pinshape.com/items/234... I recommend printing all parts with at least two shells and 25% infill. No supports are needed to print anything. It's still a work in progress, getting it to work correctly requires finding the right tension balance between the elastics that pull the wheel down and the tension of the belt that spins the flywheel up. I also want to add a trigger button; currently, you need to drop a chickpea down the loader tube for it to fire right away. Have Fun! BUILD INSTRUCTIONS: First, attach the two center bar clamps on either side as close to the center post as possible. I used a 3/16" 1" bolt and nut to secure the clamps; you might want to go a little longer, say 1 1/4". Loosely bolt them in place but don't tighten them yet. Next, place the clampbar over the handlebar clamps and center it, then tighten down the bar clamp bolts. The clampbar has many different attachment points all over its surface to attach things to. Clip the clips over the posts to secure the whole assembly in place. If you want to take the assembly off, just remove the clips and pull off the clampbar while leaving the handlebar clamps where they are. Next, attach the barrel to the clampbar with a 3/16" bolt. Then, attach the pivot bar to the clampbar with two 3/16" bolts; make sure the fins sticking out at the bottom of the pivot bar are facing towards the rear of the bicycle. Attach the fork to the pivot bar with the fork pin and stick a paperclip through the hole at the end of the fork pin to secure it in place. Attach the driver wheel to the fork with the driver pin, using a paperclip through the whole at the end of the driver pin to secure it in place. The driver wheel should be resting on the front tire. Bolt the driver plate to the clampbar with two 3/16th inch bolts. Wrap elastics around the groove in the flywheel as shown in one of the pictures provided. Attach the flywheel so that it sits in the groove in the barrel, with the flywheel axle (I added some grease so everything spins freely). Put a paperclip in the whole at the end of the axle to hold it in place on the driver plate. Tension the fork to the bike with elastics; you may have to tie a few elastics to do this. The harder you can press the driver wheel onto the bike tire, the better. Cut a few skinny elastics in half and tie them together; run the elastics through the hole in the fork around the driver wheel and up around the knob at the end of the flywheel axle. This should be as tight as you can get it without pulling the driver wheel off the front tire. Lift the front tire of the bike off the ground and give it a spin. This should cause the flywheel to rotate smoothly. While it's spinning, drop a dried chickpea down the hole at the top back end of the barrel; it should fire out the front.
With this file you will be able to print Bike wheel powered Pea-Shooter with your 3D printer. Click on the button and save the file on your computer to work, edit or customize your design. You can also find more 3D designs for printers on Bike wheel powered Pea-Shooter.