Big Helix Adjustable Shop Stool
prusaprinters
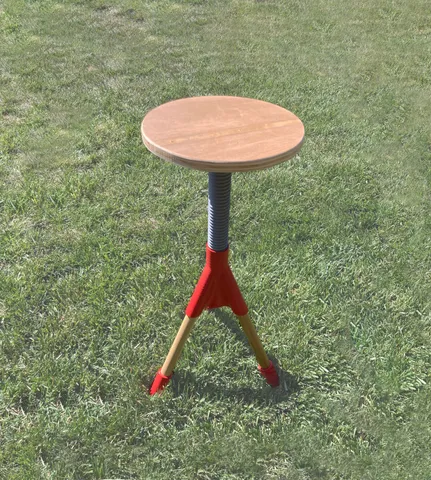
Intro:Here's what I'm calling the Big Helix Adjustable Shop Stool. This was designed to print on my near-stock Ender 5 (I used a 0.8mm nozzle) and assemble easily using some basic woodworking (the legs and seat are wood). It works as intended, and I've loaded it with 260 pounds of weight plates and it was fine. Would also make a great craft table or kids stool. Enjoy! Design:Mixed material design for hobby printers & garage woodworkers.Simple woodworking and joinery. Legs use common 1-inch diameter dowels.Custom-threaded seat post. Designed for balance of strength and print cost.Offers 10-12 inches of seat adjustment (depending on your printer capacity).Customizable thread clearance via the included Fusion360 file. Tall threaded seat nut spreads load across several threads while leaving room for height adjustment. Reinforced leg sleeves set leg angle. Cut legs to desired length to set minimum seat height. Printed feet match the leg angles and add to the aesthetic of the design. Prints: 1: FeetThe feet are an important step in checking clearances for the dowels. Dowels can vary in size despite their nominal dimension, and testing dowel fit with a quick test print of a foot is easy. Tune the fit with your slicer's scaling factor and write down your final factor, you'll need it again. When you're ready for the final feet, you can print all three at once, in correct-side-up orientation, without supports. I printed these solid using max perimeters. 2: Seat PostPrint this part upside down (wrong-side-up), and you should have plenty of bed adhesion. Don't be afraid to pop on your big nozzle. I printed this part at 8 perimeters and 100% infill with a 0.3mm layer height, 1mm line width, using a 0.8mm nozzle on my otherwise stock ender5. Because the threaded rod has a hollow center, this part should come in around 330 grams of filament, even at 100% infill. Don't forget to use your scaling factor on this part too. Fusion file is available if you need to modify part height. 3: Seat NutMostly the same settings again, printed in correct-side-up orientation. The key is testing thread fit, so do a test print. Slice a short section of the nut and try it with your scaling factor. If the threads fit well on the post, you can print the final part. If not, grab the fusion file and increase or decrease the "thread clearance" parameter by 0.2mm and try again (positive change means more clearance). Rinse and repeat until it fits well. The default total clearance (distance between faces, without scaling) is 0.5mm. You will still need to use your scaling factor in the slicer. Other Notes: General18mm (3/4”) plywood works great for the seat - I traced the bottom of a 5-gallon bucket and cut it out. I used oak dowels from the local hardware store for my legs, and hand cut them to length. I've tested my PLA version at 260 pounds, and it seems very sturdy so long as there is about 50mm of thread engagement. Printers with more Z-capacity could extent the seat post even more. If you wanted a bar-height version (longer legs), you might want to add some reinforcement against the legs splaying under load, around foot height (like bar stools have footrests), which would relieve some stress from the nut. This could be done pretty easily using rope/chain, or some additional woodworking, if not a printed solution. Strength under asymmetrical loading is probably the weak point for this design, with potential for deformation of the seat post and nut over time in PLA. Still, the strength of the printed parts is really impressive overall. In my initial testing, I expected to need a much larger nut/bolt combo but scaled back to help with print cost (these are still beefy parts). There is probably some efficiency to be had by using infill less than 100%, but I'll leave that experimentation to someone else. My Print SettingsI printed this on my Ender 5 Pro, so I've got 300mm of Z-capacity. Also, I printed these parts at 100% infill, with 4 perimeters, using my 0.8mm nozzle, 0.3mm layer height, and 1mm line width. That meant that the print for the seat post and the seat nut each tool about 9 hours. I used Prusa Slicer for this project, and capped my volumetric flow rate at 12mm3/s. But I have the stock bowden extruder and hotend setup. If you've got a printer that can handle more flow, you should be able to go quite a bit faster. Included FilesI'm including my F360 file for your use. The thread clearance parameter can be modified as needed. You can obviously modify other things as well, but be warned, I lost my parametric mojo about 50% of the way through the design, so mess with timeline at your own peril! :)
With this file you will be able to print Big Helix Adjustable Shop Stool with your 3D printer. Click on the button and save the file on your computer to work, edit or customize your design. You can also find more 3D designs for printers on Big Helix Adjustable Shop Stool.