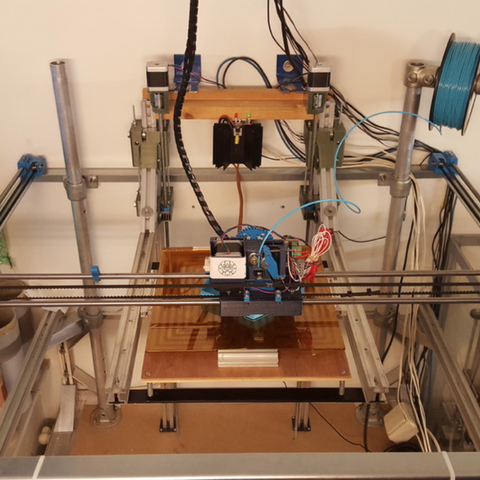
BIG DIY 3D Printer
cults3d
Big FDM Printer The idea of this printer is that you can make it as large as you want and as cheap as possible :-) Basically a printer is an X, Y and Z axis. So I made an X and Y axis that is mountable on any sort of construction that gives it height. This construction can be made of material that you have lying around. If you have wood you can use that. If you have steel pipes you can use that. You can even build it from stones if you want. I made it on an old CNC Router frame I once build. I just added aluminum pipes I had laying in the backyard. With this I build a squire platform which carries the X and Y axis. If I make this platform higher the printer can print higher. :-) Then of course you also need a print bed. Most of that construction can also be made of any material you have laying around. I used extruded aluminum lengths that limited me to a height of 710 mm. the printed parts are just to couple them and hold the motors and spindles. The dimensions of the extruded aluminum lengths I used are 30x33mm. So the parts for the Z axis are made to fit that. The gliding part in the vertical direction holds 8 608 bearings each side. “bearing holder L.stl & bearing holder R.stl” are super solid, but take a lot of material. Therefor I also made the “bearing holder small” STL's to save material. No the one peace is hacked in two peaces so they have to be held apart with a threaded rod. You can see it on the pictures. Initially these parts where made for a spindle, but because I could not find them 1 meter long, I used Threaded rod instead. For implementation of the M8 nut, you have to use the M8 nut converter part. Also it's recommended to grease the threaded rod also. For the X and Y axis setup, I used 10mm x 1000mm guiding rods. That means that the X axis is 714mm and the Y axis is 758mm in length. My heat bed can reach 710mm in height. But the glass plate of my heat bed is only 300 x 300mm so I limited my printer to 300x300x700mm at the moment. Of course the bed can be made bigger and so the print dimensions get bigger. To take away vibrations and keep these long rods straight, you can use the “X axis tension bar holder”. Install one on each end of the x axis rod and mount a M10 threaded rod in them. It's much easier to watch the pictures I guess :-). on the pictures there is installed only one, but I intend to install a second one on the other X axis rod. With only one installed you get an uneven load and uneven vibrations in the two rods. There is a option for a small 30x30 cooling fan for the X motor, but is optional. Of course all timing belts have tensioners. Under the X wagon is an optional slot where a LED strip can be mounted. The dimensions of the strip are 36x9x1 mm made by Dymand v2 DUL2 201611. I took it out of an cheap USB led lamp you cab see on one of the pictures. Because this is so big, there are two motors for the Y axis and two for the Z axis. The controller is a ramps 1.4 and Arduino Mega. The problem is that you can’t install more than one driver per axis. So you have to solder a second motor driver parallel to the one on the ramps board. It’s advisable to take the motor power directly from the power connector on the board and to install an extra capacitor for each extra driver. A printer also needs an extruder. :-) Because I print with ABS a lot this one is designed to do just that (but it also works with other filaments). With ABS printing you do not want to have airflow passing the printed parts. Therefor the air is inhaled from above. Then passed through to the Hot-end and then back out at the top. The same airflow construction is also made for the motor. This way the printed part never gets cooled by these 2 fans. For the dimensions of these snail house fans, see picture. Also I wanted an extruder on which changing filament is easy. On most extruders you can’t see the filament wire and that can make it hard to change filament. If you run out of filament due the print, you are in big trouble. Therefor I made this one in such a way that you can always see the filament wire. Because I have 3 different sizes of Filament (1.75mm, 2.85mm & 3mm) this extruder can use them all. To do this I have made an exchangeable filament wire guide. For the 1.75 mm filament I also need to put in a Teflon tube because the hot-end is made for 3mm wire. (I can recommend the Teflon tube anyways because the filament go’s in much smoother). The filament guide is also adjustable so you can guide you filament perfectly. In the photos you do not see this guide because that is still the proto type. On that model the 3mm guide is fixed to the body. Not so smart, because you can’t adjust anything anymore. Also I broke it :-) . As a lose part you can just print it out again. The guide is mounted using a washer, M3 nut and 10mm bolt. The little filament driver (11mm diameter) is mounted on an M8x50mm bolt I had lying around. On the lathe I turned the end of this M8 bolt down to 5mm so the driver can be mounted on it. See pictures. The Hot-end is a cheap Chinese one I do not even know the name of, but it works very good. For the dimensions of this Hot-end see pictures. The stepper motor is a Nema 17 x 47mm. I recommend a strong motor for this if you want to use 2.85 & 3mm filament wire. In the picture you see a 42BYGHW811, but I use an SL42S247A at the moment (a bit more torque). As a driver I still use an A9844 with heavy cooling and heat sink. For the main body I had to add support material. See picture about the removal of the support material. All other parts can be printed without support. After assembly it is wise to put katon tape on the bottom to protect the plastic from all the heat. This way the plastic holds longer Also Included is a Marlin script that should work. Hence for printing with PET-G 1.75mm I had to turn the flow-rate back to 49%. Steps/mm for the extruder motor may need some tweaking. For ABS 3mm it did work ok. Hence the blue ABS print has deformed due to warping. But that's expected because it's an open structure. I have order PLA to try that for printing vases. With the transparent PET-G it works great! For the Z axis setup you need: 16X 608ZZ bearing 1X end switch 16X M8 bolt or threaded rod 85mm and nuts 2X spindle 8mm and spindle nut or M8 threaded rod and nut 2X stepper nema 17 2X motor to spindle connector 5mm to 8mm 6X M4x40mm bolt 6X M4 nut 8X M3x10mm bolt 8x M3x20mm bolt and nuts are optional if you use the M8 converter part. For the X and Y axis setup you need: 4X sliding rod 10mm length is of you own choise 4X linear bearing LM10UU 4X linear bearing LM10UU in housing 6X F623ZZ bearing for timing belt tension-ers 3X timing belts and pulley's 3X Stepper Nema 17 2X end switch 1X LED strip but is optional 1X 30x30mm Fan but is also optional 8X M3x20mm & nuts are optional for the X axis tension bar 2X M10 threaded rod and 4 nuts are optional for the X axis tension bar 16X M5x10mm 3X M4x40mm bolt 3X M4x40mm bolt 12X M4x10mm bolt 24X M4 nut 24X M3x10mm bolt 8X M3x20mm bolt 32X M3 nut For the extruder you need: 3x bearing 608z 1x 11mm driver 1X M8 x 50mm bolt or something similar 1x hot-end 2x snail house fan 1X spring (optional, depending on filament material) 1X nema 17 stepper 1x kapton tape 12X M3 nut 4X M3 x6mm bolt 9X M3 x 10 mm bolt 3X M3 x20mm bolt 9X M3 washer (optional) 1X M3 big washer for filament guide 8X M4 nut 5X M4 x20mm bolt 1X M4 x40mm bolt 5X M4 washer (optional) But of course these parts are just a indication for everybody will build their printer in another way. That's what this concept is all about. :-) I hope I didn't forget anything, but If you have questions feel free to ask them :-) PS: I know, my so called curtains are not very creative :-)
With this file you will be able to print BIG DIY 3D Printer with your 3D printer. Click on the button and save the file on your computer to work, edit or customize your design. You can also find more 3D designs for printers on BIG DIY 3D Printer.