Belted Bowden Extruder with Filament Runout - v1
prusaprinters
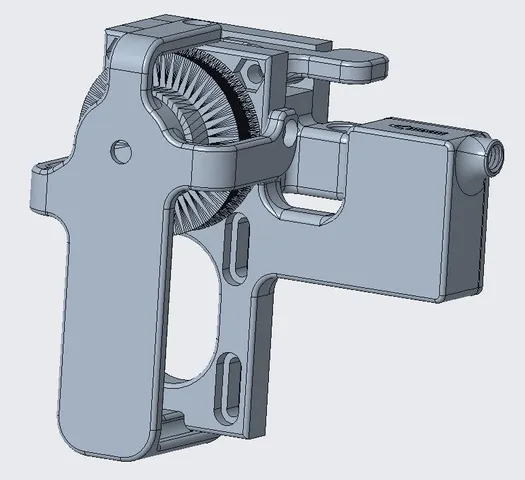
Remix and enhancement of hobie77's "Geared Bowden Extruder v2". Re-designed package to use a 25mm screw, added a cage/outer support for large pulley, filament runout sensor, and PTFE fittings. Calibrate E-Steps using Bowden method: https://www.matterhackers.com/articles/how-to-calibrate-your-extruder?gclid=CjwKCAiA0uLgBRABEiwAecFnk3e6VjFFCSB7xtvScKdYE5XQoA07qt6EHpYdsgl6DzogomQuEsX0eRoCaWUQAvD_BwE 16apr2019 - Updated middle to rev3 and arm to rev5. Moved the filament path in middle part down and towards the back to interface with MK8 hobbed gear better. Moved length of moment arm out from 14.5mm to 20mm. Change spring pre-load from 2mm to 5mm. This also allowed for the arm to be thickened from previous revision. Added info block on Acceleration and Velocity Settings for high-speed printers. 08apr2019 - Running into some underextrusion issues when printing 0.3mm layer height at 100mm/s print speeds. Working on some middle and lever modifications which will provide better gripping to the MK8 gear and more torsional pressure for the lever bearing. On a positive note, had little issues when printing 0.2mm layer heights up to 150mm/s. Updated material for large pulley to PETG since the PLA pulley failed. 28mar2019 Release v2 which has a fixed stepper and spring loaded idler to tension the belt: https://www.thingiverse.com/thing:3384722 Created a 1/2" EMT Stepper Mount: https://www.thingiverse.com/thing:3524983 30jan2019 - Not all MK8 drive gears are created equal! - Updated Bottom and Middle frame .stl files. Moved filament path to interfere with MK8 drive gear a bit more. Also adjusted where MK8 drive gear sits in relation to the filament path to try to center the filament with the knurl better. Moved rear bearing to sandwich the MK8 drive gear better. Updated Pulley Cage .stl to extend to the bottom and rest against Top Frame to prevent bowing/bending of Top Frame when belt is under tension. Updated Top Frame .stl to include a bottom M3 nut slot and hole to secure Pulley Cage to. 27jan2019 - After running extruder for some time, I've encountered two issues of parts printed in PLA - arm_new_r2l.stl and top_frame_new_filrunout.stl. Printing the arm out of PETG seems to take are of deformation. Currently testing a new design of pulley_cage_r2l-rev2.stl to help prevent part top_frame from bowing. Use of PETG, ABS, or other stronger material may be necessary. 18dec2018 - E-Steps: 557.89 / Linear Advance 1.5 K-Factor: 0.75 Been working on testing this extruder and it is working well. The only issue I have seen is that Linear Advance has to be dialed in. Hope to have a good Benchy soon to compare direct drive extruder to belted extruder. Testing was successful, photo added of direct-drive and this design. Updated PULLEY CAGE part by extending legs by 1mm so a M5 washer can be added between PULLEY and PULLEY CAGE. This will provide a slightly larger gap between PULLEY and FRONT FRAME and allow PULLEY to ride on bearing of PULLEY CAGE. BOM: 4 - M4x25mm screws 4 - M4 nuts 5 - M3 nuts - 4 inserted in Top_Part and 1 in pulley 8 - M3x8 SHCS - 4 for cage and 4 for stepper 1 - M3 set screw - pulley 4 - M3 washers - (optional) 1 - M5 washer - (optional) 1 - GT2 Timing Belt - L=158mm W=6mm 79 Teeth in Closed Loop - https://www.amazon.com/gp/product/B014QKEH26/ref=oh_aui_detailpage_o00_s00?ie=UTF8&psc=1 1 - MK8 Drive Gear - https://www.amazon.com/gp/product/B07792SHML/ref=oh_aui_detailpage_o00_s01?ie=UTF8&psc=1 4 - 625ZZ Bearings - https://www.amazon.com/gp/product/B07DZYZM86/ref=oh_aui_detailpage_o00_s02?ie=UTF8&psc=1 1 - GT2 Pulley - 16 Tooth - https://www.amazon.com/gp/product/B01IMPM44O/ref=oh_aui_detailpage_o00_s03?ie=UTF8&psc=1 1 - 5mm Dia. x 50mm Long Axle: https://www.amazon.com/gp/product/B01B27MJC6/ref=oh_aui_detailpage_o00_s03?ie=UTF8&psc=1 1 - 7.5mm Dia. x 10mm Long Compression Spring: https://www.amazon.com/gp/product/B01N6RMGD2/ref=oh_aui_detailpage_o00_s03?ie=UTF8&psc=1 2 - PTFE fittings - https://www.amazon.com/Straight-Pneumatic-Fitting-Fittings-Filament/dp/B079SCZZXD/ref=sr_1_12?ie=UTF8&qid=1544981148&sr=8-12&keywords=ptfe+fittings 1 - micro switch - https://www.amazon.com/gp/product/B06XFL4MZ2/ref=oh_aui_detailpage_o00_s00?ie=UTF8&psc=1 1 - PTFE Tubing x 30mm long - trimmed in runout sensor box during assembly. 1 - Wire/connectors for integrating switch to controller. 60T Pulley design: https://www.thingiverse.com/thing:16627 Filament Runout Instructions AnetA8/Marlin/Octoprint: https://www.thingiverse.com/thing:3143558 Print Settings Printer: Anet A8 Rafts: No Supports: Yes Resolution: 0.2mm Infill: 25% to 80% Filament: 3D Solutech PLA Real Blue Notes: All parts printed 25% Cubic infill. All parts printed in PLA except arm_new_r2l-rev5.stl and Pulley_T-MXL-XL-HTD-GT2_N-tooth.stl which is PETG. Pulley does not need support. Pulley Cage does not need support. Middle Frame does not need support Lever needs minimal support Front Frame needs minimal support Back Frame needs minimal support. Post-Printing Print all parts and check that M4 screws slide freely though TOP, BOTTOM, and MIDDLE frames and ARM part. Ream or drill holes if necessary. Cut 5mm axle down to 50mm long, if necessary Insert bearings in FRONT and BOTTOM frame, PULLEY CAGE, and ARM parts. Insert (4) M4 Nuts into FRONT frame. Insert (4) M3 Nuts into square slots in FRONT frame Insert 30mm long PTFE tube into hole of filament runout box on FRONT frame Insert MIDDLE frame on PTFE tube aligning MIDDLE frame to FRONT frame screw holes. Insert MK8 Drive Gear into MIDDLE frame with hobbed slot near FRONT fame bearing. Insert 5mm x 50mm long Axel into MK8 Drive Gear - DO NOT TIGHTEN SET SCREW Insert BACK frame bearing over Axel and against MIDDLE frame Insert (3) M4x25mm screws into three holes of BOTTOM, MIDDLE, and FRONT frames and secure Insert a length of filament long enough to go though the entire length of the FRONT frame though the filament hole Align and center MK8 Drive gear to filament path and tighten, making sure the AXEL is pushed just about against the BACK frame. TIGHTEN MK8 Drive Gear Place ARM with bearing into void between FRONT and BACK frame, where the bearing is riding on the filament and over the MK8 Drive Gear. Add COMPRESSION SPRING in circular recess in ARM and MIDDLE frame. Insert (1) M4x25mm screw though last hole in BACK frame, though ARM and into FRONT frame and secure. Compressing the SPRING will be necessary. Make sure arm can still move. Insert (1 or 2) M3 nuts into slots of PULLEY Insert (1 or 2) M3 set screws into PULLEY and slightly tighten into M3 screws Insert PULLEY over AXEL, large diameter against FRONT fame. Leave a slight gap and tighten set screw(s). Place GT2 belt over PULLEY (optional) Place M5 washer over AXEL. Insert PULLEY CAGE over axle, bearing first. slide close to PULLEY and align 4 tabs to holes in FRONT frame. Make sure GT2 belt is not tangled around legs of PULLEY CAGE. Insert (4) M3x8 Socket Head Cap Screws into PULLEY CAGE and tighten into FRONT frame. Remove filament Insert (2) PTFE fittings to entrance and exit side of filament path. Add 16 Tooth GT2 pulley over stepper shaft Add Stepper motor to back side of FRONT frame, under MIDDLE and BACK frame. Make sure BELT is inserted around 16T Pulley on Stepper Shaft. Secure with (4) M3x8 SHCS and (4) optional washers Trim PTFE tubing on the inside of filament runout switch housing Insert micro switch into filament runout housing In-Use Printer SettingsCustom Section Firmware Settings - Marlin/Klipper Here is a starting point for Marlin "e-steps" / Klipper "step_distance" based on the stepper controller's micro-steps I have used the extruder with a DRV8825 set at 1/32 micro-stepping and currently at 1/16 micro-stepping under Klipper. Values are based by measuring and extruded length through a 1000mm long PTFE tube. 1/32 micro steps Klipper step_distance: 0.000963 Marlin DEFAULT_AXIS_STEPS_PER_UNIT: 1038.4216 1/16 micro steps Klipper step_distance: 0.001926 Marlin DEFAULT_AXIS_STEPS_PER_UNIT: 519.2108 1/8 micro steps Klipper step_distance: 0.000241 Marlin DEFAULT_AXIS_STEPS_PER_UNIT: 259.6054 1/4 micro steps Klipper step_distance: 0.000120 Marlin DEFAULT_AXIS_STEPS_PER_UNIT: 129.8027 1/2 step Klipper step_distance: 0.000060 Marlin DEFAULT_AXIS_STEPS_PER_UNIT: 64.9013 Full step Klipper step_distance: 0.000030 Marlin DEFAULT_AXIS_STEPS_PER_UNIT: 32.4507 Printing Temps under printing speed The following printing temps were used for PLA with an 85mm long PTFE tube between extruder and hot end: 60mm/s = 200C 80mm/s = 200C 100mm/s = 205-210C 120mm/s = 210-215C 150mm/s = 215-220C Acceleration and Velocity Settings The belted extruder design intent is for finer control of the filament feed. The ratio of two gears provides a bit more torque over a direct-drive extruder and the belt keeps the extruder running quieter than a gear-to-gear extruder. What I have discovered is that this extruder performs well with a Cartesian printer with appropriate acceleration and velocities. When used on a CoreXY with acceleration of 3000mm/s^2 and a velocity of 300mm/s, I started to see under-extrusion when printing beyond 60mm/s at a layer height of 0.3mm. No issues where noticed at 0.2mm layer height up to 150mm/s print speeds. After lowering acceleration down to 1500mm/s^2 and velocity down to 150mm/s, printing at all speeds and though 0.3mm layer height was good. Category: 3D Printer Extruders
With this file you will be able to print Belted Bowden Extruder with Filament Runout - v1 with your 3D printer. Click on the button and save the file on your computer to work, edit or customize your design. You can also find more 3D designs for printers on Belted Bowden Extruder with Filament Runout - v1.