Bellringer - A fully Functional Christmas Ornament Blaster
prusaprinters
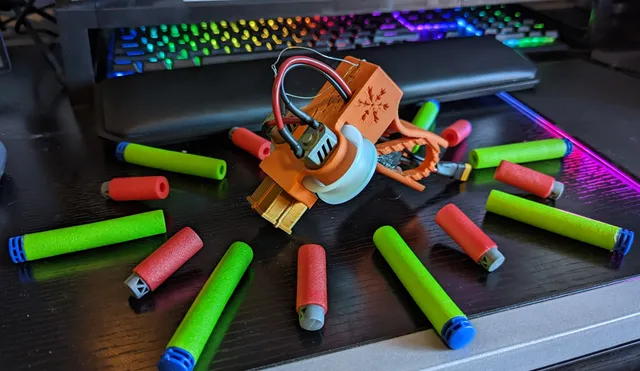
This model was inspired by an assignment to make a single-piece 3D-printable ornament that fits in a 3"x3"x3" cube. Being a Nerf hobbyist aspiring to design blasters, the obvious choice was to use these limiting criteria to forge my first blaster design. Thus the bellringer was born. SAFETY WARNINGThis blaster was made primarily as a fun showpiece for demonstrating hobbyist blasters, not for regular battle use. It features exposed flywheels that can easily get tangled in hair or burn exposed skin. If you decide to build one, please use it with caution. CreditI used the Daybreak cage by Kuryaka for this design. Check out his awesome flywheel cages here: https://github.com/Kuryaka/Daybreak-Cage-Library/tree/master/Daybreak%20Cage%20v3.x Build InfoThe build pictured uses daybreak wheels and 2s Fang motors from Out of Darts. The switch hole is sized for a standard 21 amp microswitch. There is no included battery housing, so any sized LiPo will work so long as you are comfortable with it hanging off the bottom of the grip. You should orient the blaster upside down for printing and use supports. Other printing info should follow the recommendations for printing a Daybreak cage. (link above) The build can get a little tricky, especially with the tight spacing around the grip. In general, you should wire everything up like a standard Stryfe. I recommend starting with the motors on top and then fishing the wires through the cable management hole. You can do the solder joints on the switch before placing it in the grip. The spacing on the switch and flywheels is very tight. They will fit. It might just take a little finagling.
With this file you will be able to print Bellringer - A fully Functional Christmas Ornament Blaster with your 3D printer. Click on the button and save the file on your computer to work, edit or customize your design. You can also find more 3D designs for printers on Bellringer - A fully Functional Christmas Ornament Blaster.