Beefier TIG Tungsten Electrode Grinder
thingiverse
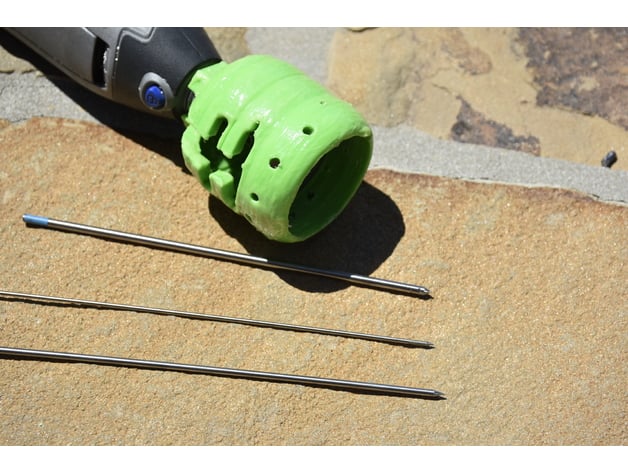
Here's a video for your viewing pleasure which shows this in action cutting off a balled up 1/8 rod (which I had difficulty due to user error), a grind of a 3/32, 1/16 and then grinding down the 1/8. This is the first time this tool was put into use as well but it did not let me down just as the previous model didn't :D I need to eat before I film this stuff ;) https://youtu.be/RPC9Tmbl3Xs 2017-06-25 - UPDATE!!! I started from scratch and completely rebuilt this thing. The new files are the ones with V4, but really you probably just need the .STL. I still kept most of JAG's design in mind but I made some upgrades and still kept the beefier aspects I added before. One new upgrade is I've added a slot to slide an electrode down on and cut it off since sometimes you have too much blob and can't get your electrode in the holes. The angles are still similar as before but I've widened the holes a bit more so you shouldn't have to ream them out to accommodate the electrodes but it still accommodates 1/16, 3/32, and 1/8 at roughly 10°, 20°, 30°, and 40°. The threading is done at 3/4 12TPI which is Dremel's standard. I've oversized the threading just slightly by .3 mm to allow ease of threading. I re-did the overall size as well so it should work with a Dremel without having to add spacers and still work with the mandrel/disc set I suggested. The rods should angle in and sit nicely in the center of the disc once they are completely ground to a point as well. Hopefully this one has less issues with others' printer software too but I will say Cura has never had issues and I've printed several of these already. The new file is called Entity Unknown V4 TIG Tungsten Electrode Grinder.stl I've also uploaded the V4 blender files if you want to modify this in any way. I still kept the originals V1s up here as well. Enjoy! Original Posting: I built this from JAG's original design over at:http://www.thingiverse.com/thing:18347 His works great but it's a PITA to attach since you must lock the mandrel for your grinding disc down in the collect, then put this tool on your Dremel, then you have to screw the diamond wheel disc on. I added two wrench slots on either side so you can just screw this tool on your Dremel, then use a wrench to lock down the mandrel with your diamond disc already mounted to your mandrel. Print Settings Printer Brand: LulzBot Printer: TAZ 5 Rafts: No Supports: Yes Resolution: .5 Infill: 40% Notes: I highly recommend printing this thing so the hex nut sits on your build plate. This ensures the least chance of distortion to the electrode guides. At worst you'll have some distortion on your threads (unless you've really learned how to use your 3d printer ;) and if you do they can be easily re-tapped. The holes are not as easy but worst case, use a drill bit and hand twist them in so you can open the holes up a bit more. You'll also spend less on your support since you're supporting the lower external taper, not the deep internal taper.
With this file you will be able to print Beefier TIG Tungsten Electrode Grinder with your 3D printer. Click on the button and save the file on your computer to work, edit or customize your design. You can also find more 3D designs for printers on Beefier TIG Tungsten Electrode Grinder.