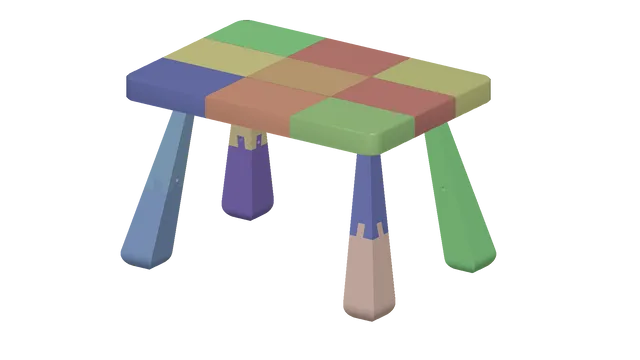
Bebe Table
prusaprinters
NOTEI have yet to 3D print and assemble this project, so do so at your own peril. The pieces should fit together, but I've yet to test the rigidity and load bearing of the design. I'll try to test it out in the coming weeks.IntroductionMeet Bebe table, the 3D printable table for all of your small furnishing needs! Bebe is designed with the following goals in mind:Be 100% 3D Printable on a 250x210x210mm build volume printer (compatible with printers such as Prusa Mk3 series printers, etc.)Use easy-to-find fasteners to assemble together. The design uses M5 hardware currently, and may be revised in the future.Can withstand the rigours of use from a growing toddler (this is a test in progress, and future revisions are still to come)There are 17 3D printable parts altogether, fastened together with M5 screws. The tabletop is 65cm x 45cm, consisting of 9 separate pieces to print. Print each part with differently coloured filament to add fun accents to your playspace. Each part has a alphanumeric code to aid with assembly - simply align the matching letters for the tabletop and numbers to attach the tabletop to its legs.Additional Hardware Requirements52 - M5 x 35 DIN 7984 (Hex Preferred)16 - M5 x 20 DIN 7984 (Hex Preferred)8 - M5 x 16 DIN 7984 (Hex Preferred)Recommended Print SettingsUntested, but should be suitable with PLA and PETG.At least 0.2mm layer height.3 Perimeters for all parts.5-10% infill for Tabletop, 30+% infill for Top Leg and Bottom Leg.Supports for Tabletop and Bottom Leg, No Supports for Top Leg.Assembly InstructionsAssembly Time: 120 minutesNOTE: Use a high quality Allen wrench to assemble. Parts are self-tapped.Print all parts. Label each part with its corresponding number (parts with same number are fastened together. The tabletop and top legs are labeled with letters and numbers to correspond to connection points.Assemble each Leg. Connect bottom piece of leg to top piece. Fasten together with M5x16 bolts.Assemble tabletop. Align letter corners together and fasten parts with M5 x 35 bolts. The bolts are inset with a 9mm clearance (if you can't find bolts with a head diameter of less than 9mm, use 40mm bolts rather than 35mm) Attach legs to tabletop. Attach one leg at a time. Allow for time to self tap threads.
With this file you will be able to print Bebe Table with your 3D printer. Click on the button and save the file on your computer to work, edit or customize your design. You can also find more 3D designs for printers on Bebe Table.
