BearingPeg 2.0 - Customizable FreeCAD
prusaprinters
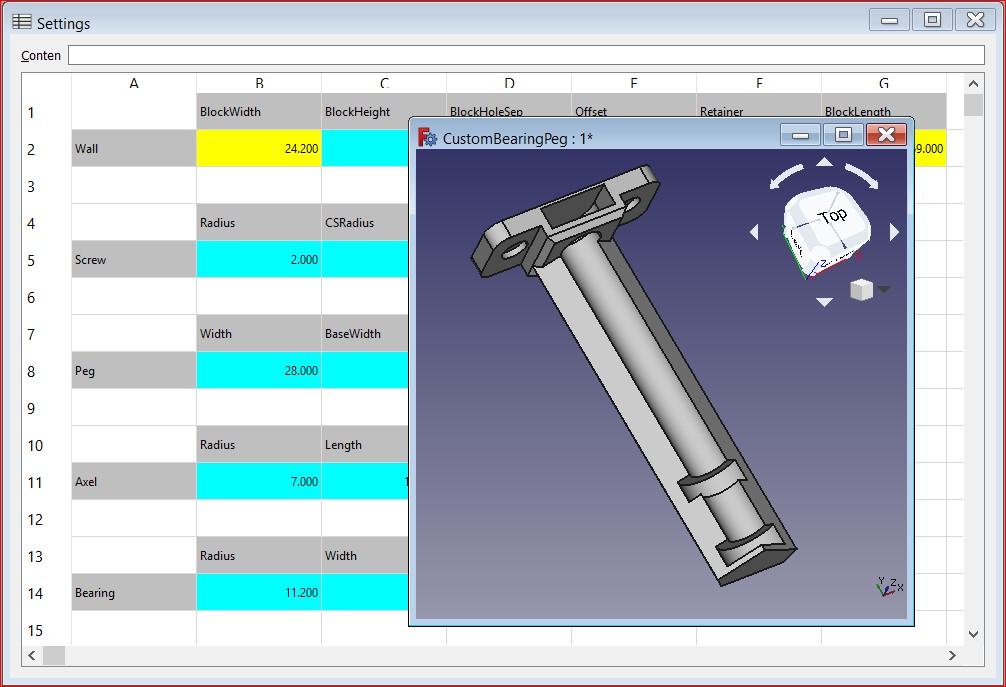
<p>This is a <a href="https://gitlab.com/FloatingCam/devenv/freecad/settings-spreadsheet">'parameterized' FreeCAD model</a> of the <a href="https://www.prusaprinters.org/prints/3094-wall-mount-spool-holder-with-bearings">BearingPeg</a> I created from the Prusa MMU2 tray bearing.</p> <p>This publication includes several different versions of pegs based on observations I've made and comments I've received. These were all made using the <a href="https://gitlab.com/FloatingCam/devenv/freecad/settings-spreadsheet/blob/master/BearingPeg.py">.FCStd file</a> which demonstrates an interactive FreeCAD model.</p> <h3>History</h3> <p>I ran across a download for a part I needed that included a FreeCAD model and talked about customization. I was curious as to how they had customized a FreeCAD model and surprised when the changes I made to the spreadsheet were instantly reflected in the view.</p> <p>Version 1.0 of the BearingPeg was a POC that worked so I printed five and was done. I thought about making a shorter peg and really liked the idea of a single hole version but couldn't justify the effort.</p> <h3>Customize</h3> <p>After seeing that an interactive model was possible I decided to see how hard it would be to <a href="https://floatingcam.com/blog/bearingpeg-customization/">Parameterize my BearingPeg</a></p> <p>Now it is possible to change:<br/> -Bearing Size<br/> -Axle Size<br/> -Width<br/> -Length<br/> -Hole Separation<br/> -Spool Bearing location<br/> -more...</p> <p>See for yourself: <a href="https://www.youtube.com/watch?v=GEhgrSl4hL0&feature=youtu.be">https://www.youtube.com/watch?v=GEhgrSl4hL0&feature=youtu.be</a></p> <h3>Interactive FreeCAD</h3> <p>If you use FreeCAD, even if you don't need a wall peg, it is worth <a href="https://gitlab.com/FloatingCam/devenv/freecad/settings-spreadsheet/blob/master/BearingPegV2.FCStd">downloading the .FCSTD file</a> to see an interactive FreeCAD model in action. I was able to do everything using just the standard FreeCAD installation.</p> <h3>Print instructions</h3><p><strong>Printer Settings -></strong> Original Prusa MK3S</p> <p><strong>Print Settings -></strong> 0.20mm - Speed MK3<br/> <strong>Perimeters:</strong> 3<br/> <strong>Solid layers - Top:</strong> 5 <strong>Bottom</strong> 4<br/> <strong>Fill density:</strong> 20%<br/> <strong>Fill pattern:</strong> Grid<br/> <strong>Top/bottom fill pattern:</strong> Rectilinear<br/> <strong>Rafts:</strong> No<br/> <strong>Supports:</strong> No</p> <p><strong>Filament Type -></strong> Generic PET<br/> <strong>First Layer:</strong> 225<br/> <strong>Other Layers:</strong> 225</p> <p>You will need the following parts (or their equivalent) from the Prusa Filament Trays.</p> <ul> <li>10x 608 Bearings</li> <li>5x 8*120mm Aluminum Tubes</li> </ul> <h3>Assembly</h3> <ul> <li>Push 608 bearing into wall mount but not all the way to the bottom.</li> <li><p>Optional: Slide two of the rubber grommets onto the axle. These have to be positioned to ride evenly on the inside hub or the spool may tilt a bit. Works fine without these.</p> </li> <li><p>Slide the other bearing onto the 120mm tube <img alt="" src="https://cdn.thingiverse.com/renders/f3/f6/f2/cb/26/e5f5d0256b56382359726fbc0f6f1cbf_preview_featured.jpg"/></p> </li> <li><p>Position the tube so it can be inserted into the wall mount bearing with the outer bearing positioned above its slot. <img alt="" src="https://cdn.thingiverse.com/renders/6a/a6/a7/c4/db/6afe615efedaa8d2b4e173c166694f6a_preview_featured.jpg"/></p> </li> <li><p>Push the tube into the bearing until it clears the outside edge and can be pushed into place. <img alt="" src="https://cdn.thingiverse.com/renders/f2/7c/5e/f5/81/10485258956412c25f00e94f766effde_preview_featured.jpg"/></p> </li> <li><p>Push on the rod near both bearings to press them into their place. <img alt="" src="https://cdn.thingiverse.com/renders/43/53/b8/b5/1e/a6b70610fe3225a0e4f79729edf138de_preview_featured.jpg"/></p> </li> <li><p>Verify the axle turns freely.<br/> <img alt="Assembled Peg" src="https://cdn.thingiverse.com/renders/96/63/01/4e/83/21e440a1a9ade202183ecce3620d9107_preview_featured.jpg"/></p> </li> </ul> <h3>Files</h3> <p>I've included 4 versions of each configuration:</p> <ul> <li>Single Hole Center Mount</li> <li>Single Hole Top Mount</li> <li>Two hole mount at 40mm separation</li> <li>Two hole mount at 40mm separation with the mounting holes moved 10mm up</li> </ul> <p>These are the configurations for each version listed above:</p> <ul> <li>Spool bearing at 75mm</li> <li>Spool bearing at 80mm</li> <li>Axel length of 100mm, no spool bearing</li> </ul> <p>My choice is the OneHoleTop 75mm version. I found the OneHoleCenter spun out the wall anchor and the peg could spin. I believe it would work screwed into wood (or better wall anchor) but the OneHoleTop seems to work fine regardless of the wall anchor.</p> <p>These STL files were provided to demonstrate how easy it is to customize pegs.</p> <h3>File Naming Convention</h3> <p>BearingPeg<em><#SpoolWidth#></em><#HoleSep#>_<#AddHeight#></p> <p>Example:<br/> <strong>BearingPeg_OneHoleCenter_80</strong></p> <p>The default Axle length is 120mm (from the Prusa MMU2 tray). Zero hole separation and the spool bearing is 80mm from the hub.</p> <p>BearingPeg100 is a shorter version (100mm vs 120mm) and uses the full peg so there is no spool bearing slot.</p> <p>The purpose of this effort was to create a version that could be customized. The models I included should meet most needs but it is super easy to customize your own if they don't.</p>
With this file you will be able to print BearingPeg 2.0 - Customizable FreeCAD with your 3D printer. Click on the button and save the file on your computer to work, edit or customize your design. You can also find more 3D designs for printers on BearingPeg 2.0 - Customizable FreeCAD.
