BearExxa Mosquito
prusaprinters
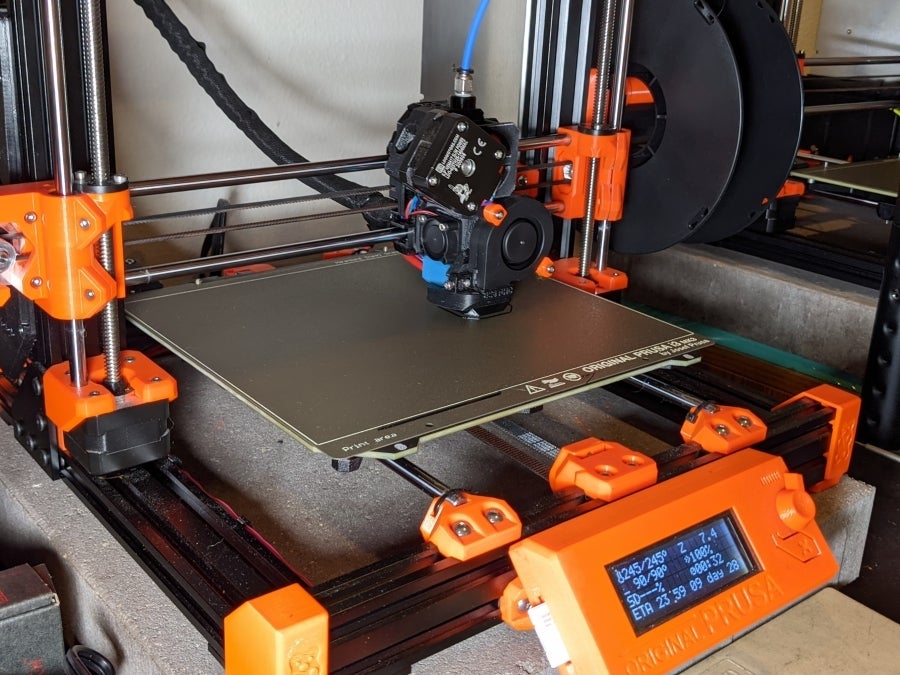
<h3>I was not content with other extruder designs for Slice Engineering Mosquito hotend so I designed my own.</h3><h3>Introducing the BearExxa Mosquito based off of the <a href="https://www.thingiverse.com/thing:4362586">Bear Extruder</a> created by <a href="/pekcitron/designs">Grégoire Saunier</a>.</h3><h3>Big thanks to both <a href="/pekcitron/designs">Grégoire Saunier</a> (Design Input) and <a href="/c-dog/designs">Brad Cronk</a> (c_dog) (Design Input, Testing, Photos) his photos are the first set in the thumbnails.</h3><h3>You can find all 3 of us in <a href="https://discord.gg/naJXZCCC">The 602 Wasteland</a> discord server if you want to chat</h3><h3>All parts are available under the <a href="https://www.gnu.org/licenses/old-licenses/gpl-2.0.html">GPLv3</a> open source license. You can download STL, CAD files (Autodesk Fusion 360) or STEP files. Feel free to fork and share!</h3><h3>Compatible with <a href="https://www.thingiverse.com/thing:3714978">Vertigo's Pully Box Mod</a></h3><p> </p><h3>Print Settings</h3><p><strong>Printer:</strong></p><p>SKR Bear w/ Mosquito Magnum</p><p><strong>Rafts:</strong></p><p>No</p><p><strong>Supports:</strong></p><p>No</p><p><strong>Infill:</strong></p><p>20%</p><p><strong>Notes:</strong></p><p>PLA (Obviously), PETG, BPET (HTPET) are not recommended for this extruder due to the temps the Mosquito heatsink can reach while in use.</p><p>Recommended Materials:<br/>ABS, ASA, Nylon, Polycarbonate (Blend and Pure), PEI, PEEK, PEKK, and other high temp materials</p><h3>Features</h3><figure class="image image_resized image-style-align-right" style="width:50%;"><img src="https://media.prusaprinters.org/media/prints/58192/rich_content/b35424c8-872f-4ecd-968a-67cca4a3ddb0/a.png#%7B%22uuid%22%3A%22027cc621-968d-4f7f-a1c9-0cb012ca87a0%22%2C%22w%22%3A465%2C%22h%22%3A827%7D"/></figure><h4><strong>Direct Mounting</strong></h4><p><strong>Unlike most other designs that utilize a groove mount adapter the BearExxa Mosquito directly mounts the mosquito hotend to the frame. This is done with the 2x M2.5x10 socket head cap screws provided with the hotend. These screws can be accessed for insertion and removal from the front and back groove (the back screw requires removal of the extruder from the carriage to access.</strong></p><p><strong>Additionally you can mount and remove the Mosquito hotend without fully disassembling the extruder, you only need to remove the fs cover and extruder cover.</strong></p><p> </p><p> </p><p> </p><figure class="image image_resized image-style-align-left" style="width:50%;"><img src="https://media.prusaprinters.org/media/prints/58192/rich_content/51140dc8-15c2-434f-bb7b-baf80b038775/c.png#%7B%22uuid%22%3A%22192bc125-09d9-41e5-9bd6-483cf1722833%22%2C%22w%22%3A502%2C%22h%22%3A839%7D"/></figure><figure class="image"><img src="https://media.prusaprinters.org/media/prints/58192/rich_content/6887f7e1-b96f-4a0d-849b-cf9baa7c3b7e/b.png#%7B%22uuid%22%3A%221fa143ff-e75f-444b-9f09-7cf286ec1f3c%22%2C%22w%22%3A946%2C%22h%22%3A616%7D"/></figure><figure class="image"><img src="https://media.prusaprinters.org/media/prints/58192/rich_content/30eef531-a950-4c28-a79b-ed6b678de603/img_20201205_111832.jpg#%7B%22uuid%22%3A%22c3209671-3cdf-40d7-9010-e79baaa06951%22%2C%22w%22%3A3024%2C%22h%22%3A4032%7D"/></figure><h4> </h4><h4><strong>Support for both Pinda and BLTouch</strong></h4><p><strong>Bltouch mount design based on </strong><a href="https://www.thingiverse.com/thing:3251530"><strong>https://www.thingiverse.com/thing:3251530</strong></a></p><p><strong>2 Versions of the BLTouch mount exist, one uses 3.2mm holes for normal m3 screws and the other has 4mm holes designed for using </strong>heat set inserts<strong>.</strong></p><p><strong>Pinda</strong></p><figure class="image"><img src="https://media.prusaprinters.org/media/prints/58192/rich_content/ab999a98-a97d-410f-b511-3916ad50ae8e/bl.png#%7B%22uuid%22%3A%22c32eccaf-23c2-45a0-95c1-fa8aef388f74%22%2C%22w%22%3A704%2C%22h%22%3A724%7D"/></figure><p><strong>BLTouch</strong></p><figure class="image"><img src="https://media.prusaprinters.org/media/prints/58192/rich_content/685f30fa-4bf9-47c7-85be-eb62b4494b43/blh.png#%7B%22uuid%22%3A%22c17e4840-a546-4eac-95fa-21872ecf3aa1%22%2C%22w%22%3A738%2C%22h%22%3A844%7D"/></figure><p><strong>3mm gap from BlTouch Probe to Nozzle Tip (Distance may vary between different nozzle types and sizes)</strong></p><figure class="image"><img src="https://media.prusaprinters.org/media/prints/58192/rich_content/a80029c9-cd6b-4a38-939e-aab729f56c94/d.png#%7B%22uuid%22%3A%22b385cc35-a8ea-42f0-999e-4bb1e4f9df7a%22%2C%22w%22%3A1286%2C%22h%22%3A674%7D"/></figure><h4><strong>25mm hotend cooling fan</strong></h4><p>This design is meant for use with a 5V, 12V, or 24V 25mm fan depending on your mainboard.</p><p>Personally I dislike the use of the 40mm fan other designs use to cool the mosquito hotend and will not be adding support for it.</p><p>Slice Engineering <a href="https://www.sliceengineering.com/collections/accessories/products/fan-for-mosquito-hotend%E2%84%A2">12/24V fan</a>.</p><p>If using the Einsy Rambo you can plug this fan directly into the einsy power input, the only downside is the fan will run all the time.</p><p>5V fan: 2pin, <a href="https://aerocooler.com/evercool-ec2510m05ca-25mm-x-10mm-5v-3pin-fan/">3pin</a></p><figure class="image"><img src="https://media.prusaprinters.org/media/prints/58192/rich_content/4d0528eb-8d66-4cd1-a147-116f0012543f/y.png#%7B%22uuid%22%3A%22fb268a58-77b1-4966-87ad-c65ef35d3999%22%2C%22w%22%3A873%2C%22h%22%3A728%7D"/></figure><h4> </h4><h4>Cable Routing</h4><p>There are 2 versions for the cable routing of the stepper motor.</p><p>The first version, labeled CR (Cable Retainer), has a tab that holds the stepper cable in the routing groove. An optional zip tie can be applied but should be unnecessary for the CR version. Note: The 25mm fan should be routed below the tab, not up over and behind it.</p><p>The second version, labeled NCR (No Cable Retainer) is lacking the tab the CR version has. The benefit of this version is you don't have to disassemble the extruder to change out non Q-link stepper motors.</p><p><strong>Cable Retainer</strong></p><figure class="image"><img src="https://media.prusaprinters.org/media/prints/58192/rich_content/1e83fc84-ebd4-4c7f-903c-04048bac158c/cr.png#%7B%22uuid%22%3A%22999a81ce-f923-4394-b90a-f1d7bf01082b%22%2C%22w%22%3A962%2C%22h%22%3A903%7D"/></figure><p><strong>No Cable Retainer</strong></p><figure class="image"><img src="https://media.prusaprinters.org/media/prints/58192/rich_content/cd1d00bd-3131-462e-9eae-c0db161ac0b0/ncr.png#%7B%22uuid%22%3A%222c061ea7-f3d9-405a-a398-c835cebee828%22%2C%22w%22%3A920%2C%22h%22%3A847%7D"/></figure><h4> </h4><h4>Notes</h4><p>1. The BEM Idler is wider than the original Bear Idler by 4mm due to needing to add 4mm to the stepper mount.</p><p>2. The fan ducts from the <a href="https://www.thingiverse.com/thing:3651160">Mosquito BNB Extruder</a> work with this design (Tested and used by <a href="/c-dog/designs">Brad Cronk</a>), I have included the stl for the <a href="/download:7014079">BS6RHD_Mosquito_Fan_Shroud_5015</a> in the zip files, you can also click the imbedded link to download it.</p><p>Category: 3D Printer Extruders</p>
With this file you will be able to print BearExxa Mosquito with your 3D printer. Click on the button and save the file on your computer to work, edit or customize your design. You can also find more 3D designs for printers on BearExxa Mosquito.