Bauhaus Tray: Additional Items
prusaprinters
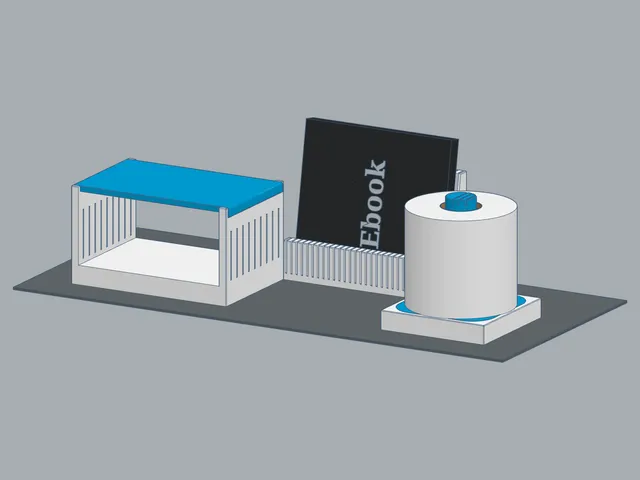
I went, uh, slightly nuts with the Bauhaus Tray system and decided I wanted a dedicated spot for everything on my nightstand. There were a few items the original set and existing expansions wouldn't accommodate, so I designed holders for them myself, with aesthetics to hopefully match the rest of the set and remixes. Currently, there are three models:Ebook Reader Holder (1x3):This was designed for my Kindle Oasis in its third-party case (if you want it for something thicker than ~15mm, let me know and I'll see about whipping you up a variation)1x3 footprint on the Bauhaus Tray Grid (57.6mm x 173.6mm)Overall dimensions:Height (Z): 120mmLength (X): 173.6mmInterior dimensions:Height (Z): Absolute: 112mmEffective (due to 10-degree angle): ~115mmDepth (Y):Narrowest (bottom): 15mmWidest (top): ~34.6mmShelf (2x3):Personally, I designed this to hold my clock and pill case, but you do you2x3 footprint on the Bauhaus Tray Grid (115.6mm x 173.6mm)The suggested version is Version 3 (in the main “Shelf” directory)Top shelf dimensions:Height (Z): 100mmLength (X): 175.62mmDepth (Y): 109.18mmInterior dimensions:Height (Z): 75mmLength (X): 158.6mmDepth (Y): 115.6mmTP Holder (2x2):Let's be real: nobody has time to buy actual Kleenex, so why not corral your facial-tissue-replacement TP roll the classy way?2x2 footprint on the Bauhaus Tray Grid (115.6mm x 115.6mm)This is the INSERT ONLY; you will also need to print the 2x2 base from the original set (Bauhaus_tray_2x2_Base.STL)Dimensions:Overall height: 130mmPost height: 109.73mmPost diameter: 30mmA note about seams:I didn't notice it, but own initial slice for this put the seams in really stupid spots, despite my default settingsAccordingly, the uploaded 3MF file has seam blocking painted on, so you should be good to goIf you use the STL file, I highly suggest checking your slicer's output for seam position and painting guides/blockers if necessaryOld Versions:If you look in the “Old Versions” folder, I've also provided earlier iterations of the shelf design, in case you might like those better either aesthetically or functionally (de gustibus non est disputandum)Note that I have NOT print-tested v1 and v2: print at your own risk!Version 1: Prints in two pieces with snap and post connectors (or you could remove the cut and print it in one piece with supports)If printing with connectors, I strongly suggest a reality test of just the connectors before printing the full piece (my test connector snapped a pin on insertion, at which point I went back to the drawing board for something that could print without supports/cutting)You may need to resize, reposition, or redesign the connectorsThe tray on top is based on the original 2x3 tray, so there shouldn't be any tolerance issuesNote that the tray on top has been trimmed to a shallower depth of only 10mm (from the usual ~17mm)Version 2:If I recall correctly, there should be 0.01mm of tolerance for the shelf slatsYou can scale them down in X/Y if you're having problems getting them to fitVersion 3.0:Hoo boyI wanted to love thisUnfortunately, the height and slenderness of the columns (particularly the corner ones, extra-particularly the corner ones farthest from the XZ axis on my Mini+) meant it came out Kind Of Messy (you can see it in the photo of my full setup)If you have a very stable Z axis, you can definitely still use this version!Printing Notes:Supports:Everything is designed to print without supports if you print it in the provided orientationInfill and perimeters:Mostly I'm using 10% adaptive cubicThe base of the shelf has 5% adaptive cubic for the first ~20mm (for the platform, basically) and then 15% gyroid for the restAt 2 perimeters and low infill, you are potentially going to see the infill pattern when it's backlit (particularly with lighter filaments and on the ebook reader holder); YMMV on whether it's worth it to change those settings, given the corresponding increase in print timeIroning:3MF and GCODE files have ironing turned on where it makes sense; do a reality check vs. your own preferencesParticularly if you're printing in something susceptible to heat creep (looking at you, PLA), be aware that larger surfaces may end up with inconsistent ironing, so be prepared to tweak settings to avoid thatTolerance:The TP holder is based on the default 2x2 tray, so the insert shouldn't have any tolerance issuesFor the shelf, there's 0.02mm of tolerance in X and Y where the top attaches to the base; if you're having problems:To help it fit the cut-out slot on top of the base: try scaling down the Y (to make it narrower than the slot)To help it fit the base from side to side: try scaling up the X (to make it wider than the base)
With this file you will be able to print Bauhaus Tray: Additional Items with your 3D printer. Click on the button and save the file on your computer to work, edit or customize your design. You can also find more 3D designs for printers on Bauhaus Tray: Additional Items.