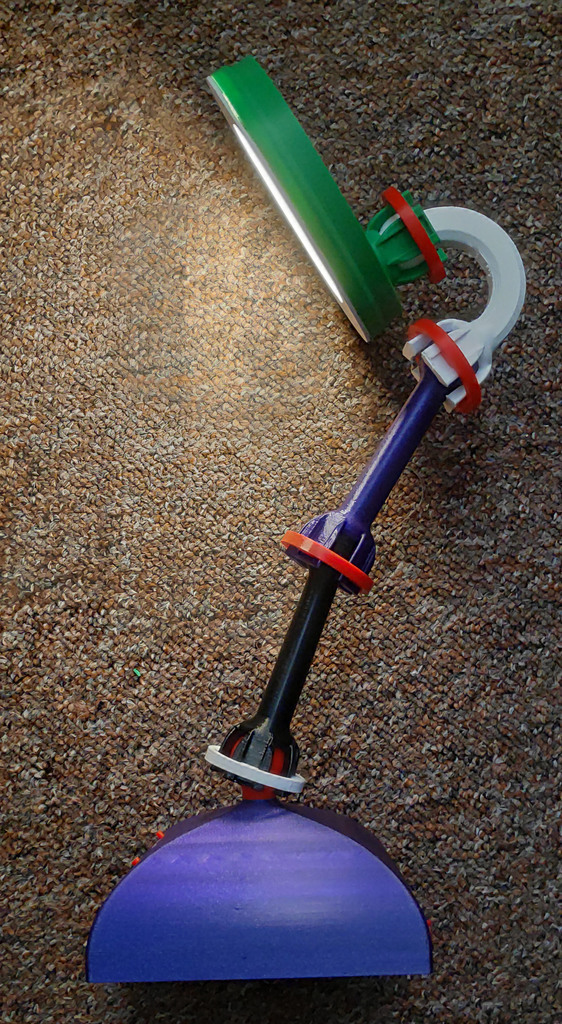
Battery powered LED desk lamp 6W
prusaprinters
<p>Attention, there is V2 as when I was designing this I didn't think about some stuff so I added them, but I didn't print this updated model. I'm only unsure about the switch if the top cover will fit as I think it should.</p> <p>Features:<br/> Battery operation, built in charger, battery state of charge, adjustable brightness, adjustable lamp length.</p> <p>Links made by Teaching Tech <a href="https://www.thingiverse.com/thing:3223979">https://www.thingiverse.com/thing:3223979</a></p> <p>Print settings:<br/> 0.4/0.6 nozzle, 0.2 layer height<br/> Supports recommended for lampMount and LampTop<br/> Print as oriented from the files.</p> <p>Things that came up during assembly that I didn't think about when designing:<br/> No ON/OFF battery cutoff, the boost converter will drain the battery slowly.<br/> Unable to see when the battery is charged (is visible from the rear only)</p> <p>The ⌀ 4mm holes of the webcam mount are too small for any connector to pass through. You won't be able to change the number of links without removing the connector.</p> <p>I've also uploaded a updated version that I didn't print out, so I'm not 100% sure that it will fit, but it incorporates some fixes:</p> <p>Changed M10 thread to M12 for the holder and enlarged the hole to ⌀ 8mm (2 pin XH connector should be able to pass).<br/> Added mount for a switch in the rear (10×15 SPST KCD11).</p> <p>As always, step files included.</p> <h3> BOM</h3> <h3> 3D printed:</h3> <ul> <li>1× 180link, lampLink, lampMount, LampTop, LampBot, LinkScrew, OnOffButton, BatteryButton</li> <li>4× LedLightPipe (in transparent filament)</li> </ul> <ul> <li>x× Teaching Tech link <a href="https://www.thingiverse.com/thing:3223979">https://www.thingiverse.com/thing:3223979</a> or longer links from trisi1231 <a href="https://www.thingiverse.com/thing:3993038">https://www.thingiverse.com/thing:3993038</a></li> </ul> <ul> <li><p>x+2 locking_ring</p> <h3>non 3d printed:</h3> </li> <li><p>6W round ceiling lamp under plaster (⌀ 120mm, 18V 300mA)</p> </li> <li>TP4056 with PCM</li> <li>SX1308 step up converter</li> <li>12V-24V LED controller (3 buttons)</li> <li>1S Battery charge indicator (<a href="https://www.aliexpress.com/item/32848288120.html">https://www.aliexpress.com/item/32848288120.html</a>)</li> <li>18650 (2–3 in parallel, current draw will be around 1.7A, so 2+ cells should be used)</li> </ul> <ul> <li>4x M3x4 (up to 10mm)</li> <li>1 tactile switch 6×6×4.3</li> <li>1 rocker switch 10×15 SPST KCD11</li> </ul> <ul> <li><p>optional: 3x whiskey ice cube stones (up to 25mm×25mm×25mm) as weights Tools:<br/> DMM, hot glue gun, soldering iron, wire</p> <p>optionally can add connectors to ease with disassembly: 2× 1×2 M+F, 1x 1×3 M+F.</p> <h3> Prep</h3> </li> <li><p>Remove the heat shrink and the dome buttons from LED controller, solder 1×2 connector from LED- and LED+. Solder a wire to pin 4 of the IC near the MOSFETs (check if the middle button from the controller goes to that pin) and terminate it in 1×3 connector, this is the ON/OFF button connection.</p> </li> </ul> <ul> <li>Desolder the button from battery indicator. Take attention as only 2 pads out of 4 have connections (in my case), solder extension wires from pads to the button (about 5 cm long). </li> </ul> <ul> <li>Solder 2 wires to positive and negative pads of battery indicator and terminate them in 2 pins of 1×3 connector.<br/> Solder 2 wires to tactile switch, 1 goes to the negative pad of the battery indicator (about 4 cm long) and second one to the remaining pin of the connector.</li> </ul> <ul> <li>Power the step up converter and adjust the output voltage to be about 17.8V.</li> </ul> <ul> <li><p>Unscrew the top cover from the ceiling lamp, remove the foam tape and apply it to lampMount, solder a pair of wire to the led strip <strong>Led controller pin 4 that connects to ON/OFF button on the other side</strong></p> <h3>Assembly</h3> </li> </ul> <p><strong>Lamp shade:</strong></p> <p>screw in the lamp into lampMount (you can add something reflective between lampMount and lampLink), thread the wires through the lampLink, 180link, link and LinkScrew. Terminate the wires in a 1×2 connector.</p> <p><strong>Electronics in base:</strong></p> <p>Lay out the parts in their spots on LampBot and solder wires between them. Hot glue everything</p> <p><strong>Electronics in top cover</strong></p> <p>Insert 4 LedLightPipe into the holes, push the button extenders into their holes. Slide the buttons into their slots, check if you can press the buttons, hot glue them into place. Take the battery indicator, put the LEDs in front of the lightPipes and hot glue.</p> Category: Office
With this file you will be able to print Battery powered LED desk lamp 6W with your 3D printer. Click on the button and save the file on your computer to work, edit or customize your design. You can also find more 3D designs for printers on Battery powered LED desk lamp 6W.