Bambu X1C Switch Receptacle
prusaprinters
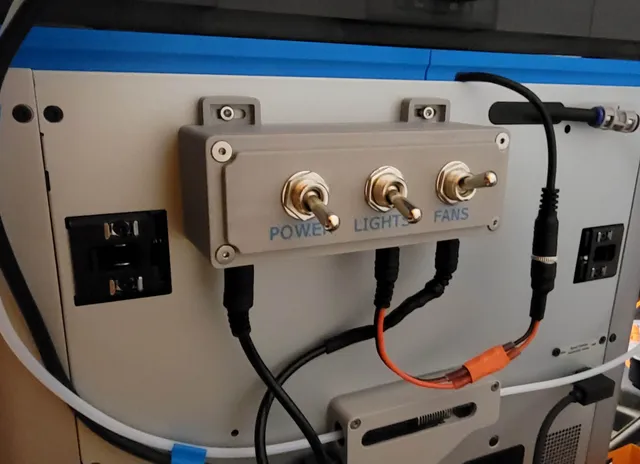
Useful for adding auxiliary devices to you Bambu X1C without connecting to the stock power supply.I created this so I could have additional lighting and use a BentoBox without interfacing with any of the stock Bambu wiring.I personally used Daniels Top Glass Riser https://www.printables.com/model/361348-bambu-labs-carbon-x1-top-glass-riser-for-leds/files with these LEDS https://www.amazon.com/dp/B09JZ8GTNP?psc=1&ref=ppx_yo2ov_dt_b_product_details I did used gel super glue to attach the LED strip to the riser. BentoBox https://www.printables.com/model/272525-bambu-lab-x1c-bentobox-air-filter I included 2 different Receptacle Cover files 1 with the labeling terminology I used and 1 blank for one to label on their own.Components Bambu screws on the back of the case are M3x0.5 screws. I designed this to use M3x8mm SHCS.Cover hardware is designed for #6 FHCS. 3mm FHCS should work as well Designed to work with standard 12v toggle switches. https://www.amazon.com/dp/B07KQ2R6G4?psc=1&ref=ppx_yo2ov_dt_b_product_details I used this 12v power supply https://www.amazon.com/dp/B07VQGHSWY?psc=1&ref=ppx_yo2ov_dt_b_product_details it has 3A(36w) of power. The fans I used for my BentoBox consumes less than 2w and the LED strip uses roughly 20 watts of power. PLEASE VERIFY THAT YOUR ACCESSORIES DO NOT OVER DRAW YOUR CHOSEN POWER SUPPLY.I used standard DC connectors. The power supply listed above uses a 5.5x2.5 DC connectors. I used 1 female 5.5x2.5 connector for the power input. My 2 power outputs I opted to use 5.5x2.1 connectors so my accessories cannot be connected connected to the power input and that is the size connector that is on the COB LED lighting listed above. 5.5x2.5 plug kit https://www.amazon.com/ZRM-Connector-5-5x2-5mm-Threaded-Adapter/dp/B081V9P8BT/ref=sr_1_2?crid=NPE8QC0L9RDD&keywords=5.5x2.5+female&qid=1677108189&s=electronics&sprefix=5.5x2.5+female%2Celectronics%2C150&sr=1-2 5.5x2.1 plug kit https://www.amazon.com/dp/B08SJM2G52/ref=sspa_dk_detail_2?psc=1&pd_rd_i=B08SJM2G52&pd_rd_w=CAWQ8&content-id=amzn1.sym.88097cb9-5064-44ef-891b-abfacbc1c44b&pf_rd_p=88097cb9-5064-44ef-891b-abfacbc1c44b&pf_rd_r=HJFAY4PSJ20YME5YB6W6&pd_rd_wg=AGsoJ&pd_rd_r=eac9a7db-8c4d-4257-9f01-09a974449e4a&s=electronics&sp_csd=d2lkZ2V0TmFtZT1zcF9kZXRhaWw&spLa=ZW5jcnlwdGVkUXVhbGlmaWVyPUFRSktMT1E1RVlBWEsmZW5jcnlwdGVkSWQ9QTAxNjE5NTQyMTU5QUlIRkowWjA4JmVuY3J5cHRlZEFkSWQ9QTAyMTI1MDkxMDVUUDlNRFJHMVNBJndpZGdldE5hbWU9c3BfZGV0YWlsJmFjdGlvbj1jbGlja1JlZGlyZWN0JmRvTm90TG9nQ2xpY2s9dHJ1ZQ==Wiring NotesI used 18AWG wire to connect the switches to the DC plugs and small crimp on ring connectors. I set this up to that the “Power” switch is a master power switch. I connected the power from the supply to this switch and the 2 power switches are ran in parallel with the outputs connected to 2 auxiliary outputs(female DC connectors). I connected the 3 negatives (power supply (-), and 2 auxiliary (-)s) to a 3 conductor lever nut aka wagos connector. Its a tight squeeze to get this all fit together. I placed the lever nut in the gap between the power and 1st auxiliary switch this is the only spot where you will have sufficient room to have all the negative wires terminate.
With this file you will be able to print Bambu X1C Switch Receptacle with your 3D printer. Click on the button and save the file on your computer to work, edit or customize your design. You can also find more 3D designs for printers on Bambu X1C Switch Receptacle.