Badgify parametric badge constructor (Openscad)
prusaprinters
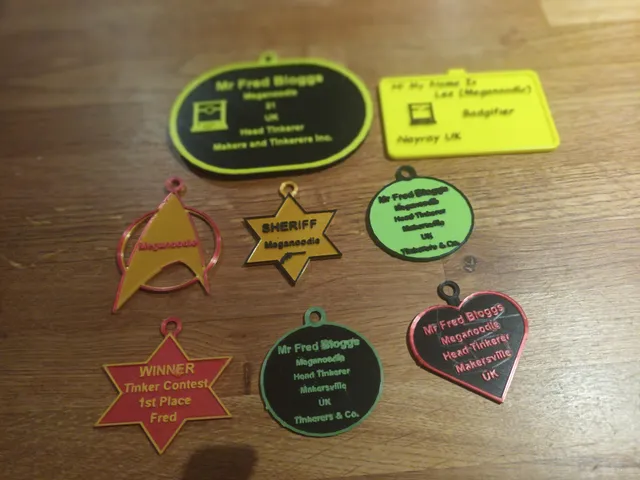
Badge / sign configurator written by Lee Goodman AKA Meganoodle.Please feel free to adapt and improve the code but please add a nod to me in with the credits, I would like to see any improvements made to it too so please share it here.Im still quite a novice with OpenScad so please dont be too harsh with the judgement in the scripting.This project started as a simple badge / name adjustment tool, but it rapidly grew as new ideas came to me. Over 400 lines later I realized just how big and complex it got.I have simplified and removed some things I previously added to reduce confusion, so now I hope this is all fairly straight forward, but at the same time as versatile as it needs to be.Badge Data and Data text placement.Type in your data into the relevant lines, (you can put what you like the headings are just a reference).You can enter basic information against each title, there are 6 lines for information on the badge, select which heading should go on each line, if you want a blank line , there is a blank option at the bottom of each line list.Badge Properties.[shape]There are currently 5 different shapes for the badge to choose from , Rectangle, Ellipse, Star, Sausage, Heart and additionally an experimental Custom option.***Note , the heart shape badge loop will probably need editing please see Heart Shape Specific Properties.[width], depth], [height]Fairly straight forward , adjust the sliders to resize the shape to your desire.[txt borderheight]This slider adjusts the height of the border, text and logo. The measurement is relative to the height it extends above the surface of the badge.[background color] and [foreground color]These dropdown boxes change the colour of the badge background and the contrast colour which effects the border , logo and text.Text PropertiesThe text does center itself when altering the text within or the text size but the shape will not dynamically alter when you do , the badge size will need to be manually adjusted which is also in the parameters of the customizer under badge properties.[header txt size] slider adjusts the text size of the top line only.[text size] adjusts the size of the remaining 5 lines.I found printing text size smaller than 2.6mm to be unreadable even when reducing the line width, 2.6mm on my setup is still not detailed enough but that could be just down to settings I havent discovered yet. Text font can be changed by selecting from the [txtfont] dropdown box, I have included what I thought to be the most popular fonts, I have set them all to bold, but you can add or edit the script if you wish to add an additional or custom font. The horizontal position of each line of text can be moved left or right using the sliders titled [txt position line#]. you can also select left right or centre justification on each line via the dropdown boxes labeled [txt_alignment line#].[txt block position y] slider will adjust the vertical position of all 6 lines of text.[txt linegap] slider adjusts the space between each line of text.Logo PropertiesYou can include a logo or image, from an svg file, you can convert most images to svg with free online converters, just place the svg file in the same directory as this file and type the filename (including extension ".svg") in the [logo filename] textbox and check the [use logo] checkbox.This will more than likely need scaling down with the [logo scale] slider. Please note when scaling down you will loose detail , if this is the case, resize the svg (or bitmap before converting.[logo position x] and [logo position y] You can adjust the x and y position with the respective position sliders. The logo extrudes from the base to border height so if the logo is outside of the badge frame, providing it is a solid line, it will add to the shape of the badge. Badge Loop Properties[badgelooptype] is where you attach your safety pin, ribbon or chain to wear the badge, you can select between ribbon or pin accordingly.Custom Badge Properties ****experimental*****If you want a specific shaped badge, create an svg file in the shape you want and place the file in the same directory as this file, enter the filename into the [custom badge shape] textbox, edit the dimensions within the customiser and add the desired text.All parts of the shape should be attached, or a continuous surface otherwise it will not work. This is experimental and may not work with your shape , i have tested this with several shapes without any issues, please let me know if you have experienced any issues.Heart Shape Specific PropertiesAs stated above there are a couple of properties that will need adjusting with the heart shape badge.[heart badgeloop y pos] moves the vertical position of the badgeloop, this should be moved so it joins with the main shape of the badge.[heart badgeloop length] Adjusts the length of the badge loop, adjust this if the curves of the heart may obstruct a saftey pin from being placed through it.This was a fun project an I may even expand on it when the desire strikes, so I will repost any updates as they occur.Thanks for reading , hope it explains the use of this project, I hope you get some good use out of it.---HAPPY MAKING---
With this file you will be able to print Badgify parametric badge constructor (Openscad) with your 3D printer. Click on the button and save the file on your computer to work, edit or customize your design. You can also find more 3D designs for printers on Badgify parametric badge constructor (Openscad).
