 prusaprinters
BackClip
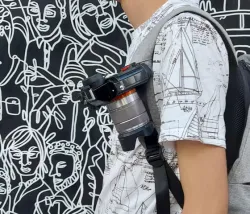
What is this?BackClip is an easy-to-use open-source camera backpack clip for those who don't wanna pay a fortune for an off-the-shelf one.I originally designed this about a year ago and since then it has overcome several iterations. Now I added refined tolerance for easier printing, a new backside, and this handy guide to improve the reproducibility of the project. I'm using the clip on a daily basis since its first version and it has served me well to this point.If you want to modify it I also included the Fusion 360 file for further improvements.________________________________________________________________________________________________________________BOMQtyNameLayer heightInfillSupportMaterial1xClip top0.1mm>70%Yes - Build plate onlyPETG1xClip bottom*0.1mm>70%Yes - Build plate onlyPETG1xClip bottom rubber**0.1mm>70%NoTPU1xPlate*0.1mm>70%NoPETG1xPlate rubber top**0.1mm>70%NoTPU1xButton0.1mm>70%NoPETG2xScrew knob0.1mm>70%NoPETG1xNut tops0.1mm>70%NoPETG2xM5 18mm Flanged button head screw 2xM5 Normal height nut 1xM3 5mm Low profile socket head screw 1x3.71mm (to 4mm) x 19mm compression spring 1x1/4-20 Tripod screw * (with or without the rubber surface)** (optional, print it if you don't have a multi-material printer) ToolsScrewdriverBox cutter or Exacto knifeRound-shaped fileCA glue (aka super glue)WD-40 or some other machine oil (I used gun oil)Sandpaper (optional)________________________________________________________________________________________________________________PrintingI'd suggest printing out the whole clip from PETG (except the rubber parts which are TPU) since it's rigid enough to withstand the stress coming from carrying a camera and has a high enough melting point to resist the heat caused by the sun and its slippery surface helps in the operation of the clip.The clip's infill should be higher than 70% so it does not bend under the screw's clamping force.The clip bottom and the plate can be printed with the rubber surface in place with a multi-material printer or by using this trick. Alternatively, you can just print out them separately and then super glue them together. (In this case, you might need to trim them down a little bit since there is no tolerance whatsoever between the two parts.) These are the recommended printing orientations with the support materials in place:________________________________________________________________________________________________________________Cleaning up the printsBrake off the supports, cut off the excess plastic with a knife and then file it down in these particular spots (and anywhere else where it's needed):Filing down the top clip's buttonhole is critical since the button wouldn't even fit into the hole because of the height difference caused by the bridging.Optionally you can also sand and polish the whole print down for a smoother operation.________________________________________________________________________________________________________________AssemblyTo help with the assembly here is a 3D model which can be opened from any web browser.#0 If you printed the rubber parts separately then trim them down and glue them in place #1 Glue the screw knobs to the M5 screw's bottom #2 Put the nuts in place then seal them up by gluing the nut tops in place #3 Put the spring into the clip top's button hole (it should be in the wider section of the hole) and then put in the button #4 File down the M3 screw, until its head, is about 2mm high, and then screw it into the button. You should be careful since you need to cut its thread in. #5 Put the whole thing together #6 Enjoy! :) TODO
Direct link to the original creator's page
Also Available On
More from zip

Similar Models
 thingiverse
 cults3d
 thingiverse
 thingiverse
 thingiverse
 thingiverse
 cults3d
 cults3d
Model Specifications
Frequently Asked Questions
How do I download BackClip?
Click the "View on prusaprinters" button above to visit the original model page on prusaprinters. You can download the STL file directly from the creator's page for free.
What 3D printer can I use for this model?
This STL file is compatible with most FDM 3D printers (Creality Ender 3, Prusa MK3S+, Bambu Lab, etc.) and resin printers (Elegoo, Anycubic). Check the original page for recommended print settings and materials.
Is this 3D model free to download?
Yes, this model is available as a free download on prusaprinters. Some creators accept tips or donations.
Can I modify this STL file?
Most STL files can be modified using free software like Blender, TinkerCAD, or Meshmixer. Check the license on the original prusaprinters page to see if modifications are permitted by the creator.