Back brace Reinforcement for Taz 1-6 Printers and other 20mm extrusion frames
prusaprinters
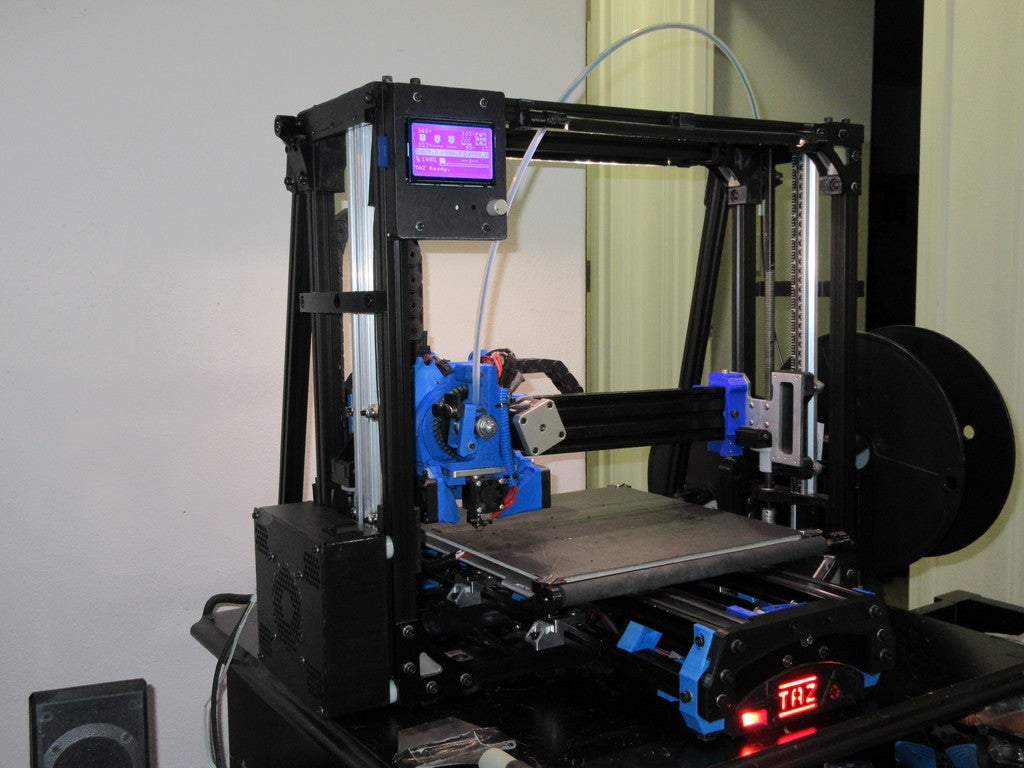
<p>This project is a low cost option for adding significant upper gantry and Z axis stiffness to the Taz frame for all model Taz printers. it uses 3 20mm surplus Taz extrusion (3x 500mm or 1x 510mm and 2x500mm for a Taz 6 specifically) some 55mm long M5 cap head bolts and m5 flange nuts, some 10mm long M5 Cap head bolts and M5 t-nuts and M5 washers (possibly shorter than 10mm i was just grabbing them from the container, will measure when i get a chance), 2 stick on furniture feet (taz 6 flexifeet edition coming soon) and about 1lb of plastic. Any type of plastic should be fine for this application, including PLA. I used Push plastics Black ABS.</p> <p>Do you need this backbrace project? Prior to printing it, I would have said no. I print at very high speeds generally (120mm/sec on average with higher moves, slower first layer is my general "medium" speed) , so I was looking for a way to reinforce the frame against even higher forces. After bolting this on though, my prints have absolutely no layer offset at all. I was already pretty well dialed in with the openbulilds mods, but this pushes it to the next level.</p> <p>You can source used 20mm taz extrusions here: <a href="https://itworks3d.com/product/aluminum-extrusion-20mm/">https://itworks3d.com/product/aluminum-extrusion-20mm/</a></p> <p>Development thread here:<br/> <a href="https://forum.lulzbot.com/viewtopic.php?f=16&t=6854">https://forum.lulzbot.com/viewtopic.php?f=16&t=6854</a></p> <h3>Print instructions</h3><h3>Category: 3D Printer Parts Summary</h3> <p>This project is a low cost option for adding significant upper gantry and Z axis stiffness to the Taz frame for all model Taz printers. it uses 3 20mm surplus Taz extrusion (3x 500mm or 1x 510mm and 2x500mm for a Taz 6 specifically) some 55mm long M5 cap head bolts and m5 flange nuts, some 10mm long M5 Cap head bolts and M5 t-nuts and M5 washers (possibly shorter than 10mm i was just grabbing them from the container, will measure when i get a chance), 2 stick on furniture feet (taz 6 flexifeet edition coming soon) and about 1lb of plastic. Any type of plastic should be fine for this application, including PLA. I used Push plastics Black ABS.</p> <p>Do you need this backbrace project? Prior to printing it, I would have said no. I print at very high speeds generally (120mm/sec on average with higher moves, slower first layer is my general "medium" speed) , so I was looking for a way to reinforce the frame against even higher forces. After bolting this on though, my prints have absolutely no layer offset at all. I was already pretty well dialed in with the openbulilds mods, but this pushes it to the next level.</p> <p>You can source used 20mm taz extrusions here: <a href="https://itworks3d.com/product/aluminum-extrusion-20mm/">https://itworks3d.com/product/aluminum-extrusion-20mm/</a></p> <p>Development thread here:<br/> <a href="https://forum.lulzbot.com/viewtopic.php?f=16&t=6854">https://forum.lulzbot.com/viewtopic.php?f=16&t=6854</a></p> <h3> Print Settings</h3> <p><strong>Printer Brand:</strong> LulzBot</p> <p><strong>Printer:</strong> TAZ 5</p> <p><strong>Rafts:</strong> No</p> <p><strong>Supports:</strong> No</p> <p><strong>Resolution:</strong> 0.5mm nozzle ABS</p> <p><strong>Infill:</strong> 85% or better</p> <p><strong>Notes:</strong></p> <p>The alternative mount for use with the cable chain mods does require support, all else can be printed without it. And you only need that one if you are running cable chain.</p> <h3> Post-Printing</h3> <p><strong>Instructions</strong></p> <p>There are a couple pieces to this project. First, source your 3 500mm long rods (or 1 510mm long center rod for a 6)</p> <ol> <li>Using the center rod as a base, attach one Taz_Backbrace_back_Crossmember_Mount_left_2_1_a.stl and Taz_Backbrace_back_Crossmember_Mount_right_2_1_a.stl to the top of each end of the center rod using T-nuts and bolts. Attach 2 furnature sticky feet to the surface now designated "the bottom"</li> <li>Attach the two long Taz_Backbrace_Lower_Short_Crossmember_Mount_Left_1_0_a.stl and Taz_Backbrace_Lower_Short_Crossmember_Mount_right_1_0_a.stl pieces to the "front" surface of that extrusion, perpendicular to the pieces you added to the top. </li> <li>Attach two more Taz_Backbrace_back_Crossmember_Mount_left_2_1_a.stl and Taz_Backbrace_back_Crossmember_Mount_right_2_1_a.stl to the lower rear corners of your Taz main frame. </li> <li>Attach the two Taz_Backbrace_Upper_Left_Frame-Mount_1_0_a.stl and Taz_Backbrace_Upper_right_Frame-Mount_1_0_a.stl pieces to the upper rear taz main frame. if you are running the openbuilds setup and have a Z cable chain that needs to go in the area the left one would run, attach the alternate Taz_Backbrace_Upper_Left_frame-mount_Alt_1_0_a.stl instead</li> <li>Remove the built in support, then attach Taz_Backbrace_Upper_Crossmember_end_left_2_1_a.stl to the top and Taz_Backbrace_Lower_Crossmember_Mount_left_2_1_a.stl to the bottom of one of the side 500mm extrusion crossbars. leave the lower mount bolts loose (10mm m5 bolts and T-nuts with washers I think) Repeat with the right hand side pieces and other crossbar. Use the alternate upper end for the left side if you are running cable chain. </li> <li>Now bolt the arms to the upper mounts using the 55mm long M5 bolts and M5 nuts. Then bolt them to the rear mount ends. </li> <li>bolt an Taz_Backbrace_LR_1_0_a.stl to each side of the frame to complete the triangle. </li> <li><p>Now attach the two Taz-Backbrace_Standard_Lower-Rail_Mount.stl to the back of the Y frame to the back crossmember. If you have the openbuilds Y components installed, use Taz-Backbrace_openbuilds_Y_Specific_Lower-Rail_Mount.stl .<br/> Thats it. if you have a square frame, everythign bolted up and you are done. Print something and be amazed!</p> <p>There will be a few additional parts for this in the next few days, an extended openbuilds z rail support, and a rear diagonal crossmember spool arm to take advantage of that new space for dual extruders.</p> <p>Enjoy!</p> </li> </ol>
With this file you will be able to print Back brace Reinforcement for Taz 1-6 Printers and other 20mm extrusion frames with your 3D printer. Click on the button and save the file on your computer to work, edit or customize your design. You can also find more 3D designs for printers on Back brace Reinforcement for Taz 1-6 Printers and other 20mm extrusion frames.