B5 Avant Cargo Cover Repair
prusaprinters
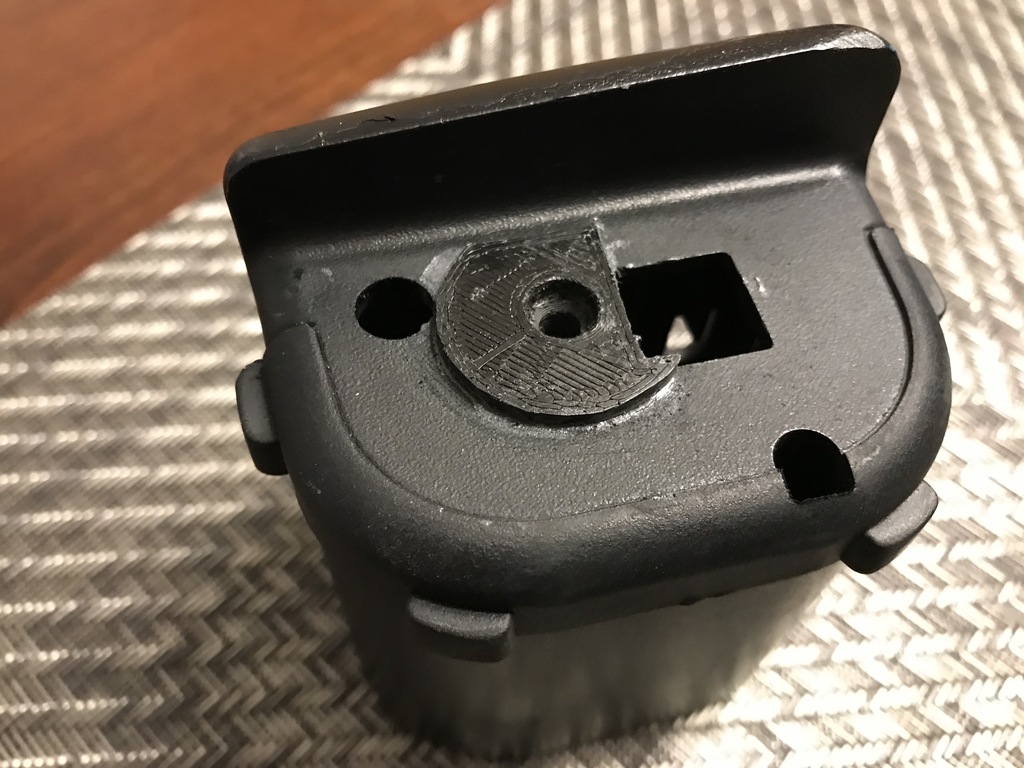
<p>Overview:</p> <p>These are pieces that I designed to repair a friends cargo cover on his Audi A4 Avant (B5). I'm not sure how common this exact failure is but I figured I'd share it in case it helps someone from throwing out their cover and having to shell out for a replacement.</p> <p>There are other repair pieces for Audi/VW cargo covers which are used on wagon models, like <a href="https://www.thingiverse.com/thing:2388692">VW Jetta wagons</a> and an <a href="https://www.thingiverse.com/thing:399921">A6 Avant</a> but the repair parts are specific to those covers since the designs are different. The end result of the repairs are the same, to allow the shade to retract again. Typically an internal plastic piece that holds spring tension on the shade gets brittle over time and breaks, thus causing the shade to not retract inside the cover and also not stay taut when pulled over the rear trunk/cargo area.</p> <p>On this cargo cover, the plastic broke on the outside of the end cap where the counterbore for the screw is. Due to where it broke and how the end cap goes together, it is very difficult to repair with glue alone. The plastic is very thin in this area. The screw is threaded into a plastic "plug" that is inserted to a metal rod that runs the whole length of the cover. The rod stays stationary (it's held into place on the other end in the same manner) and is what the fabric and another tube rotates around to provide spring tension. I don't have a lot of pictures of the cover disassembled and can be difficult to explain, but if you're reading this you're likely familiar with how it goes together. However, this <a href="https://www.audizine.com/forum/showthread.php/464749-DIY-Fix-a-broken-cargo-cover">Audizine thread</a> gives some detail on how to take it apart and put back together, although it's specific to an Audi A6 Avant.</p> <p>The files I've uploaded are a replacement screw anchor/plug for the main metal rod and the repair part that is glued to the outside of the endcap. The screw anchor was quick to design and I figured it was a good idea to print one in case it gets lost or stripped out. The repair piece was designed to have a flange that is glued to the outside of the end cap. The taper and outside diameter of the cylindrical portion is critical since it needs to fit inside the locking tab piece that holds the cover into the cargo area trim panels. You may be required to scale the part in your slicer to get a good fit. The counterbore for the screw was designed to be at the same height so that thread engagement into the plastic anchor is the same. The flange thickness was made thick enough to provide strength while also allow the cargo cover to still fit in between the trim panels. You may need to cut out some of the counterbore with a knife depending on how much of an elephants foot you have on the first layer of the print so that the screw fits.</p> <p>Instructions:</p> <ol> <li>Print parts.</li> <li>End cap may require drilling with a 1/2" bit or be filed to open up the hole where it broke. You want a snug fit around the repair part.</li> <li>Sand the mating surfaces of the repair part and the end cap to improve adhesion for the epoxy. I would avoid using krazy glue or similar.</li> <li>After you apply the epoxy, make sure the repair part is lined up with the cutout for the locking tab.</li> <li>Allow epoxy to cure according to the manufacturers instructions.</li> <li>Reassemble cargo cover (see <a href="https://www.audizine.com/forum/showthread.php/464749-DIY-Fix-a-broken-cargo-cover">Audizine thread</a> for instructions).</li> <li>Install and enjoy your now functional cover!</li> </ol> <h3>Print Settings</h3> <p><strong>Printer Brand:</strong></p> <p>Ultimaker</p> <p><strong>Printer:</strong></p> <p>Ultimaker 2</p> <p><strong>Rafts:</strong></p> <p>No</p> <p><strong>Supports:</strong></p> <p>No</p> <p><strong>Resolution:</strong></p> <p>0.1mm</p> <p><strong>Infill:</strong></p> <p>100%</p> <p><strong>Filament:</strong> Doesn't Matter ABS</p> <p>Black</p> <p><strong>Notes:</strong></p> <p>Material selection is important since something like PLA can deform while inside the hot interior of a car. I used ABS to avoid any issues and for strength. Print with 100% infill.</p> <h3>Post-Printing</h3> <p>Counterbore for screw on repair part may require some cleanup depending on how much of a elephants foot there is on the first layer.</p> Category: Automotive
With this file you will be able to print B5 Avant Cargo Cover Repair with your 3D printer. Click on the button and save the file on your computer to work, edit or customize your design. You can also find more 3D designs for printers on B5 Avant Cargo Cover Repair.