B-Struder - E3D Hobb-goblin edition
prusaprinters
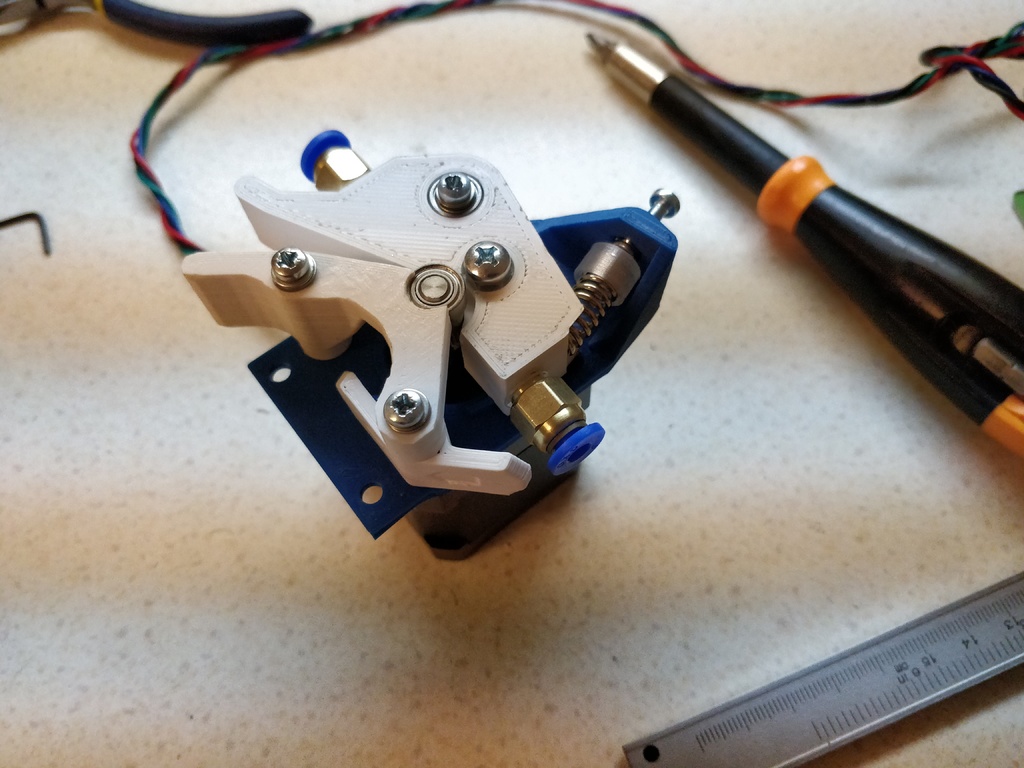
<p>So I came across the original B-Struder while searching for extruders. I like the design, but as I had some E3D Hobb-goblin drive gears, decided to remix the design to support those.</p> <p>Changes to original:</p> <ul> <li>basically the arm was re-designed from scratch in OpenSCAD to match Hobb-goblin gear</li> <li>the arm's filament path needs to be drilled open. See post-printing</li> <li>other parts (MR105zz_support, lock lever) extended in height as needed</li> <li>extended and added some bolt holes to the motor mount as I needed those for my own use (4mm hole, 29mm distance)</li> <li>lock lever has other 'arm' which should help operating it. I actually cannot use it due to space constraints (was a good idea but didn't check clearances...)</li> <li>added a spacer which can be used if one has MR105zz_support and lock lever from original thing</li> <li>added new spring cap for 8mm spring</li> </ul> <p>Most of the original instructions and part list apply. You will need a bit longer than 25mm M3 bolts for this. Also I'm not using the printed washers but those should fit fine.</p> <p>Source code: <a href="https://github.com/spegelius/3DModels/blob/master/B-struder_remix/b-struder_remix.scad">https://github.com/spegelius/3DModels/blob/master/B-struder_remix/b-struder_remix.scad</a></p> <h3>Print Settings</h3> <p><strong>Printer:</strong></p> <p>FrankedCube</p> <p class="detail-setting rafts"><strong>Rafts: </strong> <div><p>No</p></div> <p><strong>Supports:</strong></p> <p>Yes</p> <p class="detail-setting resolution"><strong>Resolution: </strong> <div><p>0.2mm</p></div> <p><strong>Infill:</strong></p> <p>50%</p> <p><strong>Filament:</strong></p> Esun? ABS <p>Any</p> <p><br/> <p class="detail-setting notes"><strong>Notes: </strong></p> </p><div><p>For the arm. 4perimeters and 50% infill. I used supports, but should work without those too if your printer and material like bridging.</p> The motor mount should be solid. Other parts 2-3 perimeters, 20+% infill. <h3>Post-Printing</h3> <p>After printing the arm, you need to drill out the filament path with 2mm drill bit. This is by design as I tried to maximize continuous perimeters around the filament path and drive gear hole.</p> <p>When printing, be careful to print straight! There's a small hole that should guide the drill bit, but the drill bit can still wander if not careful.</p> <p>The M6 push fittings should be possible to just screw them in. I haven't printed the arm without supports so don't know how well the threads work if printed without supports</p> </div></p></p> Category: 3D Printer Extruders
With this file you will be able to print B-Struder - E3D Hobb-goblin edition with your 3D printer. Click on the button and save the file on your computer to work, edit or customize your design. You can also find more 3D designs for printers on B-Struder - E3D Hobb-goblin edition.