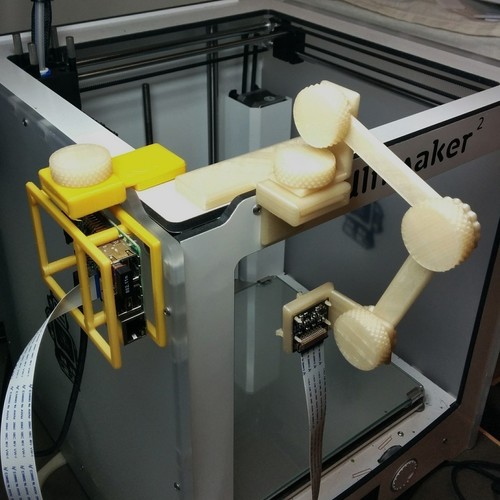
B+ Pi Cam Ultimaker 2 timelapse harness
pinshape
The assumption is that you already have a Raspberry Pi Model B+, any chosen Pi Camera module, an extension cable, and capture software for taking images etc. This modular harness will attach and support the Pi and camera module onto the front or side of an Ultimaker 2. The camera can be moved into any position and rotates as well so it can look down on your print, hang underneath to look directly at your print, face the front, or look from a corner. Note that the focal length of the PI Cam module is about 45cm. For this reason, you'll probably want to hotglue a +2.0 reading glass lens over the front of the module to get it back in the region of 20-25cm, where the camera actually sits from the center of the build plate. To assemble the pi, you will need a Pi Frame Front, a Pi Frame Back, a hook of your choice (depending on where you'll like to situate your Pi - I'd suggest the side) and a regular (non-long) bolt. Assembly should be pretty self-explanatory. For the camera mount, you will need the pi cam mount, the mount block, the hook of your choosing (I'd suggest the front), and a long bolt. You then need at least 2 arm pieces to give flexibility and a regular bolt for each. The mount block has threads so you need to bolt through the hole in the arm into the block. The same happens for the second arm. Press the Pi Camera Module into the camera head, which has locator pins and recesses for components on the camera board, so it will sit flush. The camera head should then bolt through to the top of the last arm piece. I also built a lens holder for photos instead of using hotglue, but I didn't include it in the files because chances are you won't have the same lens. You can take off 2mm from the camera head (taking you to the midpoint of the curves) and then build a 3mm plate to hold your lens. This should give enough clearance for the curved lens from a pair of reading glasses.
With this file you will be able to print B+ Pi Cam Ultimaker 2 timelapse harness with your 3D printer. Click on the button and save the file on your computer to work, edit or customize your design. You can also find more 3D designs for printers on B+ Pi Cam Ultimaker 2 timelapse harness.
