Axial Hotrod (V5)
prusaprinters
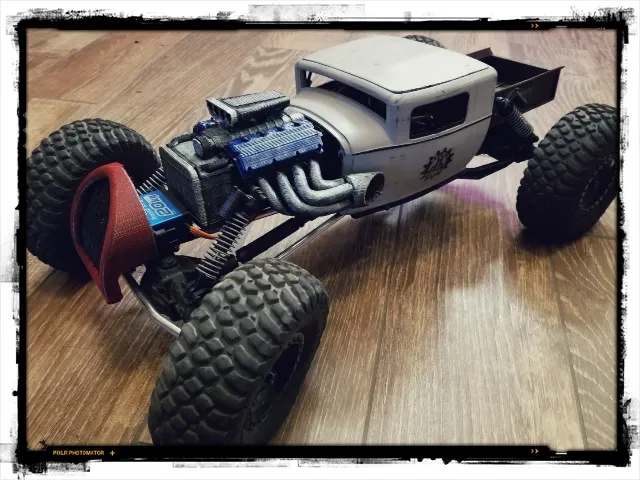
Loved the hot rod Ossum made so much I had to make one. I wanted it to be functional as an actual rock crawler so I put most of the weight up front and down low for steep climbs. I designed it to work with an axial ax10 wraith or scx10 style transmission with an extended output shaft I had laying around. I am using my old rr10 bomber drivelines and ar60 axles on 2.2 wheels and tires. This is designed to be printed on my anet a8 with a 220x220 mm bed, 200x200 is probably no problem as well. The overall wheel base is 380mm so its a monster. Rear links are 120mm Front Links 160mm Still need to finish the front battery tray for looks and shock mount is weak.but these files are drive able as you can see in the pictures. Update V2: Added assembled non print version. Updated battery tray (Unprinted) Radiator in front doesn't look great from my slicer, need comments on how to improve. maybe just reduce detail. I print at .3.. on this. Added Battery Lid (Unprinted) Not as easy to print as I would like and no mount system. so if your need this printed now, you can just drill holes down through the edges and install screws, or maybe double stick tape. Update V3: Ok so I didn't realize before I make an stl I should combine the parts into a single solid, then convert to stl. So some parts may print funky. Just fixed Battery tray, need to review other parts. Deleted old files, Should I do that? Going to need to beef up upper link mounts. Update 3.5 no upload at this time, but v4 will only use the same bed, roof and grill. old Cab, battery tray, battery lid and skid will not fit properly. so hold off printing those for now. Update v4 New skid with reinforced upper link mounts battery lid should clip in new battery tray new cab updated whole 3d view Update v4.1 Slight modification to gear thicken gear cover on battery tray. I'm not putting this as finalized yet, but its pretty damn close, I might add headlights to the battery tray, and it needs some testing, but I am printing it, and probably will not print any following versions myself, unless I find a major hidden flaw. Status after v4.1 I have reprinted most of the parts, not including the cab, I am using the original ossum cab printed at 80% height (found here https://www.myminifactory.com/object/3d-print-35986 with some body clips I printed and keep cutting down I will probably add later as an alternative method of assembly) . I have noticed the cab I designed "may" have issues fitting together during assembly. I didn't leave a whole lot of wiggle room preferring just to grind down the plastic with a rotary tool if necessary. if you have any issues or broken parts please let me know in the comments and I will attempt to fix them. Also after adding the spur gear shroud I realize the maxim spur that will fit under it is a 56t stock axial gear. If you want a larger 68t gear for low speed you will need to cut that wire safety shroud off. Drove this in the rocks for a few hours. Had no breaks. Everyone loved it The issue with assembly has to do with the screw holding in the front upper links. I used long screws that don't allow the battery tray and cab assembly to drop straight down to the chassis. The cab I modified may flex enough to fit depending on the hardware used. But I still haven't printed the current body to test. 7/27 added some other grill options. Added a battery tray with exhaust that is 3mm wider so it wont rub the doors as much during assembly, it also has a larger spur gear cover to fit larger spur gears (not sure how large, it can still go larger though). I'm calling this finished. Anything else I do will be optional upgrades. But will still fit previous versions. Here is the fusion 360 file of the complete build, if you use it please share you files with the rest of us. https://a360.co/2vtigru Here is a horrible youtube video of the thing in action https://youtu.be/UCwjHNRoGoQ 8/8/18: Added body clamps for origional body 8/11/18: Added Rollcage and Rollcage with spare tire mount thanks for the idea carlton267 8/25/18: I printed this current version finally, I see there are still changes I need to make concerning the mate between the Cab and Battery tray. Its possible to cram them together, or grind material away to assemble them easier, but it can also be fixed, so I should do that. 9/18/18: v5 OK, so I redesigned the way the cab mounts to the battery tray. So now the cab should be able to slide straight down over the tray and there is no forcing alignment. also the mount screws are more accessible, especially with long hex Drivers. Optionally I beefed up the back corners of the truck bed so the top tips aren't so easy to break. No changes to other parts. 9/25/18 Rotated Cab STL 12/3/2018 I recommend drilling 3mm holes between the bed and the cab and putting bolts between them, as there is a weak spot in the skid I have broken twice. mounting the bed to the cab would fix the issue. The weak spot is where the lower link screws go under the motor. 01/29/2019 (beta v6) Added the holes from the cab to the bed as recommended in previous comment. Overall I am very happy with the performance and durability of this car. As 3d printed parts fail I redesign them for extra durability in these areas. Right now the only issue I have is with the long screws that hold the lower links and the cab to the battery box. They grab the plastic so hard sometimes the screws fail during first assembly. I have not thought of a remedy or procedure to alive the issue other then drilling out the holes some. I am not wanting to bore out the holes in the stl in fear they might get too loose. 02/03/2019 updated the fusion 360 shared file to current version, its a hacked together file with excessive junk all over it, but that's my workflow. https://a360.co/2vtigru Print Settings Printer: Anet A8 Rafts: Doesn't Matter Supports: Yes Resolution: .30 Infill: 15% Notes: One important thing and this is my opinion. The infill is not as important as the perimeter shells for structural support. So I use a low infill and high shell count. This mostly applies to the skid and to a lesser extent the battery tray and truck bed as those are the main structural components. Perimeter/Shells 8 Top solid layers 8 Bottom solid layers 8 .4mm tip .48mm extrusion width .3mm layer height Adjust accordingly if you use different tip or layer height. How I Designed This Assmebly The Battery tray kind of needs to be smashed into the body as the exhaust rubs against the doors. It goes inside the cowl of the body I used long screws, magnets and a hot glue gun to attach the roof which worked out pretty good. Drill holes in the side of the truck bed where you want the shocks mounted and use a couple hex nuts to space them away from the bed. I used the 3rd hole from the front. Parts list Any of these parts can be substituted with a variety of R/C components but here is what I used. Transmission: Standard Ax10 style but with the extended output shaft. SCP38HT03 Extended Output Steel Gear Locked Transmission Gearbox Ax10 SC10 Or a standard AX10/SCX10/Wraith Transmission with Hot Racing SCP125E20. No idea if the extended output shaft is necessary. Motor: standard 550 or 540 r/c motor TRAILMASTER SPORT 550 27t. Pinion gear: 9t 32p or similar Pinion gears. Spur gear: I think mine is 68t 32p its too big (50mm) and I had to grind the motor mount plate for it to fit (also 68t wont fit under the wire safety shroud. The stock 56t 32p spur should also fit. You will also need a slipper clutch. AX31027 - Spur Gear 32P 56T. Drivelines:If you want metal drive lines, try the ones for the axial bomber. I used the short one in the rear end and the longest one in the front. There is not much tolerance around the top of the drive lines so don't buy any that look fatter then stock. AX31114 - WB8-HD Driveshaft. AX31148 - WB8-HD Driveshaft Coupler Set. 4x or metal driveshafts from super shafty, 101-126 and 148-170 https://supershafty.com/collections/drive-shafts/products/supershafty-mip-x-duty-driveline-kits-order-by-measurement Tires: Really you could use so many different R/C tires here. AX31325 - 2.2 BFGoodrich Baja T/A KR2 Tires - R35 Compound (2pcs). 2x Wheels:AX31326 - 2.2 Walker Evans Wheels - Black (2pcs). 2x Front axle: AX30831 - AR60 OCP Front Axle Set (Complete). Rear axle: Stock axle bomber/wraith ar60 rear axle (cant find complete so here is a front rear aluminum set (quality unknkown) 1 Set 1/10 RC Crawler Car Full Alloy Front And Rear Axles For Wraith 90018 Axial Free Shipping. Steering servo: This dirt cheap servo works pretty good for the price. But I prefer more expensive holmes hobbies servos. Power HD LW-20MG Waterproof Digital High Torque Servo. Battery:actual box dimensions 35mm x 48mm x 141mm True Spec Premium 11.1V 4500mAh 85Amps/90C. Transmitter/Reciever: Many options, at least 2ch, this is a good one. Spektrum DX5C. ESC: QuicRun WP Crawler Brushed. Shocks: any 90mm rc shocks, mine are off a scx10 II. Heavier springs should go in the front. THE ULTIMATE SCALE SHOCKS 90MM (SILVER). 4 link suspension rods: I made my own using 1/4 in steel rod from a local hardware store and traxxas rod ends. you need 4 at 120mm and 4 at 160mm eye to eye. On the rear I used some stock axial oes that were close to 120mm. Rod ends, Revo (large) with hollow balls (12). AX80083 - Wraith Links Set (rear). Screws: 300pcs M3 Black Alloy Steel Screws Bolt with Hex Nuts Washers Assortment. 100pcs 5 sizes assortment m3 x 20mm/25mm/30mm/35mm/40mm button head hex socket. Magnets: 3 x 2 mm Mini Disc Round Rare Earth Neodymium Magnets. Category: R/C Vehicles
With this file you will be able to print Axial Hotrod (V5) with your 3D printer. Click on the button and save the file on your computer to work, edit or customize your design. You can also find more 3D designs for printers on Axial Hotrod (V5).