AudioMoth Vault
prusaprinters
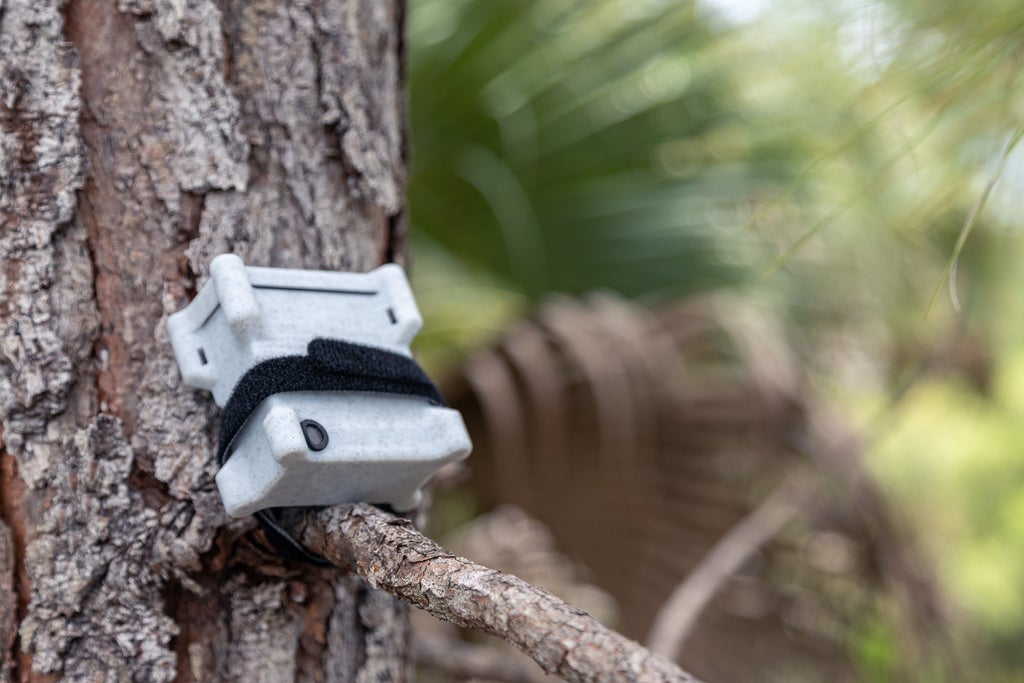
<h3>UPDATE: V3 IS OUT!!!</h3><p>It improves on this v1 in nearly every way. Check it out:</p><p><a href="https://www.prusaprinters.org/prints/56767-audiomoth-vault-v3">https://www.prusaprinters.org/prints/56767-audiomoth-vault-v3</a> </p><p>The original version below is deprecated, but entirely fine for less demanding environments, especially indoors.</p><p>----------<br/><br/>The <a href="https://www.openacousticdevices.info/">AudioMoth</a> is a low-cost, full-spectrum acoustic datalogger.</p><p>The <strong>AudioMoth Vault</strong> is a weather-resistant, magnetically-closed, easily-mounted case for your AudioMoth, which you can make with about $3 in materials, in under 3 hours, on any 3D printer.</p><p>Thanks to Bat Conservation International (BCI), initial prototypes have been field-tested in the cloud forests of Nyungwe National Park in Rwanda, limestone forests in Jamaica, and in the more urban (but tropical heat) of Miami. Check out the pictures of field usage above!</p><p><a href="https://youtu.be/S3YnExejDxc">See the design in action:</a></p><figure class="media"><oembed url="https://www.youtube.com/embed/S3YnExejDxc"></oembed></figure><p> </p><p><strong>Features include</strong>:</p><ul><li><strong>Flexible mounting options</strong>: Use velcro straps, zip ties, or rope. Channels at the top, plus indents in the middle, make it easy to securely attach to trees with a range of widths and swap the AudioMoth without remounting.</li><li><strong>Water Resistance</strong>: The O-ring provides water resistance (not water-proofness), is held in securely with a lip, and needs no glue. An acoustic membrane keeps the water out, but lets the sound in.</li><li><strong>Magnetic Closure</strong>: Instead of using plastic clips that will inevitably break, the Vault uses magnets, so you can open and close it an infinite number of times without breakage. Plus, they’re magnets so they’re fun to play with!</li><li><strong>Easy Opening</strong>: A lip on the lid eases opening, even when wet.</li><li><strong>Compatible with both versions of AudioMoth</strong>: Compatible with older ones with an overhanging power switch, as well as improved ones with a recessed power switch. This is the reason for some internal object features.</li></ul><p>If you find this case useful, post your Make, throw some love to BCI with a <a href="http://www.batcon.org/">donation</a>, and check out the <a href="http://www.batcon.org/">latest BCI news</a>. Thanks!</p><p> </p><p><a href="https://youtu.be/ei7f14mPKvI">See 3 cases getting printed at once</a></p><figure class="media"><oembed url="https://www.youtube.com/embed/ei7f14mPKvI"></oembed></figure><p> </p><p><a href="https://youtu.be/xPoKikuWNEY">Learn how to assemble one</a></p><figure class="media"><oembed url="https://www.youtube.com/embed/xPoKikuWNEY"></oembed></figure><p> </p><p><strong>Parts you’ll need</strong>:</p><ul><li><strong>Magnets</strong>: 6mm OD, 3mm height - find on Amazon</li><li><strong>O-ring</strong>: 1 5/8" ID, 1 3/4" OD, 1/16” thick, found at a local Ace - worked fine. Amazon link</li><li><strong>Acoustic membrane</strong>: 6mm ID, 10mm OD, adhesive backed. <a href="https://sinri.m.en.alibaba.com">Alibaba link for IP67-rated membranes</a> / <a href="https://sinri.en.alibaba.com/product/50042020774-817207262/Sinri_IP67_protective_waterproof_eptfe_acoustic_vent_membrane_for_speaker.html?spm=a2700.icbuShop.41413.20.48264bbdxXWH09">Specific Alibaba link</a> (SV-021)</li><li><strong>Super glue</strong>: Gorilla Super Glue Gel worked great for me, as the applicator tip made it easy to get to the deeper bottom surface of the main body of the case. <a href="https://sinri.en.alibaba.com/product/50042020774-817207262/Sinri_IP67_protective_waterproof_eptfe_acoustic_vent_membrane_for_speaker.html?spm=a2700.icbuShop.41413.20.48264bbdxXWH09">Amazon Link</a></li></ul><p> </p><p><strong>Assembly Instructions</strong></p><ul><li><a href="https://youtu.be/xPoKikuWNEY">Watch an assembly video</a></li><li>Make sure to glue the magnets in the same way for each part. Once glued, you won’t be able to take them out. Make sure to let the glue cure sufficiently before testing. Then, remove any excess glue from the top of the magnets to ensure the lid fits tightly, using an X-acto knife, screwdriver, spudger, or whatever you have.</li></ul><p><strong>Tools that may help:</strong></p><ul><li>If you print the holes slightly small, a 6mm reamer and a 6mm end mill can make it easy to get every hole perfectly-sized before inserting the 6mm magnets. Even with a well-tuned printer, these are helpful. Make sure to measure each hole with dial calipers before inserting any magnets.</li><li>A countersink tool can help clean up the magnet holes for smoother opening/closing.</li><li>An X-acto knife helps clean up the parts.</li></ul><p><strong>Design Notes:</strong></p><ul><li>If you’re looking for a custom-logo version, reach out.</li><li>To further enhance water resistance, you can put rubber bands around the case. You can print the parts flipped, so that the printer bed enables a perfectly flat surface for the O-ring to seal against. You can also slightly over-extrude when printing, to reduce the chance of any water intrusion outside of the O-ring.</li></ul><p><strong>Can’t find the parts?</strong></p><ul><li>The magnets aren’t truly necessary; in a pinch, you could replace them with 6mm dowels, even printed ones.</li><li>The O-ring isn’t truly necessary either; in a pinch, any squishable material could form the seal, like adhesive-backed neoprene, or rubber, or even printed urethane.<br/>As always - if you have comments, share them! I’d love to continue iterating the design based on feedback.</li></ul><h3>Print instructions</h3><h3>Print Settings</h3><p><strong>Printer:</strong> Custom Kossel</p><p><strong>Resolution:</strong> 0.2mm or finer</p><p><strong>Infill:</strong> 15%</p><p><strong>Filament:</strong> Any</p><p><strong>Notes:</strong></p><ul><li>Gently-sloped overhangs, tiny bridges, and few sharp corners make this an easy print. If the corners pop a bit, it won’t affect the usability.</li><li>Prints great with 15% infill, 2 perimeters, and 0.2mm layers with a 0.5 nozzle and 0.64 extrusion width (a value large enough to print the walls with fewer perimeters). Smaller layers and extrusion widths will only make it look smoother.</li><li>Most parts were printed conservatively on a custom Kossel delta at 60mm/s outer perimeters, 75 mm/s inner perimeters, and 90 mm/s infill, but even at 144 mm/s infill speeds I couldn’t tell a difference. You might be able to print this one really fast and still get great results.</li><li>PLA and PETG both work fine. PETG is recommended for the additional temperature range, especially if this will be in hot areas in direct sun and printed in black.</li></ul>
With this file you will be able to print AudioMoth Vault with your 3D printer. Click on the button and save the file on your computer to work, edit or customize your design. You can also find more 3D designs for printers on AudioMoth Vault.