Atomstack A5 Z-Axis
prusaprinters
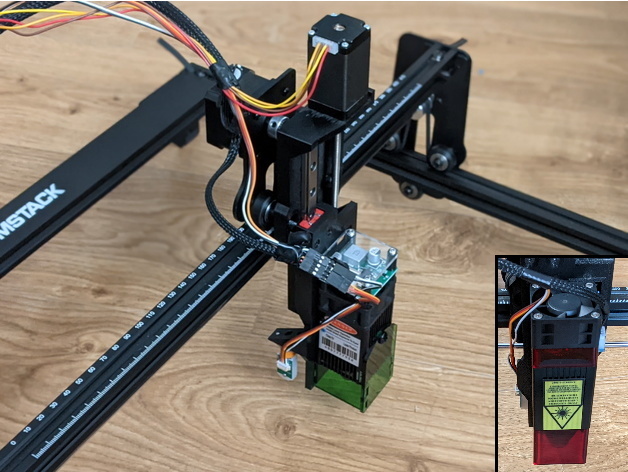
<p>Motorized Z-Axis for Atomstack A5.<br>(with mount for 3D touch sensor like BLTouch)</p><p>Effective Z-axis travel is between 100 to 110mm.<br>Additional weight on X-axis carriage is about 300 grams (690 -> 990).<br>Y-axis travel is reduced by about 18mm.<br>Touch sensor offsets: X-25 Y38.5 Z0 (LT-80W-LE-MINI: Z-1.5)</p><p>Both parts can be printed lying flat and without support.<br>Therefore, screw holes for the linear rail have a sacrificial layer that has to be be punched or drilled through.</p><p>Used additional parts:</p><ul><li>150mm MGN9 linear rail with a MGN9H carriage block</li><li>Nema 11 stepper motor with 150mm TR5x2 lead screw and (POM) nut (eg. 28SG51-150N52 from AliExpress)</li><li>(optional) 3D Touch Sensor (BLTouch or clone from e.g. Trianglelab)</li></ul><p>Needed screws:</p><ul><li>Linear rail: 8 pieces M3x8 cylinder head screws + 8 pieces M3 hexagon nuts</li><li>Linear rail carriage block: 4 pieces M3x8 countersunk screws</li><li>Motor: 4 pieces M2.5x5 cylinder head screws (may depend on motor!)</li><li>Lead screw nut: 3 pieces M3x6 or M3x8 (cylinder head) screws</li><li>Touch sensor: 2 pieces M3x4 or M3x6 cylinder head screws</li><li>LT-80W-LE-MINI laser module: 4 pieces M3x8 countersunk screws</li></ul><p>Additional air assist (v2.1):</p><ul><li>Pipes should be brass or other metal. Preferably with largest possible inner diameter (eg. 0.5mm wall thickness).</li><li>One piece of 2-3cm length and 5mm OD should be glued in the inlet hole into the top. This is to connect the (silicone) hose coming from the air pump.</li><li>Another piece of 20-22mm length and 3mm OD can be pushed into the outlet hole at the bottom. Preferably it should not protrude vertically, so it is protected against crashing into the work piece. Also countersinking the inner end might be beneficial for the air flow.</li></ul><p><strong>Update 2022-03-07 / laser-mount_v2.1:</strong></p><p>Improvements on the additional air assist:</p><ul><li>increased diameters for inlet pipe diameter and inner channel</li><li>outlet hole is now angled so that the nozzle can be a simple straight piece of pipe</li></ul><p><strong>Update 2021-12-20 / laser-mount_v2:</strong></p><p>I have replaced the laser module on my machine with a Laser Tree LT-80W-LE-MINI because of higher power and a better (square!) laser dot.<br>This is an easy replacement because the size matches and the power/signal plug and its pinout are identical.<br>Just mounting is a bit different, so laser-mount_v2 has additional screw holes. But of course it still can be used for the old laser module.</p><p>And another (yet untested) feature is that laser-mount_v2 has an air channel embedded in the vertical stiffening beam with exit holes on the front. This might be useful in case additional "real" air assist is needed. The idea is to push a short piece of 4mm OD brass pipe at the top to connect a hose. And another piece of 3mm OD brass pipe at the bottom that can be fittingly shaped to act as nozzle.</p><h3>Print Settings</h3><p><strong>Printer Brand:</strong></p><p>Prusa</p><p> </p><p><strong>Printer: </strong></p><p>I3 MK3S</p><p><strong>Rafts:</strong></p><p> </p><p>Doesn't Matter</p><p> </p><p><strong>Supports: </strong></p><p>No</p><p><strong>Resolution:</strong></p><p> </p><p>0.2</p><p> </p><p><strong>Infill: </strong></p><p>50</p><p><br><strong>Filament:</strong><br><br>DAS FILAMENT PETG black <br> </p><p><strong>Notes: </strong></p><p>perimeters: 6<br>top/bottom layers: 6/5</p><p>infill: cubic</p><p> </p><p> </p><p> </p><p> </p><p>Category: DIY</p>
With this file you will be able to print Atomstack A5 Z-Axis with your 3D printer. Click on the button and save the file on your computer to work, edit or customize your design. You can also find more 3D designs for printers on Atomstack A5 Z-Axis.