Artillery Sidewinder X1 / Genius illuminated bed cable side chain
prusaprinters
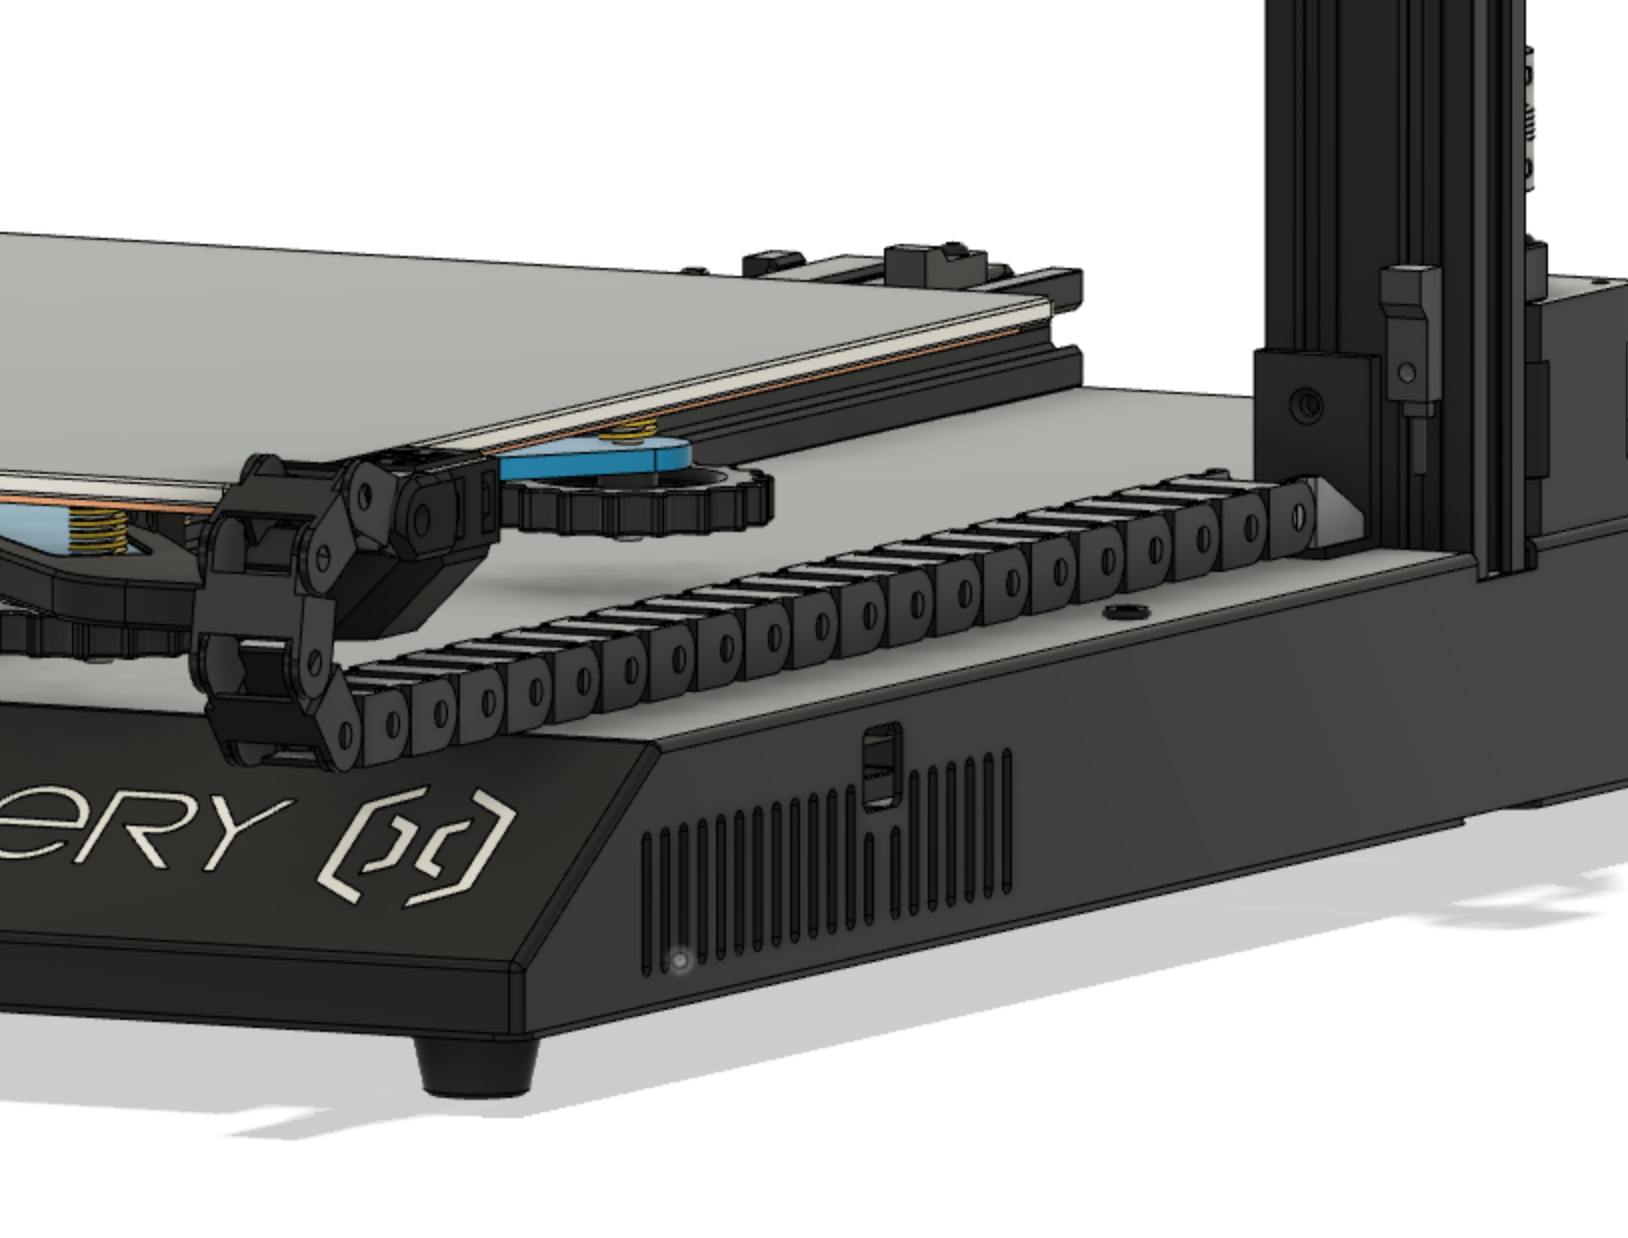
<p>The idea with this mod is to rotate the bed 90°, so that the bed wires come out the front right side instead of the back. That way, they can travel over the case rather than behind it, allowing the printer to be pushed back closer to a wall.</p><p>I had a few additional design goals:</p><ol><li>not require removing bed to add or remove the strain relief bracket</li><li>not interfere with Z endstop or limit Y travel</li><li>have a sweet illuminated logo</li></ol><p>In addition to the printed parts here, the design requires:</p><ul><li><a href="https://www.amazon.com/gp/product/B07WJ4CPF5/ref=ppx_yo_dt_b_asin_title_o01_s01?ie=UTF8&psc=1">10x15 cable chain</a></li><li>4x 45 mm M3 flat-head screws</li><li>2x 10 mm M3 flat-head screws</li><li>3x 6 mm M3 flat-head screws</li><li>2x 8 mm M3 flat-head screws</li><li>7x M3 hex nuts</li><li>2x M3 hammer T-nuts</li><li>small zip-ties for affixing cables</li></ul><p>For the illuminated bit, you also need a single Neopixel, and will need to print the file <code>top_cover-artillery_logo.stl</code> with a filament swap, with dark filament for the first ~0.8 mm and light filament for the remainder.</p><p> </p><p>Basic instructions (thanks to Popato):</p><p>1/- print the following files :</p><ul><li>top_cover-artillery_logo.stl (optional)</li><li>chain_arm_attach.stl</li><li>[printer]_clamp_arm.stl</li><li>chain_frame_attach.stl </li></ul><p>2/- Remove the 2 front knobs on the bed, insert the <code>clamp_arm</code> on the blue X that's on the correct side for the mod </p><p>3/- Screw the <code>chain_arm_attach</code> on top of the clamp_arm </p><p>4/- Remove the end part of the drag chain, and attach it to the <code>chain_arm_attach</code> instead </p><p>5/- Remove the extra length of drag chain </p><p>6/- Attach the <code>chain_frame_attach</code> to the other end of the cable </p><p>7/- Use t nuts to secure the <code>chain_frame_attach</code> in place with the vertical extrusion</p><p>To wire it up, remove the bed cables from the passthrough on the rear of the case and reroute them through the hole on the top of the case just inside the right Z extrusion profile. You will likely need to extend the wires. In my case, I just replaced them with high-quality 20 gauge silicone wire, using crimped connectors. </p><p>EDIT 2021-01-30:</p><p>I've designed a version of the bed attachment for the Genius. All the other parts should work identically.</p><p>I've also created a direct attachment to the cable chain to the frame, rather than the bolt-on attachment -- this should make mounting a little bit easier.</p><p>EDIT 2021-01-31:</p><p>The Genius attachment works <i>perfectly!</i> Due to the ability to make a positive mechanical connection with the geometry of the carriage, it may not even need the clamping screws -- a couple zip ties might be just fine.</p><p>I've also made a small fix to the chain_frame_pivot to receive the detent from the female side of the cable chain, which I'd previously neglected.</p><figure class="image"><img src="https://imgur.com/tdRChdm.mp4" alt="Imgur"></figure><p> </p><p>EDIT 2021-03-1:</p><p>I uploaded a new version of <code>chain_arm_attach.stl</code> to properly limit the pivot motion of the link where it attaches to the bed. The old version allows the last segment to bend too far upwards, potentially straining the wires. </p><p> </p>
With this file you will be able to print Artillery Sidewinder X1 / Genius illuminated bed cable side chain with your 3D printer. Click on the button and save the file on your computer to work, edit or customize your design. You can also find more 3D designs for printers on Artillery Sidewinder X1 / Genius illuminated bed cable side chain.