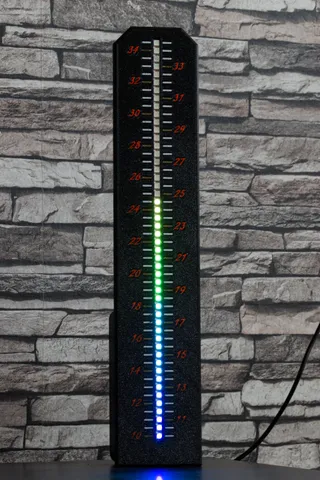
Arduino Thermometer
prusaprinters
Based on the work of Mirko Pavleski i've created this 3d printable design. The BOM remains the same, I used the Arduino Nano Every instead of an Arduino Nano, also I left out the switch for changing the display modes. The thermometer is powered by the micro USB cable from the Arduino.BOMArduino Nano Every DS18B20 Temperature Sensor50 LEDs WS2812B 144 Leds/m4.7k Ohm resistorWiringThe wiring diagram is from the original post. The LEDs actually only need to be soldered to the Arduino with 3 pins at the beginning. For the temperature sensor a 4.7k Ohm resistor is connected in parallel to the 5V data line. CADFirst I measured the LED strip (WS218B 144 LED/m) to get the right distance between the LEDs. Then I inserted the numbers and markings for 0.5°C steps. I made the cutouts so that I can print it with several colors. For this I created individual bodies and combined them as a group, so that they can be imported again as a model in the slicer.For the Arduino I just put a small box on the backside. The cables can be hidden there nicely and you can also set it up with it. The Arduino I have fixed in the box just with hot glue.PrintingPrinted this on my Hevo with 420x420x400 build space and a Palette 2S Pro attached, the numbers are orange, the strokes right at the numbers in 1°C increments are gold and the rest of the strokes are white. I also have a PEI Texure Sheet on there as well, which makes a nice surface that looks like it is powder coated.The LED strips are easy to slide in from the bottom. In the wiring, I left out the push button because I only want the mode where you can see a line in the different colors (blue to red). Also, I found an error in the program code where in the line display was not updating correctly. I fixed that and corrected the offset because the displayed temperature was slightly off. Code#include "Wire.h" // imports the wire library for talking over I2C #include <OneWire.h> #include <DallasTemperature.h> #include <Adafruit_NeoPixel.h> #define ONE_WIRE_BUS 5 OneWire oneWire(ONE_WIRE_BUS); DallasTemperature sensors(&oneWire); float Celcius=0; int buttonPin = 2; // momentary push button on pin 0 int oldButtonVal = 0; #define NUM_PIXEL 50 #define PIN 6 Adafruit_NeoPixel strip = Adafruit_NeoPixel(NUM_PIXEL, PIN, NEO_GRB + NEO_KHZ800); int nPatterns = 3; int lightPattern = 2; int out =0; int t =0; void setup() { Serial.begin(9600); //turn on serial monitor strip.begin(); clearStrip(); strip.show(); strip.setBrightness(2); pinMode(buttonPin, INPUT); digitalWrite(buttonPin, HIGH); // button pin is HIGH, so it drops to 0 if pressed sensors.begin(); } void testing(){ for(int L = 0; L<50; L++) { clearStrip(); strip.setPixelColor(L,wheel(((205+(L*3)) & 255)));//Gradient from blue (cold) to green (ok) to red (warm), first value here 205 = start color, second value here 42 = end color strip.show(); delay(100); } for(int L = 49; L>=0; L--) { clearStrip(); strip.setPixelColor(L,wheel(((205+(L*3)) & 255)));//Gradient from blue (cold) to green (ok) to red (warm), first value here 205 = start color, second value here 42 = end color strip.show(); delay(100); } delay(1000); } void dot() { sensors.requestTemperatures(); Celcius=sensors.getTempCByIndex(0)*2-1.5; int t = map(Celcius, 20, 70, 0, NUM_PIXEL); for(uint16_t L = 0; L<t; L++) { clearStrip(); strip.setPixelColor(L,wheel(((205+(L*3)) & 255))); //Gradient from blue (cold) to green (ok) to red (warm), first value here 205 = start color, second value here 42 = end color } strip.show(); //Output on strip Serial.print("The Temperature is: "); //Serial.print(Celcius); Serial.print(sensors.getTempCByIndex(0)); delay(1000); } void line() { sensors.requestTemperatures(); Celcius=sensors.getTempCByIndex(0)*2-1.75; int t = map(Celcius, 20, 70, 0, NUM_PIXEL); for(uint16_t L = 0; L<t; L++) { strip.setPixelColor(L,wheel(((205+(L*3)) & 255))); //Gradient from blue (cold) to green (ok) to red (warm), first value here 205 = start color, second value here 42 = end color } strip.show(); //Output on strip Serial.print("The Temperature is: "); //Serial.print(Celcius); Serial.print(sensors.getTempCByIndex(0)-1.75); delay(1000); clearStrip(); } void loop() { // read that stapressurete of the pushbutton value; int buttonVal = digitalRead(buttonPin); if (buttonVal == LOW && oldButtonVal == HIGH) {// button has just been pressed lightPattern = lightPattern + 1; } if (lightPattern > nPatterns) lightPattern = 1; oldButtonVal = buttonVal; switch(lightPattern) { case 1: dot(); break; case 2: line(); break; case 3: testing(); break; } } //Color wheel ################################################################ uint32_t wheel(byte WheelPos) { if(WheelPos < 85) { return strip.Color(WheelPos * 3, 255 - WheelPos * 3, 0); } else if(WheelPos < 205) { WheelPos -= 85; return strip.Color(255 - WheelPos * 3, 0, WheelPos * 3); } else { WheelPos -= 205; return strip.Color(0, WheelPos * 3, 255 - WheelPos * 3); } } void clearStrip(){ for(int i = 0; i < NUM_PIXEL; i++) { strip.setPixelColor(i, 0); } }
With this file you will be able to print Arduino Thermometer with your 3D printer. Click on the button and save the file on your computer to work, edit or customize your design. You can also find more 3D designs for printers on Arduino Thermometer.
