Arduino Stream Deck
prusaprinters
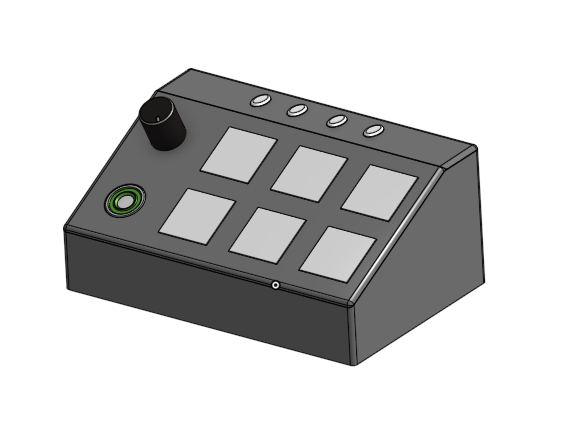
<p>This stream deck was designed as an open source tool to allow the user more efficient control over their pc and workflow. All of the code, information and progress updates will be published to my github repo found here <a href="https://github.com/Tysonrm1/Arduino-Stream-Deck">https://github.com/Tysonrm1/Arduino-Stream-Deck</a>. If you have feature requests, ideas on how to improve the product or are interested in contributing you can send me a message and I will do my best to reply when I get a chance. I designed this to be budget friendly while still maintaining an acceptable amount of features. As this was not initially created to be posted. The circuitry and design is all handmade and will require a basic understanding of how to create perf board circuitry and the troubleshooting that comes with it I recommend starting with the usb port fitment guide because it is the most difficult part to solder and requires fairly accurate dimensions.</p><p>To build this project you will need have at least a basic knowledge and understanding of soldering and building perf board circuits.</p><p>The parts I used in this stream deck are listed as follows.</p><ul><li>24x or 32x 5mm momentary push buttons depending on which top plate you print. I purchased this set off of amazon <a href="https://amzn.to/3vsRNdS">https://amzn.to/3vsRNdS</a> </li><li>1x rotary encoder. I purchased this set of 5 from WayinTop <a href="https://amzn.to/3rUyA2r">https://amzn.to/3rUyA2r</a> </li><li>1x 16mm diameter latching toggle push button. I couldn't find the exact one that I used for this build but any 16mm toggle like the ones linked should work <a href="https://amzn.to/37SqHUj">https://amzn.to/37SqHUj</a></li><li>1x arduino uno r3. I used the uno because I had one lying around but it is possible to adapt this to work with other microcontrollers. If requested I can revisit the design and work on adding compatibility.</li><li>3x 3cm x 7cm perfboard, 2x 2cm x 8cm perfboard, 1x 4cm x 6cm perfboard, and various pins and headers. I bought this kit that lasted me around a year and a half over various projects <a href="https://amzn.to/38yPlsV">https://amzn.to/38yPlsV</a></li><li>various wire, I use old dupont wires that had long since had the crimped connections fall apart though this could be any wire within reason.</li><li>I also recommend getting Jst connectors to allow for a much easier time disconnecting and reconnecting all of the buttons on the top plate from the arduino when disassembling to troubleshoot. <a href="https://amzn.to/37SCYrV">https://amzn.to/37SCYrV</a> </li><li>11x or 13x M3 heat set inserts depending on which top plate was printed. I linked the pack that I used but any with similar dimensions will work <a href="https://amzn.to/3rYByTF">https://amzn.to/3rYByTF</a></li><li>2x or 4x 12mm M3 socket head cap screws depending on which top plate was printed, 9x 8mm M3 Socket head cap Screws. I bought this pack <a href="https://amzn.to/3rYByTF">https://amzn.to/3rYByTF</a> quite a while ago but any will work.</li></ul><p>I will answer any questions I receive and can make changes as needed. this will all be uploaded on my github <a href="https://github.com/Tysonrm1/Arduino-Stream-Deck">https://github.com/Tysonrm1/Arduino-Stream-Deck</a> as well as all the code and instructions.</p>
With this file you will be able to print Arduino Stream Deck with your 3D printer. Click on the button and save the file on your computer to work, edit or customize your design. You can also find more 3D designs for printers on Arduino Stream Deck.