Arduino Robotic Arm (OPEN SOURCE) + Python control APP + EXTRAS
prusaprinters
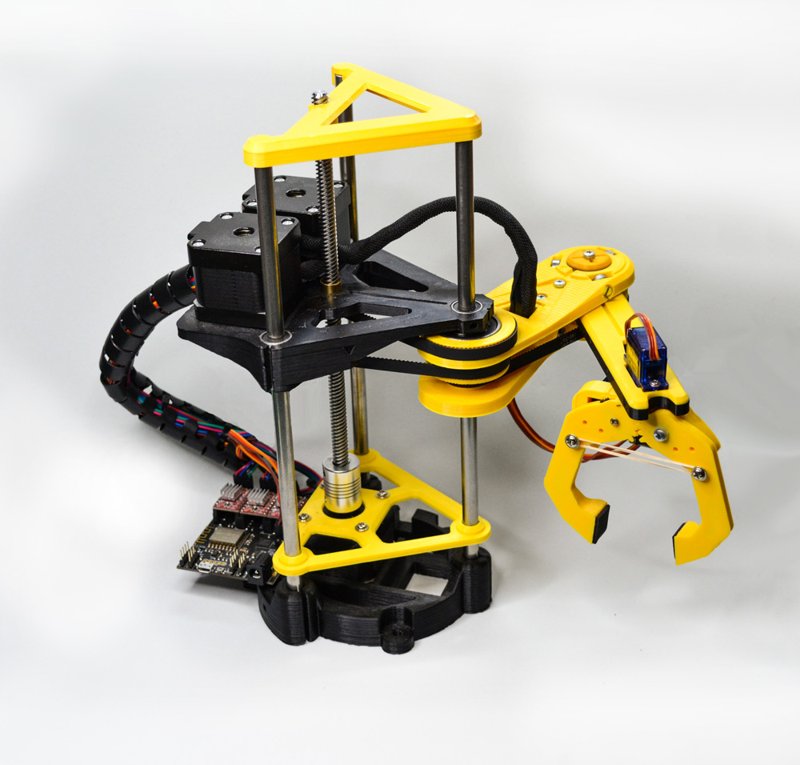
<p>This 3D printed Pybot SCARA Robotic arm has been created using common and affordable elements from the 3D printed World (NEMA 17 motors, Linear bearings, timing belts...)</p> <p>The idea was to create a reliable, fast, modifiable and accurate Robotic Arm for everyone who wants to have a very cool desktop robot and/or anyone willing to learn robotics and mechanics. The control APP has been created with Python</p> <h3>Print instructions</h3><p><img alt="" height="300" src="https://www.jjrobots.com/wp-content/uploads/2019/10/pyBot-Robotic-Arm-Thingiverse.png" style="display: block; margin-left: auto; margin-right: auto;" width="643"/></p> <p>This <strong>3D printed Pybot SCARA Robotic arm</strong> has been created using <strong>common</strong> and affordable elements from the <strong>3D printed World</strong> (NEMA 17 motors, Linear bearings, timing belts...)</p> <p>The idea was to create a <strong>reliable</strong>, <strong>fast</strong>, <strong>modifiable </strong>and <strong>accurate</strong> Robotic Arm for everyone who wants to have a very cool desktop robot and/or anyone willing to learn robotics and mechanics. The control APP has been created with Python</p> <p><img alt="" height="100" src="https://www.jjrobots.com/wp-content/uploads/2019/09/python-logo.jpg" style="display: block; margin-left: auto; margin-right: auto;" width="330"/></p> <p><strong>Robotic Arm Stages of </strong> <a href="https://www.jjrobots.com/robotic-arm-scara-project-updates/"><strong>project development</strong></a></p> <p><strong>Robotic Arm </strong> <a href="https://sketchfab.com/3d-models/scara-robotic-arm-by-jjrobots-6db379cb0c064c2e8d0e7fd01469bf44"><strong>3D interactive model</strong></a></p> <p>We have written a <a href="https://www.jjrobots.com/scara-robotic-arm-assembly-guide/"><strong>detailed assembly guide</strong></a>, explained the <strong><a href="https://www.jjrobots.com/robotic-arm-mechanical-design/">Mechanical design</a></strong> and <strong><a href="https://www.jjrobots.com/pybot-control-app-code-arduino-code/">code</a></strong> on its landing webpage : <a href="https://www.jjrobots.com/scara-robotic-arm-by-jjrobots/">https://www.jjrobots.com/scara-robotic-arm-by-jjrobots/</a></p> <p>The control code has been written in <strong>PYTHON</strong> and it has been thoroughly explained and commented for easy understanding.</p> <p>The control APP for MacOS and Windows is freely available and 100% OPEN. <a href="https://www.jjrobots.com/pybot-robotic-arm-control-app-user-guide/"><strong>User guide here</strong></a></p> <p>All the links to code, assembly guides...etc can be found here: <a href="https://www.jjrobots.com/scara-robotic-arm-by-jjrobots/">https://www.jjrobots.com/scara-robotic-arm-by-jjrobots/</a></p> <p><strong>Repeatability test</strong> <a href="https://www.jjrobots.com/wp-content/uploads/2019/09/Robotic-ARM-repeatability-Test.mp4"><strong>video</strong></a></p> <p><strong>NEW!:</strong>Added Xbox/PS4 controller. Now you can control the pyBot Robotic arm using your PS4/Xbox controller</p> <p> </p> <p>************************************************************************************************</p> <p>If you want to <strong>save the hassle</strong> of getting the different elements from different sources and want them all fast, create your own <a href="https://www.jjrobots.com/product/pybot-robotic-arm/"><strong>custom Robotic KIT here</strong></a> (and add what <strong>you really need</strong>)</p> <p>************************************************************************************************</p><p>All the parts are easy to print but you will need to <strong>add SUPPORT to two</strong>:<br/><strong>REDUCTION</strong> and <strong>FOREARM</strong>. In the images attached to the gallery you will see the recommended <strong>orientation</strong> for every element to be printed.<br/><strong>Gently</strong> remove the support once printed.</p> <p>The <strong>REDUCTION</strong> part is a <span style="color: #ff0000;"><strong>critical part of the robot.</strong></span> Print is <strong>slowly</strong>.</p><p><h3>Features:</h3></p> <p><ul></ul></p> <p><li><a href="https://blockly-games.appspot.com/"><strong>Google Blockly</strong></a> controllable</li></p> <p><li><strong>Trajectory</strong> movement (you can add up to 20.000 trajectory points)</li></p> <p><li><strong>Real Time</strong> control</li></p> <p><li><a href="https://www.leapmotion.com/"><strong>Leap Motion</strong></a> control</li></p> <p><li><strong>Artificial vision</strong> control <strong>OPENCV</strong> (Use your webcam to tell the robot what to do)</li></p> <p><li><strong>100% OPEN SOURCE</strong> (Arduino control board and Python control code)</li></p> <p><li>Control it via <strong>USB</strong> or <strong>WIFI</strong></li></p> <p><li><strong>Smartphone</strong>/ <strong>Tablet</strong> control APP (for iOS and Android devices) F<strong>ree A</strong><strong>PPs</strong></li></p> <p><li>Control it <strong>using a Xbox or PS4</strong> controller</li><br/> </ul></p> <p><h3> </h3></p> <p><h3>Mechanical Specifications:</h3></p> <p><ul aria-autocomplete="list" aria-label="Write list…" aria-multiline="true" class="block-editor-rich-text__editable editor-rich-text__editable" contenteditable="true" data-is-placeholder-visible="false" role="textbox"></ul></p> <p><li><strong>Robot frame total height</strong>: 270 mm.</li></p> <p><li>Nº of axis: <strong>3</strong> (arm) + <strong>2</strong> (clamp)</li></p> <p><li><strong>Working height with the clamp mounted</strong>: 145 mm</li></p> <p><li><strong>Arm (extended) length</strong>: 24 cms</li></p> <p><li><strong>Working area</strong>: 1190 cm2</li></p> <p><li><strong>Horizontal max. speed</strong>: 220 mm/s</li></p> <p><li><strong>Vertical max speed:</strong> 55 mm/s</li></p> <p><li><strong>Total Weight</strong>: 2120 grams</li></p> <p><li><strong>Repeatability</strong> (mm): 0.4mm</li></p> <p><li>Maximum <strong>Payload</strong> Capacity (arm extended) = approx. 150 g</li></p> <p><li><strong>Range of motion</strong> per axis: Arm: ~190<strong>°</strong> Forearm: ~280<strong>°</strong></li></p> <p><li><strong>Driving</strong> motors: 3x <strong>NEMA17 1.8° stepper motor</strong></li></p> <p><li>Gripper / Actuator <strong>drivers</strong>: 2x SG90 /MG90 / MG92R servos</li><br/> </ul></p> <p> </p> <p><img alt="Scara Robotic Arm GRIPPER (2 DOF)" height="250" src="https://www.jjrobots.com/wp-content/uploads/2019/10/SCARA-CLAMP-LOOP.gif" style="display: block; margin-left: auto; margin-right: auto;" width="369"/></p> <p> </p><p><h3>Direct links</h3></p> <p><li><a href="https://www.jjrobots.com/scara-robotic-arm-assembly-guide/"><strong>Assembly guide</strong>: A complete step-by-step guide to create your own Robotic Arm </a></li></p> <p><li><a href="https://www.jjrobots.com/pybot-control-app-code-arduino-code/"><strong>Arduino code:</strong></a> The <a href="https://www.jjrobots.com/pybot-control-app-code-arduino-code/">code</a> in charge of controlling the pyBot Robotic Arm. To be uploaded to the DEVIA control board</li></p> <p><li><a href="https://www.jjrobots.com/pybot-control-app-code-arduino-code/">CONTROL APP <strong>Python</strong> code</a></li></p> <p><li><a href="https://www.jjrobots.com/pybot-robotic-arm-control-app-user-guide/"><strong>Control APP</strong>:<strong> User guide</strong></a>, links to Python code <strong></strong></li></p> <p><li>pyBot <strong>3D parts models</strong> <a href="https://www.jjrobots.com/wp-content/uploads/2019/09/pybot-Robotic-Arm-3D-MODELS-IGES-V11.zip">(.<strong>iges </strong>file format)</a></li></p> <p><li><a href="https://www.jjrobots.com/robotic-arm-mechanical-design/">pyBot Robotic Arm: <strong>Mechanical guide </strong></a><strong></strong></li></p> <p><li><a href="https://www.jjrobots.com/robotic-arm-electronics-how-to-control-the-robotic-arm/">pyBot Robotics Arm: <strong>Electronics guide</strong></a> <strong></strong></li></p> <p><li><a href="https://www.jjrobots.com/robotic-arm-gripper-2-degrees-of-freedom/">Robotic Arm <strong>Gripper</strong></a></li></p> <p><li><a href="https://www.jjrobots.com/product/devia-robotics-control-board-v1-0/"><strong>DEVIA</strong> Control Board</a></li><br/> </ul></p> <p>************************************************************************************************</p> <p><img alt="Scara Robotic Arm GRIPPER (2 DOF)" height="388" src="https://cdn.thingiverse.com/assets/2d/9a/91/cf/79/xbox_controller_1_1.gif" style="display: block; margin-left: auto; margin-right: auto;" width="640"/></p> <p> </p><p><img alt="Scara Robotic Arm GRIPPER (2 DOF)" height="388" src="https://cdn.thingiverse.com/assets/87/ce/34/f0/af/picking_up_MandM_1_1.gif" style="display: block; margin-left: auto; margin-right: auto;" width="640"/></p> <p> </p> <p><img alt="Scara Robotic Arm GRIPPER (2 DOF)" height="480" src="https://cdn.thingiverse.com/assets/7e/c2/26/55/e0/Gcode-interpreter.gif" style="display: block; margin-left: auto; margin-right: auto;" width="264"/></p> <p> </p><p><img alt="Scara Robotic Arm GRIPPER (2 DOF)" height="388" src="https://cdn.thingiverse.com/assets/72/22/23/6f/8e/Google_Blockly_pyBot_1_1.gif" style="display: block; margin-left: auto; margin-right: auto;" width="640"/></p> <p> </p>
With this file you will be able to print Arduino Robotic Arm (OPEN SOURCE) + Python control APP + EXTRAS with your 3D printer. Click on the button and save the file on your computer to work, edit or customize your design. You can also find more 3D designs for printers on Arduino Robotic Arm (OPEN SOURCE) + Python control APP + EXTRAS.