Arduino Dice System
thingiverse
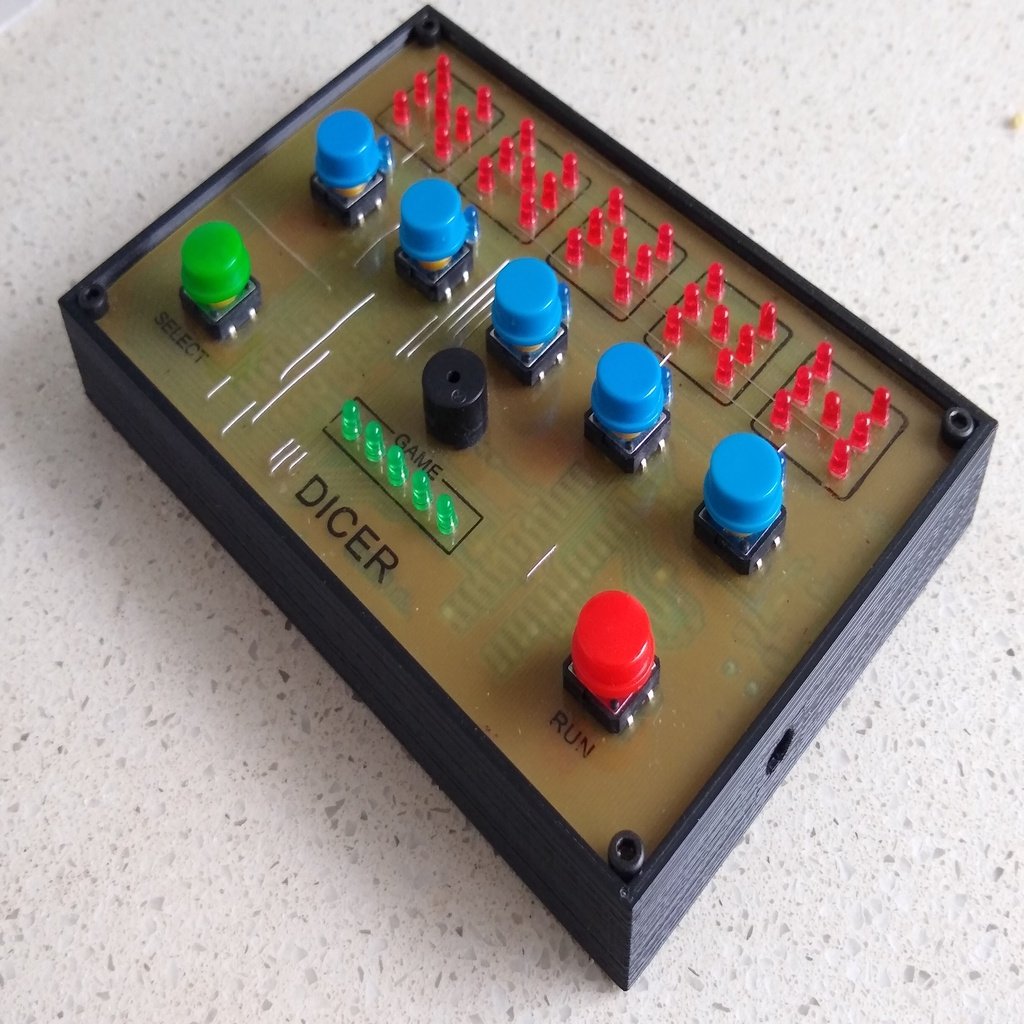
This electronic dice system is based on a concept by mbedni (https://www.hackster.io/mbedni/the-dicer-788d6a).\r\n\r\nVideo\r\n---------\r\nhttps://youtu.be/1oj1bzX5WPM\r\n\r\nDesign\r\n--------\r\nThe electronic dice system's design centers around the layout of the printed circuit board, which doubles as a simple box created using OpenSCAD. The PCB becomes the front panel, with all non-user-required components mounted on the back. To use DIP packages for both ATMEGA328 and MAX7219 chips, standard IC sockets are installed on the back by flattening out the pins and soldering them like an SMD device.\r\n\r\nGames\r\n-------\r\nGreen LEDs indicate which game is active. The Green SELECT button exits a current game and allows selection of a new game. Games include:\r\n\r\n1. Dice - Simple dice game: Press the blue button corresponding to the number of dice you want to play with, then press the PLAY button to roll them.\r\n\r\n2. Poker - Press the PLAY button and all 5 dice will roll. Use blue buttons to select which dice to hold, then press the PLAY button again for non-held dice to roll again. The system flashes winning dice.\r\n\r\n3. Craps - Press PLAY and left two dice roll. If a 7 or 11 appears, you win; if a 2 or 3 or 12 appears, you lose. Any other value means playing again. This time only right two dice roll. If left two dice and right two dice match, you win; if you throw a 7 on the right two dice, you lose.\r\n\r\n4. Yahtzee - Press PLAY and all 5 dice will roll. Use blue buttons to select which dice to hold, then press the PLAY button again for non-selected dice to roll. You can repeat this process up to three times.\r\n\r\n5. Duel - Press PLAY and left two dice and right two dice will roll. Each pair represents a player. The player with the higher dice value gets to move their car; the amount moved is based on the difference between the values of the two players' dice.\r\n\r\nPrinting/Assembly\r\n-----------------\r\nEagle files for Schematic and PCB layout are included. I made my board using the toner method. The top side board was also printed with the toner method.\r\n\r\nThe 3D printing of the box is straightforward: Drill out the PCB mount holes with a 2.5mm drill, then create a thread using a 3mm tap. Use M3 x 8mm screws to mount the PCB.\r\n\r\nParts used\r\n----------\r\n1 x ATMEGA328\r\n1 x MAX7219\r\n1 x 78M05 (5V SMD regulator)\r\n3 x 0.1uF 1206\r\n1 x 10uF 1206 non-polar\r\n1 x 220uF 10V 7343\r\n1 x TECHNIK SMD power socket\r\n5 x 3mm Green LED\r\n5 x 3mm Blue LED\r\n35 x 3mm Red LED\r\n1 x 16Mhz CSTCR6M Crystal Filter\r\n1 x 22K 1206\r\n1 x 10K 1206\r\n1 x 5K1 1206\r\n1 x 4K7 1206\r\n2 x 3K3 1206\r\n2 x 2K7 1206\r\n4 x 1K 1206\r\n7 x 12mm x 12mm Tactile switches\r\n1 x Passive Buzzer 47\r\n1 x 28 Pin IC Socket\r\n1 x 24 Pin IC Socket\r\n1 x 6 Pin SMD Straight pin header\r\n\r\nSoftware\r\n---------\r\nSketch included - code is documented.
With this file you will be able to print Arduino Dice System with your 3D printer. Click on the button and save the file on your computer to work, edit or customize your design. You can also find more 3D designs for printers on Arduino Dice System.
