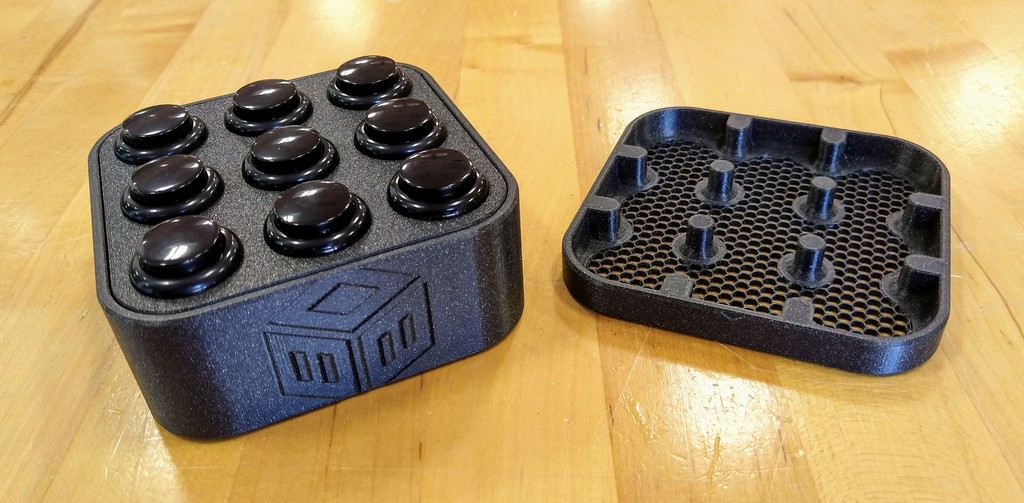
Arcade Button Panel
prusaprinters
<p>Inspired by Maker's Muse's Macro Keyboard: <a href="https://www.youtube.com/watch?v=MeYuIWGqquE">https://www.youtube.com/watch?v=MeYuIWGqquE</a></p> <p>A simple 3x3 arcade button panel for use as a macro controller, stream deck, or any other key-related needs. Design is held together with 6x2mm magnets embedded mid-print using PrusaSlicer's change filament feature (or Cura/M600 command). Sanwa OBSF-24 or other 24mm buttons should fit (I used knockoffs).</p> <p>Fusion File: <a href="https://a360.co/2yvyi5L">https://a360.co/2yvyi5L</a></p> <p><em>Bottom</em> has a hole, but no logo, so add your own! <em>Bottom_Logo</em> has both a hole and the Syber-Space logo (as in picture) <em>Bottom_NoHole</em> has no logo or hole, so add your own!</p> <p>STEP file is provided, as is fusion link, so that other designs and logos can be made!</p> <p>UPDATE 1: Lid, Lid_Logo, and Lid_ModifierMesh added. Lid slides a little, so further work may be needed. Magnet locations are inset further to avoid the lid pulling the top off.</p> <h3>Print Settings</h3> <p><strong>Printer Brand:</strong></p> <p>Prusa</p> <p class="detail-setting printer"><strong>Printer: </strong> <div><p>I3 MK3S</p></div> <p><strong>Rafts:</strong></p> <p>No</p> <p class="detail-setting supports"><strong>Supports: </strong> <div><p>No</p></div> <p><strong>Resolution:</strong></p> <p>0.15mm</p> <p class="detail-setting infill"><strong>Infill: </strong> <div><p>20%</p></div> <p><strong>Filament:</strong> Prusament PLA Galaxy Black</p> <p><br/> <p class="detail-setting notes"><strong>Notes: </strong></p> </p><div><p>Use a layer viewer to determine the correct height to add the M600 commands for the magnet placement. 6mm diameter (1.8mm tall) magnets should fit into the holes reasonably snugly and will be covered when the print completes. Layer height doesn't matter much, but I wouldn't go over 0.2mm layers to avoid issues with the magnet slots.</p> UPDATE 1: If using PrusaSlicer the*Lid\_ModifierMesh* can be loaded with the lid of choice to achieve interesting effects. I used hexagonal (honeycomb) infill at 0° and 20% with no top, bottom, or perimeters to achieve the effect in the pictures. Make sure to add a filament change for inserting the magnets. <h3>Post-Printing</h3> <p><strong>Programming and Wiring</strong></p> <p>Code based on: <a href="https://www.partsnotincluded.com/electronics/diy-stream-deck-mini-macro-keyboard/">https://www.partsnotincluded.com/electronics/diy-stream-deck-mini-macro-keyboard/</a></p> <p>Simply flash the provided arduino script to the board to use the keys as F13-F21, or modify it if needed to use other keys. I have kept mine as function keys and used AutoHotKey like this:</p> <p>F13:: Send, {Key here, with brackets if special} return</p> <p>Wiring is as simple as possible, using internal pull-up resistors, so all that is needed is a pro micro, 9 switches, a reprogramming switch (not needed, but helpful if you need to reprogram the arduino), and wire. I also used a USB-B socket to make the connection cleaner, though you could run the cable directly in.</p> <h3>How I Designed This</h3> <p><strong>Design</strong></p> <p>This model was designed in Fusion 360 to be printed without supports, using the M600 command to insert magnets for a seamless snap-on top.</p> <p>I sourced these parts, but anything similar should work.</p> <p>Buttons: https://smile.amazon.com/gp/product/B01LWQ9YN5</p> <p>Pro Micro: https://smile.amazon.com/gp/product/B012FOV17O</p> <p>Magnets: https://smile.amazon.com/gp/product/B07N12QFRT</p> <p>USB-B: https://smile.amazon.com/gp/product/B00EZK6I3O</p> </div></p></p></p> Category: Gadgets
With this file you will be able to print Arcade Button Panel with your 3D printer. Click on the button and save the file on your computer to work, edit or customize your design. You can also find more 3D designs for printers on Arcade Button Panel.
