Aquila OOTBDD with Armadillo flex mount
prusaprinters
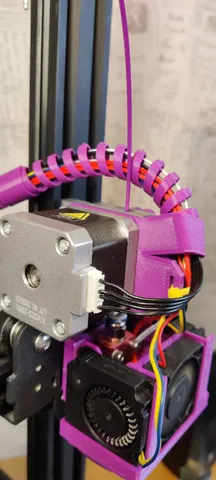
I have an original Aquila and use the minimus shroud and armadillo 10mm flex system (links below) so modified the original 3DPrintSOS adaptor to include the flex holder. The holder (when viewed from the front) is angled to the right and back. This helps avoid the filament touching the armadillo cable management even when printing as far as right as possible.Update 11/3/23 I've added another file with a thicker backplate (6.5mm v 4.5mm printed). I found after a week of use the motor was loose as the screws had bottomed out. I measured the combined thickness of my metal extruder baseplate (i'd replaced the stock one) and the aquila mounting point and combined they were 6.5mm. I suppose I could have just used spacer washers but I thought of that after starting the print! I will own up that I just used Onshape to add the extra thickness quickly, but it is still watertight in cura. I recommend you measure the combined thickness of your existing mount before selecting the STL. See the original for print settings (I followed them).Links to Minimus Shroud and Armadillo flex (you don't need the shroud &backplate for this, but they do fit with the OOTDD)https://cults3d.com/en/3d-model/tool/armadillo-flex-wire-conduithttps://cults3d.com/en/3d-model/tool/minimus-hotend-cooler-systemNote, the armadillo flex design has been updated since I printed mine so may look slightly different than the photos, but the fit is the sameHow I Designed This For the bulk of the work I Imported the original STL into Onshape and then created the flex holder using measurements from my minimus backplate that had the wire management option. I printed this and realised the original slot for the cable tie was now in the wrong place.I had been meaning to learn more about blender for sometime, so took this opportunity to use blender to split the mesh where the cable slot was and move it to be centred under the armadillo fitting.I then used blender to reconnect the vertices. improved some of the joining profiles to the new parts and make a watertight model.....something that with my absolute beginner skillset took many hours and many YouTube! The STL model attached has passed the blender and cura manifold /watertight tests
With this file you will be able to print Aquila OOTBDD with Armadillo flex mount with your 3D printer. Click on the button and save the file on your computer to work, edit or customize your design. You can also find more 3D designs for printers on Aquila OOTBDD with Armadillo flex mount.