Aperture Iris Box
prusaprinters
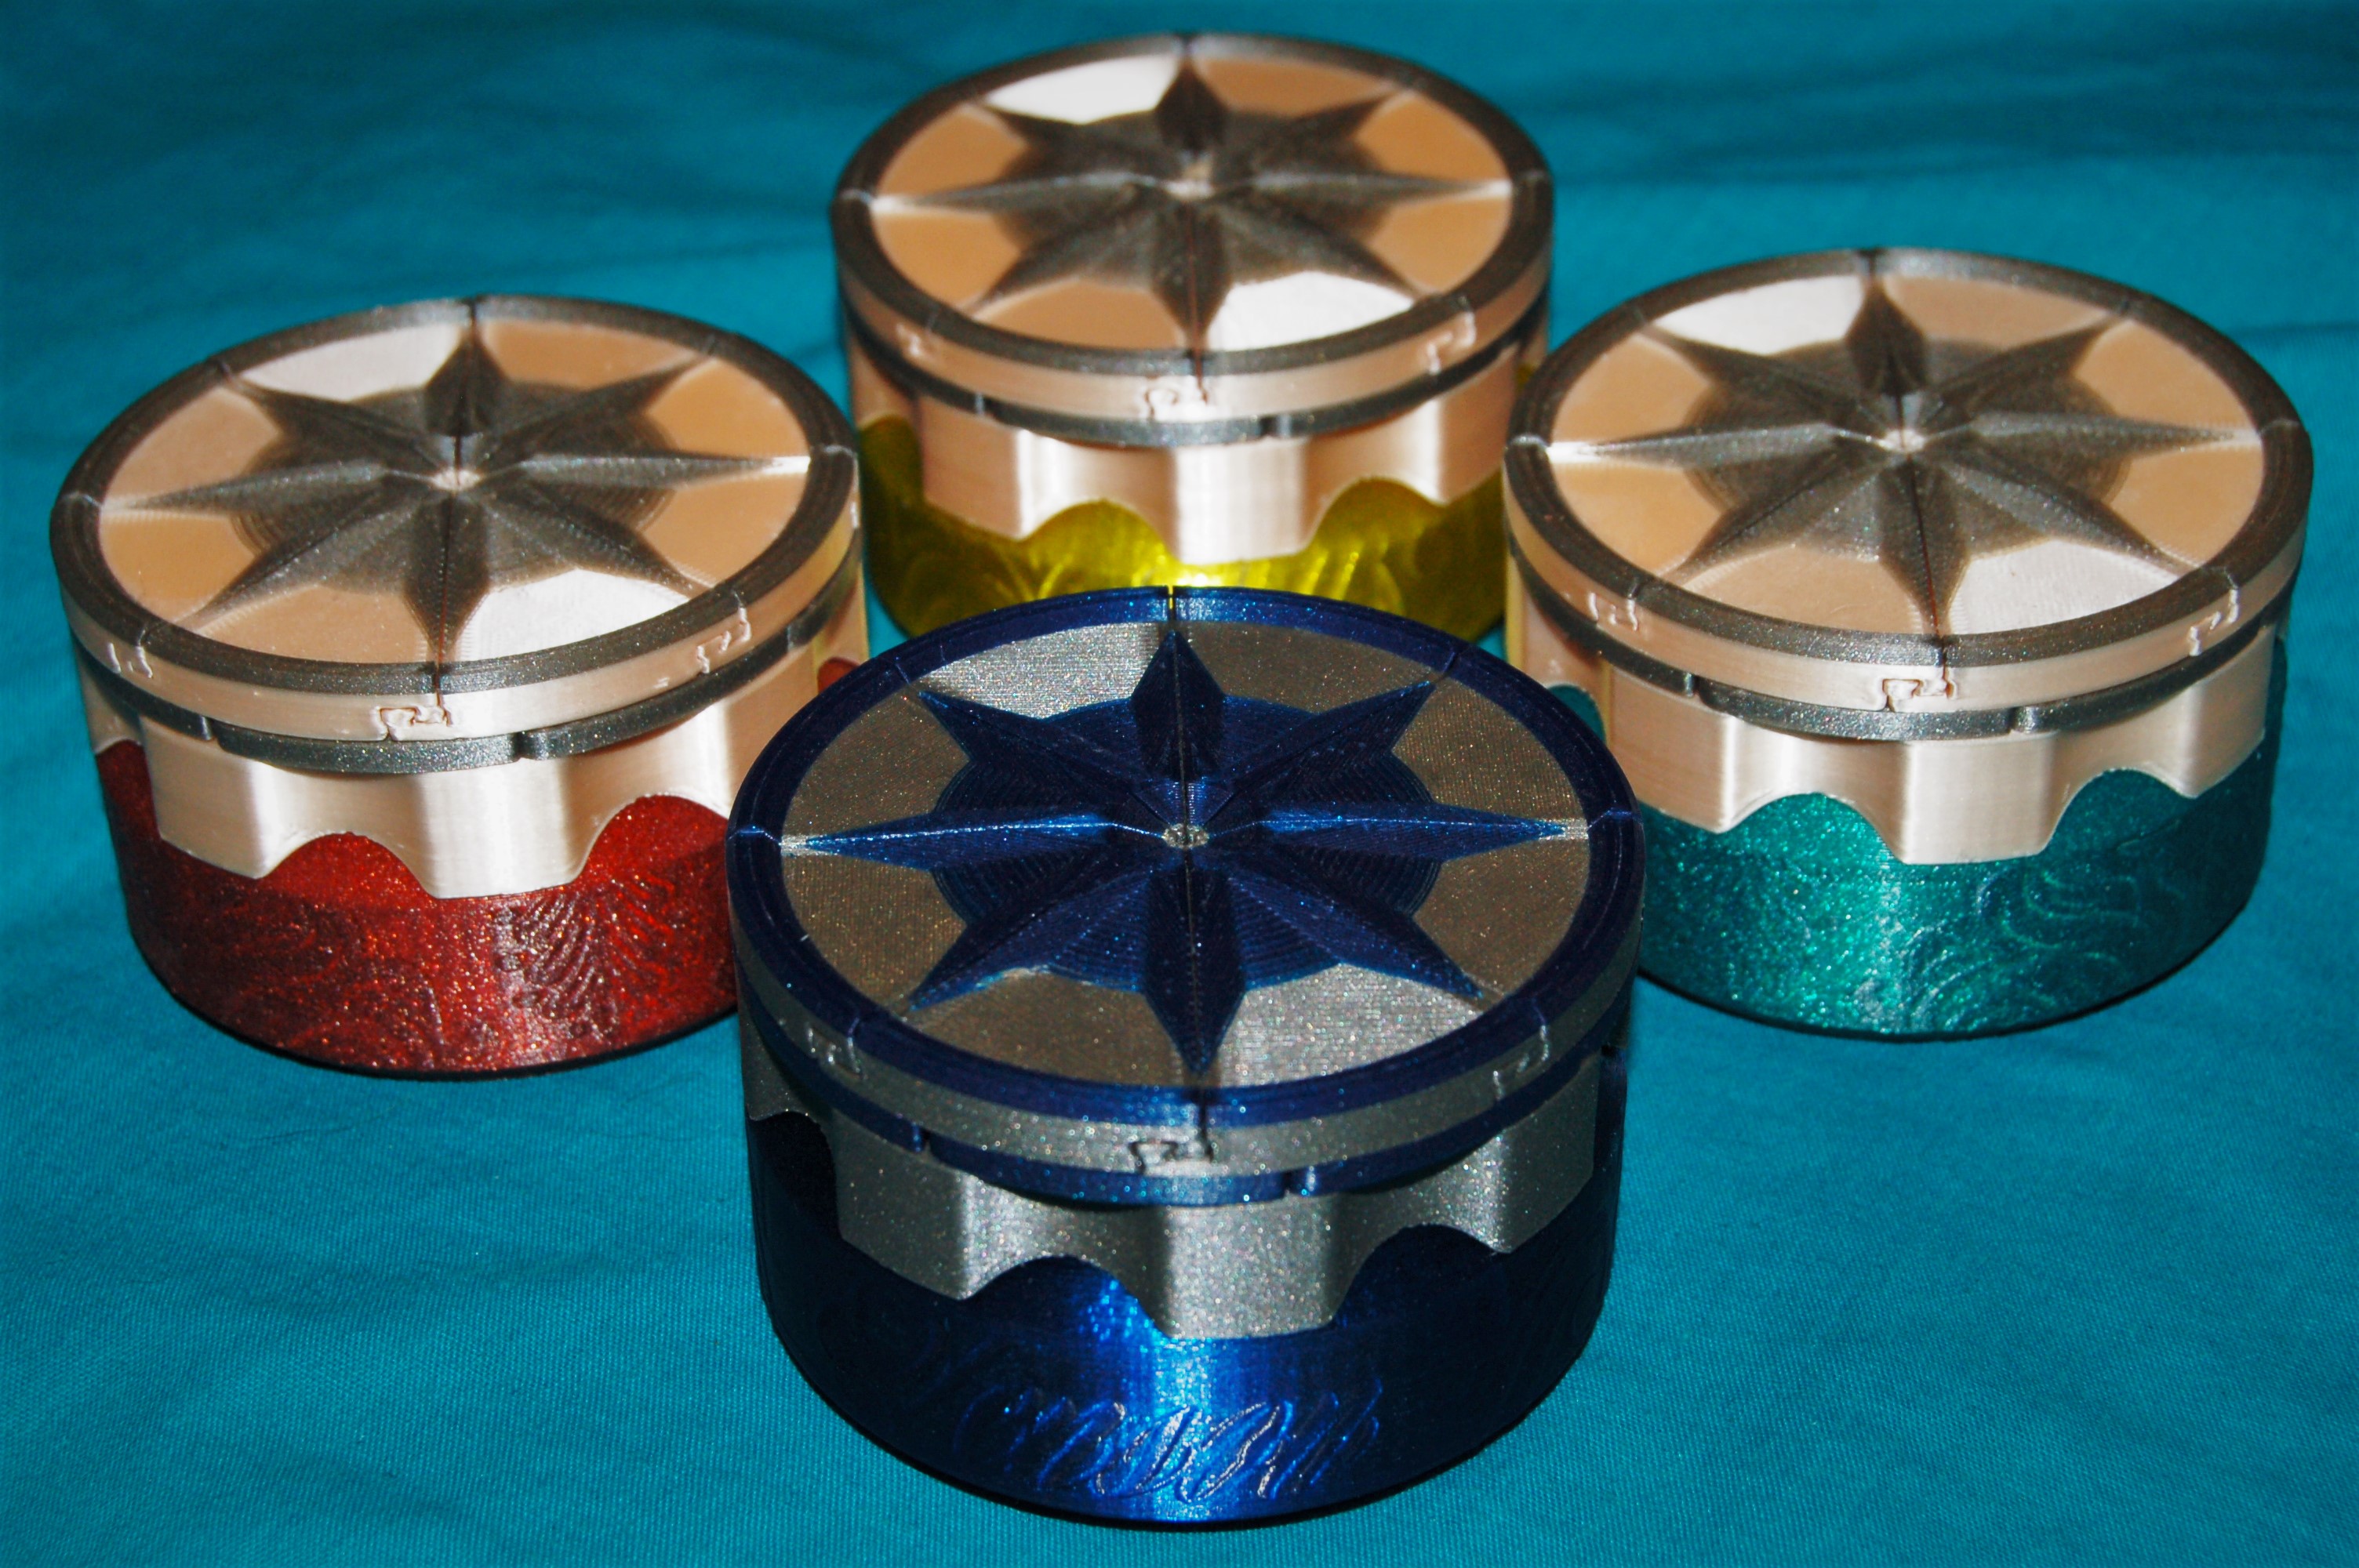
<p>This is not a lie, unlike cake. </p><p>An improvement to the <a href="https://www.printables.com/model/314649-aperture-box">Aperture Box</a>, this is an iris box which features an easy opening twist collar and decorative lids. The box is 80mm tall, 80mm in diameter and is opened by twisting the collar anticlockwise.</p><p>This was originally uploaded to MyMiniFactory in 2019, and I have now moved it here as well.</p><p>I have 14 other Iris boxes designs and I have an <a href="https://www.instructables.com/Decorative-Iris-Box-Guide/">instructable</a> describing them and how to print them.</p><p>Other than the printed parts, this requires <a href="https://www.amazon.com/s?k=M2x6+countersunk+screw&rh=n%3A17290023011&ref=nb_sb_noss">M2x6 countersunk/flathead screws</a> to assemble (as with all my other designs); 24 screws are required in total. Larger or smaller screws may be used if you scale the model appropriately e.g. M3x8 screws at 150% part scale.</p><p>There are two types of door. The simple 'door' is completely flat and the decorative door 'door-dec' creates a compass like embellishment on top of the container.</p><p>There are two versions of the container, the standard container and the shortened container which brings the overall height down to 48mm.</p><h3>Part testing</h3><p>If you can print one of my other 'aperture' designs then you will be able to make this design.</p><p>Before printing off all the parts you should make sure the screw joints and sliding dovetail joints work correctly with your print settings. Use settings which give good accuracy e.g. 0.1mm layer height. I recommend at least 3 perimeters with an 0.4mm nozzle.</p><p>Print two of the 'Door' parts using some support on the dovetails and test the dovetail sliding. Be careful when adding supports to the dovetails, to only support the outer part (see pictures). The inner part can be bridged easily, and adding unecessary supports here make them hard to remove.</p><figure class="image image_resized" style="width:85.5%;"><img src="https://media.printables.com/media/prints/315227/rich_content/ddc8ee91-e6be-42d3-85aa-91162575a56d/dovetail-support-setup.png#%7B%22uuid%22%3A%22d28ff694-5795-43a5-af6b-64bc2243e9c1%22%2C%22w%22%3A857%2C%22h%22%3A586%7D"></figure><figure class="image image_resized" style="width:84.92%;"><img src="https://media.printables.com/media/prints/315227/rich_content/3d1d9bf5-068a-4942-9677-86a50994f8ca/dovetail-support-slicing.png#%7B%22uuid%22%3A%22e8b125cc-52bf-4176-b9ee-7e814c392e1e%22%2C%22w%22%3A857%2C%22h%22%3A586%7D"></figure><figure class="image image_resized" style="width:84.1%;"><img src="https://media.printables.com/media/prints/315227/rich_content/731fc48a-0a26-4d30-b5ba-ac79b6e60a88/dovetail-supports-1.png#%7B%22uuid%22%3A%22141f4704-37dc-4234-89c1-d1999f6cd310%22%2C%22w%22%3A857%2C%22h%22%3A586%7D"></figure><figure class="image image_resized" style="width:83.02%;"><img src="https://media.printables.com/media/prints/315227/rich_content/c37915e1-d479-4ceb-a00b-e6310ffac851/dsc_0472.jpg#%7B%22uuid%22%3A%22a80cecce-964e-4fc7-82a2-3c2693c3c9d7%22%2C%22w%22%3A2637%2C%22h%22%3A1644%7D"></figure><figure class="image image_resized" style="width:81.66%;"><img src="https://media.printables.com/media/prints/315227/rich_content/c0f31af9-88e7-48a6-8693-c3c011946b14/dsc_0473.jpg#%7B%22uuid%22%3A%226cad6db7-0342-4a9d-8083-458b708cc37b%22%2C%22w%22%3A2335%2C%22h%22%3A1554%7D"></figure><figure class="image image_resized" style="width:80.57%;"><img src="https://media.printables.com/media/prints/315227/rich_content/cc41324d-461b-4313-b69a-9474d75b6424/dsc_0478.jpg#%7B%22uuid%22%3A%22c5cf15fc-51b1-48c6-af82-82e61ba6ee87%22%2C%22w%22%3A2514%2C%22h%22%3A1676%7D"></figure><figure class="image image_resized" style="width:78.94%;"><img src="https://media.printables.com/media/prints/315227/rich_content/017415f2-2311-4003-8764-e4eec2bec350/dsc_0482.jpg#%7B%22uuid%22%3A%22e2e529aa-40aa-4c46-bd79-b428bccc2c31%22%2C%22w%22%3A2453%2C%22h%22%3A1691%7D"></figure><p>The doors should be loose enough to slide easily for the design to work effectively. Try to avoid 'elephants foot' on the base of the doors, as this can reduce tolerances and cause excess friction. If they are too tight then try reducing the layer height or using outer contour XY compensation in your slicer. Lower friction materials are also ideal, I used PLA which works great.</p><p>Check that the screws fit tightly in the holes on the base of the doors and they turn freely in the links and that the head is flush with the part surface. You may need to scale the parts or use XY compensation to get a good fit.</p><h3>Parts printing</h3><figure class="image image_resized" style="width:78.67%;"><img src="https://media.printables.com/media/prints/315227/rich_content/a16427ba-8db2-4808-9b2e-9b725d478c6b/dsc_0514.jpg#%7B%22uuid%22%3A%22f8093637-1305-47c7-84b4-7726e71552a0%22%2C%22w%22%3A3008%2C%22h%22%3A2000%7D"></figure><p>To make the box you will need to print: </p><ul><li>1x 'Container' or ‘Short Container’</li><li>1x ‘Collar’</li><li>8x ‘Link 1’</li><li>4x ‘Link 2’</li><li>8x 'Door' or ‘Door dec’</li></ul><p>The multicolour lids were achieved by doing a material swap at the appropriate height.</p><p>The pattern on the green container was formed using the velocity painting technique (more info in my <a href="https://www.instructables.com/Decorative-Iris-Box-Guide/">Instructable</a>). The floral patterns were Designed by <a href="https://www.freepik.com/freepik">GarryKillian / Freepik</a>.</p><h3>Assembly Instructions</h3><h4>Step 1</h4><figure class="image image_resized" style="width:86.55%;"><img src="https://media.printables.com/media/prints/315227/rich_content/73f3a45b-c6f7-4eb1-9983-c13493a7679b/dsc_0509.jpg#%7B%22uuid%22%3A%224413cb86-f21d-4cc2-9285-31b6c960227f%22%2C%22w%22%3A3008%2C%22h%22%3A2000%7D"></figure><p>Take the container and place the collar onto it.</p><h4>Step 2</h4><figure class="image image_resized" style="width:85.5%;"><img src="https://media.printables.com/media/prints/315227/rich_content/8cfd8e6f-7d90-4e6d-8513-efa0ca8d7bc0/dsc_0507.jpg#%7B%22uuid%22%3A%221511f4b5-6450-486e-8e70-cebb3e0c4ac1%22%2C%22w%22%3A3008%2C%22h%22%3A2000%7D"></figure><p>Screw the narrower ends of the four small links (Link 2) to the holes in the container. Be sure you have them the correct way around, the difference is slight but important. The collar should now be held securely onto the box but also be able to twist freely.</p><h4>Step 3</h4><figure class="image image_resized" style="width:84.94%;"><img src="https://media.printables.com/media/prints/315227/rich_content/028b9253-6495-4879-b08c-95b5ed735e3e/dsc_0503.jpg#%7B%22uuid%22%3A%220d62e87c-e071-43a5-b034-e17ea9486aa0%22%2C%22w%22%3A3008%2C%22h%22%3A2000%7D"></figure><p>Screw the non-pointed ends of the larger links (Link 1) to the collar.</p><figure class="image image_resized" style="width:83.9%;"><img src="https://media.printables.com/media/prints/315227/rich_content/d54c3e57-8e0f-4d1b-ba23-248793c999e7/dsc_0502.jpg#%7B%22uuid%22%3A%221c48382b-876d-4a75-907e-4a783c69ada6%22%2C%22w%22%3A3008%2C%22h%22%3A2000%7D"></figure><h4>Step 4</h4><figure class="image image_resized" style="width:82.44%;"><img src="https://media.printables.com/media/prints/315227/rich_content/2b3bf419-ccfa-4303-9c1d-c31995f0d24b/dsc_0494.jpg#%7B%22uuid%22%3A%22f60b999d-1c99-4b80-9695-5799c83c4154%22%2C%22w%22%3A3008%2C%22h%22%3A2000%7D"></figure><p>For attaching the links to the doors it's easiest if you roughly assemble the doors in the open position upside down and place the container and collar assembly on top of them. Now screw the other end of the small links to the inside holes on the doors.</p><h4>Step 5</h4><figure class="image image_resized" style="width:82.2%;"><img src="https://media.printables.com/media/prints/315227/rich_content/bdb36e62-e142-4798-b1b6-21dcb48ad747/dsc_0490.jpg#%7B%22uuid%22%3A%2222664757-d8e2-4317-8681-dc4656bece10%22%2C%22w%22%3A3008%2C%22h%22%3A2000%7D"></figure><p>Now screw the larger links to the holes on the outside edge of the box doors.</p><p>You should now have a working Aperture Iris box! The mechanism may be a little stiff at first but should loosen up over time. A little big of silicon lubricant could also be used on the dovetail joints to make it work more smoothly.</p><figure class="image image_resized" style="width:81.16%;"><img src="https://media.printables.com/media/prints/315227/rich_content/0c96083f-5d30-4d84-96c7-6bdf3e2bd119/dsc_0435.jpg#%7B%22uuid%22%3A%221da6a2fd-f649-4497-b736-382e3dc799d0%22%2C%22w%22%3A3008%2C%22h%22%3A2000%7D"></figure><p>If you have any questions or problems with this design, I will be more than happy to help.</p>
With this file you will be able to print Aperture Iris Box with your 3D printer. Click on the button and save the file on your computer to work, edit or customize your design. You can also find more 3D designs for printers on Aperture Iris Box.
