Anycubic Mega X silent running upgrade
prusaprinters
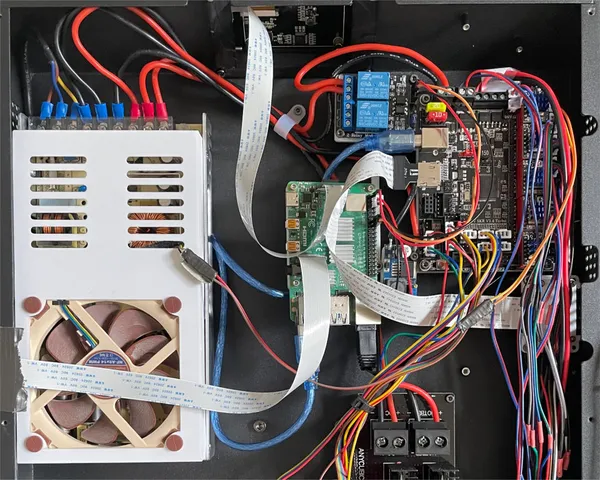
Upgrade parts for an Anycubic Mega X to achieve silent running. Achieving a quiet Mega X is done in two parts, the first is to replace the noisy fans and the second is to use upgraded stepper drivers. I chose to completely upgrade the motherboard in my Mega X with an BigTree Tech SKR 1.4 (Turbo) board together with TMC 2209 stepper drivers.The stepper drivers operate at low enough temperatures that no active cooling is necessary for the board or drivers themselves. Replacing the board requires cutting some of the original internal wires and crimping them with JST-XH plugs and might not be for the faintest of hearts. I can only imagine that it voids the warranty pretty much immediately.The PSU cover is a replacement PSU cover that can host a Noctua A9x14. Replacing that fan is essentially a no brainer and can be done without changing any of the existing wiring. Just print the part (PLA is fine), take out the PSU and remove the old cover. Seat the new fan using the rubber attachments and plug it into the PSU board. Then just screw the PSU back together and you are good to go.The board mount comes in two versions. One is just a Gorilla Board to SKR 1.4 adapter, the other version also comes with mounts for a Raspberry Pi 3 or 4 and a step down buck converter to step down the 12v from the PSU to the 5v required by the Raspberry Pi. If you put in a SKR 1.4 board, you'll have a free power cable from the PSU that is no longer necessary but can be used to power the Raspberry Pi. I use this set up to run Klipper and Fluidd on the Raspberry Pi to run the 3D printer, but it'll also work with OctoPrint and Marlin.There's also space for an optional relay (I used a SainSmart 5V 2-Channel Relay Module), which allows you to turn the SKR 1.4 board on and off via the Pi.The buck converter that I used is a Erayco LM2596, but if you just look for LM2596 on Amazon or eBay you will find many versions of the exact same thing. They aren't super precise and the Raspberry Pi gets very upset at the slightest sight of under-voltage, so you'll want to set it up so it outputs ~5.3v or even a little more. The Pi can handle the bit of extra voltage.There's now also a SD card adapter. I used a OUSHE Micro SD to SD card extension cable (with a length of 25cm). This replaces the original SD card reader and allows using the SD card port on the Mega X with the SKR 1.4 board. This way you can easily upgrade your firmware without opening the printer to switch SD cards.For the part cooler I'm using the following: https://www.thingiverse.com/thing:3726476. You'll only need the part cooler from there, the rest is incompatible with the Mega X. Finding a silent 5015 radial fan is pretty easy, and eliminates the last piece of noise. Alternatively, I also have a direct drive adapter that you can find here: https://www.printables.com/model/203081-anycubic-mega-x-direct-drive-adapterI am also using a Bigtree Tech 5" TFT screen to replace the original Mega X screen with one that runs KlipperScreen (but it also supports OctoScreen). This allows me to run everything nicely from the Raspberry Pi, leaving the board only with kinematics and heater control. You can find my BTT TFT mount here: https://www.printables.com/model/203021-anycubic-mega-x-btt-pitft50-mount
With this file you will be able to print Anycubic Mega X silent running upgrade with your 3D printer. Click on the button and save the file on your computer to work, edit or customize your design. You can also find more 3D designs for printers on Anycubic Mega X silent running upgrade.
