Anycubic Mega Series, VORON afterburner mods
thingiverse
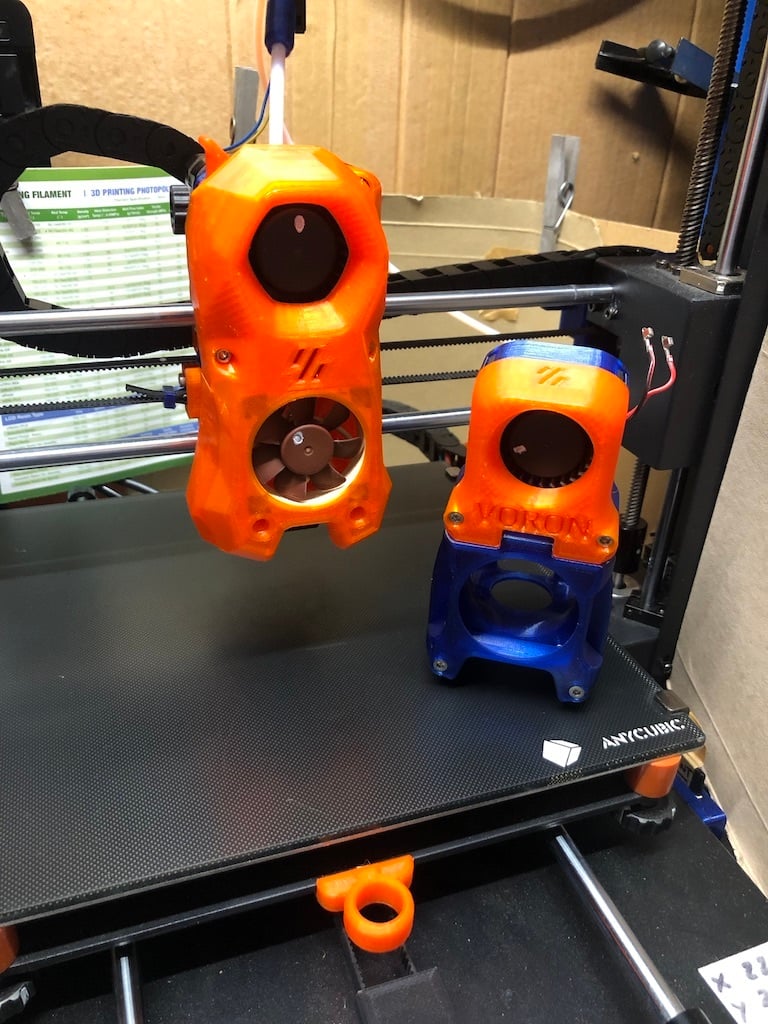
30-04-22 Just added a coupe of things, I wasn't happy that the x-axis carriage had the right dimensions on the new BLT holes I added, while fixing that, I decided to look at the cable routing for the BLT. I realised I could sneak it under the extruder motor, so I added a cable-recess to the x-carriage at the same time. Then I realised that the stealthburner parts have an extra set of holes for the acceleration sensor for tuning features in klipper, which we don't use on the AC-Megas. This is now an optional bracket mounting point for the BLT. bracket uploaded. April-22 Update; I added a BL-touch! new little bracket to fit on the side of the x-carriage, I've actually drilled the holes in mine with a 4.2mm drillbit, and then added heat-sets m3 threads. I have updated the x-carrriage stl to have the holes pre-made in it so that future makers can just print and ignore if they don't have BLtouch, or if they do, just add 2more m3 heat-sets and they're off, also can be retro-fitted easier that way too. Using Knustwurst firmware from here; https://www.thingiverse.com/thing:4431052 for my configuration it's the variant of firmware "MEGA_S_TMC_BLT_10_v1.4.3.hex" based on having TMC2209s in a Mega-S machine with the 0.0.2 trigorilla board and a genuine creality BL-touch. 08-Feb-22 Update: I was asked if Stealthburner would work with this mod, so I printed out just the fanducts and hotend carrier parts as I saw they were Clockwork1 compatible as-is. Pictures to show what that looks like and comparison to Afterburner parts sat on the bed next to it. For this to be fitted, it lowers the hotend by about 2mm, so I had to adjust the z-stop screws again and re-level. In order to use Clockwork2, I will need to rework the new x-rail parts that VORON provided with Stealthburner and try it from there. For now, I probably won't do that very soon, unless I can find a 12v motor that is compatible with the Stealthburner build. 15-Nov-21 Update: I decided I didn't like the x-stop threaded part I added to the part cooler duct. So I created a flappy-paddle thing to be bonded to the x-carriage frame, that then gives an adjustable thread to set the zero position by making contact with the standard Voron part. I also decided to upload some new photos of parts printed with this mod, to show the quality difference of part made with the old Hotend and the parts re-manufactured with it. Original Project Notes: In order to get a working Voron Afterburner on my Anycubic Mega S, I was able to modify the X-Carriage from the Mk4 ML3DPrinting project and cut and shut a solution to hold the Voron printhead so that the hotend is in the same position in X/Y as the original. It requires lowering the X-Rail by moving the z-stops due to the position of the extruder motor in the Voron clockwork extruder. It also is swappable with the bowden extruder version of the Afterburner printhead by using the original extruder on the X-rail. UPDATE 25.10.21: Slimmed down the combined A+B parts of the x-carriage so that its the same width as the bearings and suits the size of the VORON mounting plate better. Improved the cable cover/cowl for slip on fitment like later Afterburner covers, but with the same narrow fitting as the V1.8 to avoid clash with the x-rails.
With this file you will be able to print Anycubic Mega Series, VORON afterburner mods with your 3D printer. Click on the button and save the file on your computer to work, edit or customize your design. You can also find more 3D designs for printers on Anycubic Mega Series, VORON afterburner mods.
