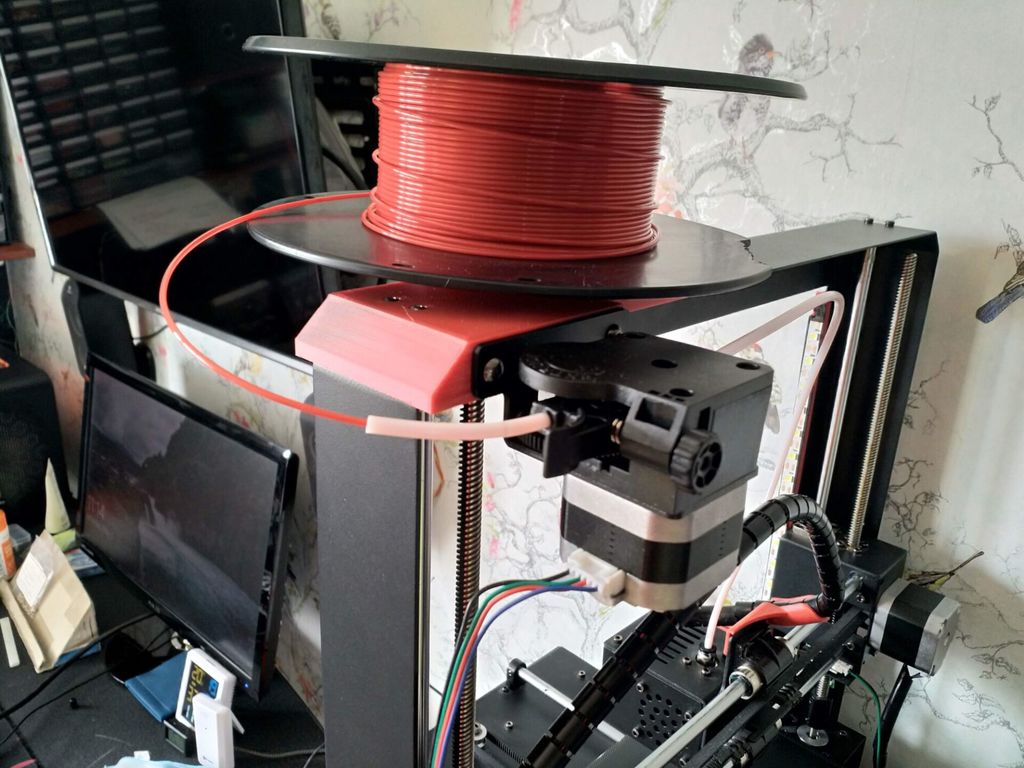
Anycubic i3 Mega S | Top Extruder Mount (Titan)
thingiverse
This design was heavily inspired by Sergiu_I's model (found here: https://www.thingiverse.com/thing:4319135). As I didnt want to disassemble the extruder, I created my own mount that can be used with the stock L bracket that comes with the titan extruder (on Mega S). I believe it is a steel bracket and its is extremely strong so there should be no problems at all. This model uses two strong M4 knurled brass inserts and are more than enough to hold the extruder in place. You do not need to buy M4 screws because you can just use the stock ones from the extruder. However, for the top M3 screws you will need 2x M3x12mm button hex screws. At the moment, this design does not include the filament sensor, however, later on I will probably update this model to include a mount for the sensor. The purpose of this mount is to offload the additional weight of the motor+extruder from one of the Z-carriage. If used with a top mounted spool holder, the combination also provides a shorter than typical filament path to the hotend. In the photos, the spool holder is another one of my remixes (found here: https://www.thingiverse.com/thing:4847375), it uses a single 608 bearing and spins very freely. The combination of both of these parts provides a natural path for the filament into the extruder. The extruder motor is protruded far enough outward to ensure that there is approx. 2-3mm clearance between it and the right-hand Z-carriage when it is at Z(max) height; so this mount does not affect the maximum Z height of your printer. In the photos you may also notice that the mount is not completely flush with the profile of the top of the printer frame (at the 45 degree corner). I fixed this issue later on by offsetting the M3 screws by ~1.8mm. I didnt reprint the whole mount because the original still works, but I did print a section to check and it fits perfectly; I included the updated version in here. I have also included STEP and PTC Creo Parametric project files so you can easily edit if you want :) BOM TO PURCHASE: 2x M4 x D6mm x L(5 to 8mm) Brass inserts - https://www.aliexpress.com/item/4000714545328.html 2x M3 x 12mm Button head screws - https://www.aliexpress.com/item/32864450890.html ASSEMBLY: Use a soldering iron to put the M4 brass inserts in place and mount to the top using the M3 screws mentioned. PRINT SETTINGS: Make sure to print with the 45 degree overhang FACING the part cooler duct. PLA 1.75mm filament 0.4mm nozzle 0.2mm layer height 25% infill 4 walls + alternating 3 top/bot layers Support only at 90 degree for the M3 recess Print time: approx 2hrs
With this file you will be able to print Anycubic i3 Mega S | Top Extruder Mount (Titan) with your 3D printer. Click on the button and save the file on your computer to work, edit or customize your design. You can also find more 3D designs for printers on Anycubic i3 Mega S | Top Extruder Mount (Titan).
