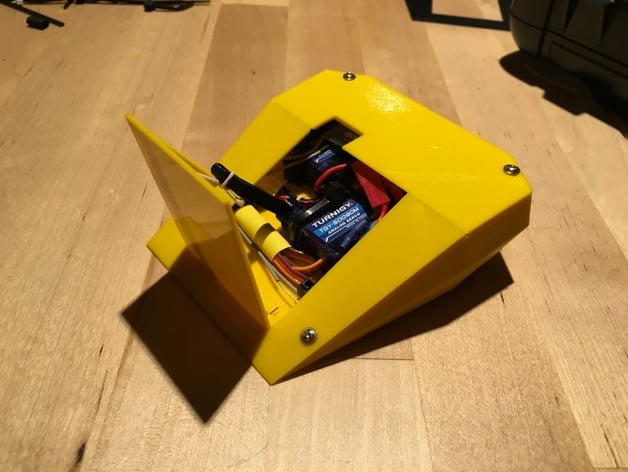
Antweight Robotwars Firestorm R/C Robot
thingiverse
Antweight Version of Firestorm Robot A miniature version of my Robotwars robot, Firestorm. The dimensions are slightly off, but overall I'm pleased with it. My version is printed in Colorfabb XT yellow and requires a nice paint job on the back to complete it (or finishing my Bigbox upgrade to dual nozzles). Required Parts All other parts should be less than £50 and reusable in other tiny robots. Please see below for details. Print Settings Printer: BigBox3d Rafts: No Supports: No Resolution: 0.1-0.25mm Infill: 20-100% Notes: You can use almost any filament for most parts, and layer height between 0.1 to 0.25mm should work fine. The parts are easy prints with no large overhangs and nice big contact patches. The lid should be printed in something flexible as it needs to bend to fit on top, but even stiff PLA should work without snapping. The tires should be printed in Ninjaflex or other rubbery TPU, although you can get away with using o-rings or superglue-ing strips of rubber band instead. You'll need one of each part, except for wheels and tires where two of each are required. Post-Printing Bits You Will Need * 180maH 2S battery * 2 x 9g HXT900 Servos for drive * 1 x 9g 90 degree metal gear servo * 1 x BEC This one looks good, I'm currently using an old ESC for a 5V supply, which should be much better with 6V from this supply * Heatshrink or insulating tape * Drill and drill bits * Superglue * Plastic stop removal tool * Gear train cleaning tools Optional Mechanical Modification (Speed Increase) To do this you need to remove a stage in the gear train. The top gear on the center shaft should be removed. Clean the oil/grease off gears of the potentiometer shaft, to make the superglue bond better. Superglue the top and bottom gears of the potentiometer shaft, together. Take care to glue only the gears on the potentiometer shaft to each other and not to the potentiometer or the gear on the centre shaft. Reassemble the gear train without the top gear of the center shaft. Screw the drive servos back together Trim the mounting lugs off the flipper servo Put the tires on your wheels Push the wheels onto the drive servos, fix with the screws supplied with the servo Cable tie your drive servos in place, see below Slide the battery in-between the drive servos with the wires exiting towards the front The BEC should fit on the left front of the robot, cable tie loosely in place until you've got all your wiring sorted out The flipper hinges are created by passing a short length (15-20mm or so) of the unfolded paper clip through the holes in the flipper and lower body, on each side, bend the ends to stop the clips coming out. For fitting the flipper arm, you'll need to power on the servo with the receiver so you can find the limits The receiver may need to be uncased and should sit just over the drive servos and battery. The elastic should be tied around the end of the arm (the hole in the arm is a red herring, sorry) and through the hole in the flipper. It should be fairly slack at full extension and tighter when folded away. Routing cables can be tricky, I found pushing spare loops into heat shrink made it easier, although you may want to cut and solder your cables to the perfect length once you've test fit everything. Servo Placement Created with OpenSCAD, the lower shell is a whole load of horrid polyhedron blocks.
With this file you will be able to print Antweight Robotwars Firestorm R/C Robot with your 3D printer. Click on the button and save the file on your computer to work, edit or customize your design. You can also find more 3D designs for printers on Antweight Robotwars Firestorm R/C Robot.
