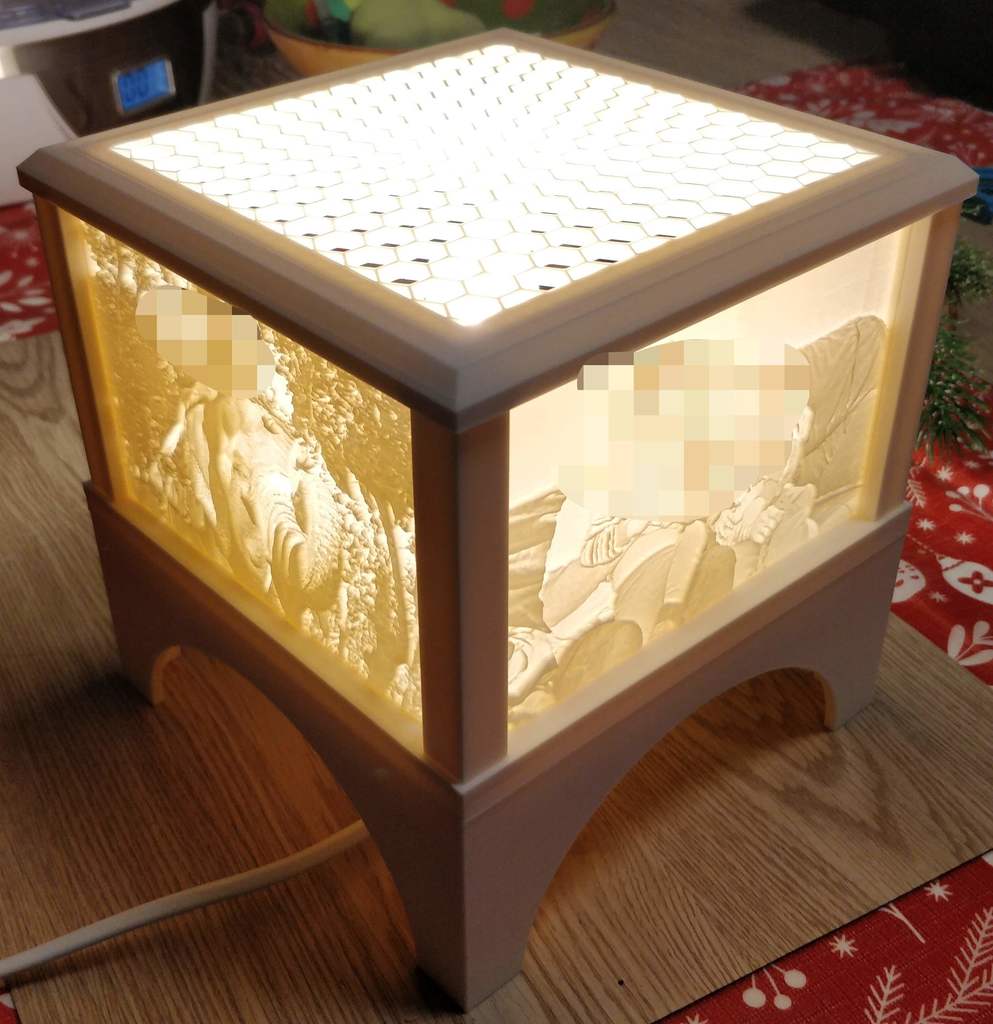
Another LithoBox
prusaprinters
<p>As Christmas is nearing and as it's always a difficult task to find gifts for my parents and grandparents I thought lithophanes would be nice.</p> <p>But of course they need something to hold them and provide the backlight needed.</p> <p>So of course I went and designed Another LithoBox.</p> <p>The box holds 4 Lithophanes 148mmx100mmx4mm on the sides and if you think heat from the LED lightbulb will not be a problem (I am still printing and will test one that is closed by 5 lithophanes) you can put one 149.8mmx149.8mmx4mm on top instead of the honeycomb cover.</p> <p>Tolerances are 0.1mm in all Directions</p> <p>For One Lithobox with 4 Sides and a roof with honeycomb cover you need:</p> <p>1xStand.stl</p> <p>1xBase.stl</p> <p>1xRoofHoneyComb.stl</p> <p>4xCorner.stl</p> <p>OR</p> <p>1xStand.stl</p> <p>1xBase-Pin.stl</p> <p>1xRoofHoneyComb-Corners-Pin.stl</p> <p>If you want to be able to put in a Litophane on top you can use</p> <p>Roof.stl or Roof-Corners-Pin.stl</p> <p>depending on which way you choose (Corners printed solo or included in the roof).</p> <p>In case you don't have a picture for the top you can put in the CoverHoneyComb.stl instead.</p> <p>You can also use RoofHoneyComb.stl with Base.stl, just make sure you only use base/roof parts that do or do not have "Pin" in their name with each other.</p> <p>the only parts you need to print with supports are the non honeycomb Roof parts</p> <p>Other Materials needed:</p> <p>4 Screws M4x16mm + 4 Nuts</p> <p><a href="https://www.amazon.de/gp/product/B07SC1LKQ9/ref=ppx_yo_dt_b_asin_title_o00_s00?ie=UTF8&psc=1&tag=thingiverse09-20">https://www.amazon.de/gp/product/B07SC1LKQ9/ref=ppx_yo_dt_b_asin_title_o00_s00?ie=UTF8&psc=1</a></p> <p>(Set of 4 E27 LED Lamps with 14W (the description says 8W but on the Lamps it says 14W)</p> <p><a href="https://www.amazon.de/gp/product/B072C41H54/ref=ppx_yo_dt_b_asin_title_o01_s00?ie=UTF8&psc=1&tag=thingiverse09-20">https://www.amazon.de/gp/product/B072C41H54/ref=ppx_yo_dt_b_asin_title_o01_s00?ie=UTF8&psc=1</a></p> <p>(Set of 3 Cables with Switch and E27 Socket)</p> <p>If you like my design feel free to leave a tip for a Coffee. <a href="https://paypal.me/UnNamedGER">https://paypal.me/UnNamedGER</a></p> <hr/> <hr/> <p>Da Weihnachten sich schnell nähert und es immer schwierig ist Geschenke für meine Eltern und Großeltern zu finden dachte ich mir, dass Lithophane was schönes wären.</p> <p>natrülich benötigen diese etwas um sie zu befestigen und um die Belechtung zu liefern. also war das Naheliegenste Thingiverse um eine weitere Lithophane-Box zu bereichern.</p> <p>Die Box fasst 4 Lithophanen mit 148mmx100mmx4mm an den Seiten und wenn man davon ausgeht, dass die Wärme einer LED Lampe kein problem ist (Ich bin momentan noch am drucken und teste es die nächten Tage) kann auf die Oberseite eine weitere Litophane mit 149.8mmx149.8mmx4mm anstelle eines Deckels mit Wabenmuster.</p> <p>Toleranzen sind 0.1mm in allen Richtungen.</p> <p>Für eine LitoBox mit 4 Seiten und dem Dach mit Wabenmuster wird benötigt:</p> <p>1xStand.stl</p> <p>1xBase.stl</p> <p>1xRoofHoneyComb.stl</p> <p>4xCorner.stl</p> <p>ODER</p> <p>1xStand.stl</p> <p>1xBase-Pin.stl</p> <p>1xRoofHoneyComb-Corners-Pin.stl</p> <p>Wenn man auf die der Oberseite eine Lithophane einlegen möchte</p> <p>Roof.stl oder Roof-Corners-Pin.stl</p> <p>je nachdem welche Variante man druckt (Ecken einzeln oder mit dem Dach verbunden).</p> <p>Wenn noch kein Bild für das Dach vorhanden ist oder es zu heiß wird kann in diesem fall auch das CoverHoneyComb.stl eingelegt werden.</p> <p>Es kann auch RoofHoneyComb.stl mit der Base.stl verwendet werden, achtet nur darauf base/roof Teile miteinander zu verwenden die "Pin" im namen haben oder nicht.</p> <p>Das einzige Teil das Supports benötigt ist das Dach ohne Wabenmuster.</p> <p>Ausserdem wir and Material benötigt:</p> <p>4 Schrauben M4x16mm + 4 Muttern</p> <p><a href="https://www.amazon.de/gp/product/B07SC1LKQ9/ref=ppx_yo_dt_b_asin_title_o00_s00?ie=UTF8&psc=1&tag=thingiverse09-20">https://www.amazon.de/gp/product/B07SC1LKQ9/ref=ppx_yo_dt_b_asin_title_o00_s00?ie=UTF8&psc=1</a></p> <p>(4er Set E27 LED Lampen mit 14W (in der Beschreibung stehen 8W aber auf den Lampen 14W)</p> <p><a href="https://www.amazon.de/gp/product/B072C41H54/ref=ppx_yo_dt_b_asin_title_o01_s00?ie=UTF8&psc=1&tag=thingiverse09-20">https://www.amazon.de/gp/product/B072C41H54/ref=ppx_yo_dt_b_asin_title_o01_s00?ie=UTF8&psc=1</a></p> <p>(3er Set Kabel mit Schalter und E27 Fassung)</p> <p>Wenn euch mein Design gefällt lasst gerne eine Spende da für einen Kaffee. <a href="https://paypal.me/UnNamedGER">https://paypal.me/UnNamedGER</a></p> <h3>Print Settings</h3> <p><strong>Printer Brand:</strong></p> <p>Creality</p> <p><strong>Printer:</strong></p> <p>Ender 3 Pro</p> <p><strong>Rafts:</strong></p> <p>No</p> <p><strong>Supports:</strong></p> <p>Yes</p> <p><strong>Resolution:</strong></p> <p>0.20</p> <p><strong>Infill:</strong></p> <p>20%</p> <p><strong>Filament:</strong> Maertz Budget PLA PLA</p> <p>White</p> <p><strong>Notes:</strong></p> <p>Supports are only needed for the Roof without honeycombs</p> <hr/> <p>Supports werden nur für das Dach ohne Wabenmuster benötigt</p> <h3>Post-Printing</h3> <p><strong>Assembly | Aubau</strong></p> <p>To Assamble put the Lamp Socket in the Base and Screw on the Nut.</p> <p>Then put the cable through the Stand, put the stand under the base and put the srews in.</p> <p>If the corners where printed seperately you can use the GlueingAid.STL to put them into position in the roof for glueing. (not necessarily needed)</p> <p>Afterwarts slide the lithophanes into the corners and put on top of the base</p> <hr/> <p>Zum Zusammenbauen wird die Lampenfassung in die Basis gesteckt und mit ihrer Kontermutter befestigt.</p> <p>Dann wird das Kabel durch den Sockel geführt, der Sockel unter die Basis gesetzt und mit den 4 Schrauben befestigt.</p> <p>Anschließent können die 4 Ecken wenn sie einzeln gedruckt wurden mit der Montagehilfe (GlueingAid.STL) in das Dach eingeklebt werden (nicht zwingend notwendig)</p> <p>Anschließend die Litophanen zwischen den Ecken des Dachs einschieben und auf die Basis aufsetzen.</p> <h3>Lithophanes | Lithophane</h3> <p>For the lithophanes I used the Flat lithophane maker of lithophanemaker.com</p> <p>(<a href="https://lithophanemaker.com/Framed%20Lithophane.html">https://lithophanemaker.com/Framed%20Lithophane.html</a>)</p> <p>with the following Settings</p> <p>Lithophane Resolution: 0.2</p> <p>Width: 148</p> <p>Height: 100</p> <p>Base Width: 4</p> <p>Base Height: 4</p> <p>Overhang Angle: 40</p> <p>Maximum Thickness: 4</p> <p>Minimum Thickness: 0.6</p> <p>For the top Lithophane set Width and Height to 149.8</p> <hr/> <p>Für die Lithophane hab ich den "Flat lithophane maker" von lithophanemaker.com verwendet</p> <p>(<a href="https://lithophanemaker.com/Framed%20Lithophane.html">https://lithophanemaker.com/Framed%20Lithophane.html</a>)</p> <p>dazu habe ich folgende Einstellungen benutzt:</p> <p>Lithophane Resolution: 0.2</p> <p>Width: 148</p> <p>Height: 100</p> <p>Base Width: 4</p> <p>Base Height: 4</p> <p>Overhang Angle: 40</p> <p>Maximum Thickness: 4</p> <p>Minimum Thickness: 0.6</p> <p>Für die obere Lithophane Width und Height auf 149.8 setzen.</p> Category: Decor
With this file you will be able to print Another LithoBox with your 3D printer. Click on the button and save the file on your computer to work, edit or customize your design. You can also find more 3D designs for printers on Another LithoBox .
