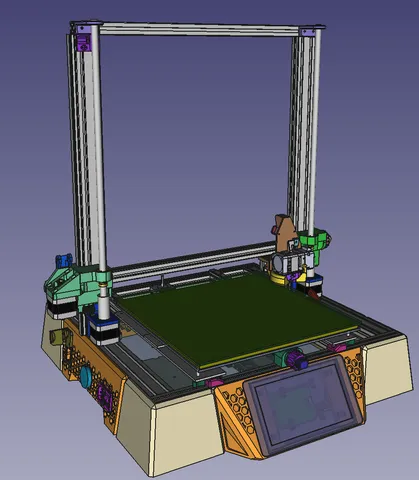
Anot Blac-cop
prusaprinters
Basically just the original frame, motors, PSU, and some other small metal hardware from the Anet A8 Plus. Build-it-yourself kit was missing parts and Anet refused to send them out so instead of spending any more money with them I upgraded - and didn't know when to stop!Raspberry Pi 4BKlipperKlipperscreen 7" touchscreenBTT SKR2TMC 2209sBiqu H2 extruder & hotendDirect drive with optional reverse bowdenBL Touch ABL120V silicone build plate heaterPP build plate (Polypropylene)Carbon fibre & cork Y-carriageLinear RailsCustom silicone sockSensorless X & YGates fiber belts & idlersThere's a lot going on here but I'm finally able to get really nice prints, reliably, at speed. I'll get straight into some of the more interesting parts. The build plate in Polypropylene. I've only printed PLA on it so far but it's absolutely fantastic. Adhesion is super reliable and when it cools down it self releases. Occasionally, It will require a light cleaning with slightly soapy water and rinse with clean water or at worst, rub it down with light grit sand paper. It gives a super smooth matt finish. Manufacturers claim you can use pretty much any filament on it but I can't confirm that because I simply haven't tried yet. The 120V silicone heater is adhered DIRECTLY to the bottom of the build plate. This allows for super fast and even heatup. That sits on a 300mm x 300mm x 5mm cork tile. I used a very thin few dabs of heat resistant silicone to hold them together. The adhesive side of the cork tile is stuck onto a 300mm x 300mm x 3.4mm carbon fibre sheet. I made the Y-carriage from regular flat bar aluminium keeping the bed adjustment screws as close to the corners as possible. I used stiffer springs here and kept the linear rails as wide apart as I could.In case you can't tell, I was aiming to go as lightweight, stiff, and stable as possible. I haven't weighted it yet but it is considerably lighter than the stock steel and glass one.Keeping with the lightweight theme I chose the Biqu H2 direct drive extruder and hotend. Probably not the most versatile one out there (no spring tension adjustment) but it is light, compact, and reliable. It's all metal so can hit higher temperatures too.I'd be interested to hear what people think of the part cooling and silicone sock I designed. It's a 5015 fan blowing through three ports. The silicone sock matches the contours of the ports in an effort to ensure the air hits exactly below the nozzle. I also tried to leave enough of a coutout at the front to give some kind of reasonable visual access to the nozzle - something I found to be particularly important when monitoring the initial laying down of filament on the build plate.I've included stl's for the moulds. There are some videos online on how to do it but to simplify:print the mould partssoak them in soapy waterfill them with high temperature ssilicone or gasket maker (I used "Red RTV High Temp Gasket Maker)tighten the mould together with screws taking time to tighten them all a little bit at a timeSilicone will ooze out the vent holes and sides - this is good!Pop it out after 24 hoursFinally, I ran all my hotend wires through an IDC-20 socket and ribbon cable - except the heater due to the higher current necessary for that one. It should make it much easier to swap out failed parts rather than fishing wires through cable-chains and flipping the machine upside down.Other things of note. I had a spare 5V PSU from another project so I used that to power the Raspberrry Pi and screen. I used the original 24V Anet PSU on everything else. I included a “cigar lighter” USB on the side to power a spare LED strip I had. It's a nice little option to have.Most parts can be printed without support if you choose your orientation carefully and have reasonable overhang capabilities. Filament used:Hatchbox PLA3D Fuel PLA Standard (Midnight Black & Metallic Copper)3D Fuel PLA Plus (Midnight Black)1.75mm filament 0.4mm nozzleVarious infills depending on how ridgid / light weight I wanted certain parts to be.Other things of note:I might swap out the "reverse bowden mount to integrate a filament runout sensor soon.The “fans mount” may not work for you depending on how you lay out your electronics / what hardware you're using under the hood. I have a couple of Noctua fans blowing at the stepper drivers and at the Raspberry Pi (Not that it seems to ever have to work hard!).I run this mostly through Fluidd on my browser. Klipperscreen interface is nice if I need to make minor adjustments. Rename printer.txt to printer.cfg if you want to use this klipper configuration as a template.I will try to post a bill of materials at some point soon.
With this file you will be able to print Anot Blac-cop with your 3D printer. Click on the button and save the file on your computer to work, edit or customize your design. You can also find more 3D designs for printers on Anot Blac-cop.
