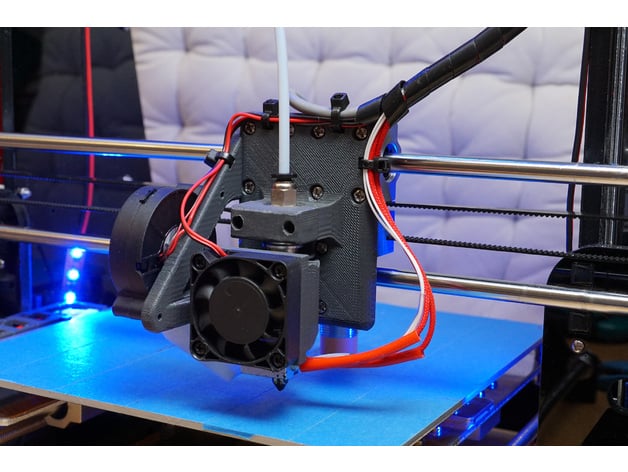
ANET A8 | Customizable E3D v6 Carriage / Bowden Mount
thingiverse
Hello Thingiverse Community! UPDATE March 27th: I've added a new feature to the Customizer that lets you create your own parameterizable sensor holder. I was unhappy with the stock hotend/extruder setup on my ANET A8. There were several issues that bothered me: The extruder motor was hard to access (you had to unmount the fan and cooling plate). It was difficult to see the nozzle during printing because of the cluttered design. High print speeds led to inaccurate results due to the heavy "print-head" with the extruder motor. This design is based on Jubaleth's excellent work (http://www.thingiverse.com/thing:2002778). Key features of this mount include: A slim, light, and modular design that provides an unobstructed view of the nozzle. Several slots for zip ties to keep cables organized. The cooling fan is moved to the left side, with the leveling sensor on the back. It's fully compatible with x-axis cable chains (http://www.thingiverse.com/thing:2105040). You can customize the sensor holder using our Customizer interface. Just pick your preferred file: CarriageV2_3__63mm_AnetA8_E3Dv6_Mount.stl - For hotends with a total height of ~63mm (top to nozzle tip, measured without push-fit). CarriageV2_3__74mm_AnetA8_E3Dv6_Mount.stl - For hotends with a total height of ~74mm (top to nozzle tip, measured without push-fit). Use the Customizer! Just set your personal preferences and export your custom carriage. Be cautious: some settings in the "expert" tab may require firmware adaptations. DISCLAIMER: This design has been adapted for most hotend variations, but you might need to fine-tune the fan position using the Customizer's "expert-fine-tuning". Recommended addons include: Bowden extruder motor mount (Anet A8 stock parts) or an improved bowden extruder (non-stock parts). Rear bed leveling sensor mount or rear sensor mount V2 (screw- and customizable). Belt holder (by Simhopp). Hotend cooling mount for E3D v6 clones (by anthony). E3Dv6 / E3D clone. Teflon tube and pneumatic couplers. Print Settings: Printer: ANET A8 Rafts: No Supports: No Resolution: 0.2 Infill: 40 Post-Printing: Quick Installation Guide This is a quick installation guide with some images for the basic steps. Step 1: After unmouting stock metal frame, screw hotend mount with stock screws to the sliders. Step 2: Attach belt tensioner/belt holder to the back of the mount with 6 screws. (OPTIONAL: Attach auto leveling sensor to the back as seen in the image) [Links to those parts can be found in the description]. Step 3: Insert hotend and secure it with corresponding cap. Step 4: Attach stock cooling fan with stock screws to side frame. Step 5: Attach cooling fan for hotend. Either use one shipped with your hotend or print an adapter for the stock 40mm fan. [Corresponding links in the description]. Step 6: Arrange cables and fix them with zip ties. Changelog: 02/12/17 - V2.0 - Initial (public) release 02/13/17 - V2.1 - Smoother finish and slightly repositioned fan mount 02/17/17 - V2.2 - Minor optical fixes 02/19/17 - V2.3 - Fixes and optimizations in mesh export 02/22/17 - V2.3 - Added Customizer support/version 03/05/17 - V2.3 - Updated Customizer version (wider range fan z pos.) 03/27/17 - V3.0 - Added option for sensor mount to customizer version
With this file you will be able to print ANET A8 | Customizable E3D v6 Carriage / Bowden Mount with your 3D printer. Click on the button and save the file on your computer to work, edit or customize your design. You can also find more 3D designs for printers on ANET A8 | Customizable E3D v6 Carriage / Bowden Mount.
