Andonstar AD407 Extender and Raiser Arm (AD407,AD409,AD302) (Customizable)
prusaprinters
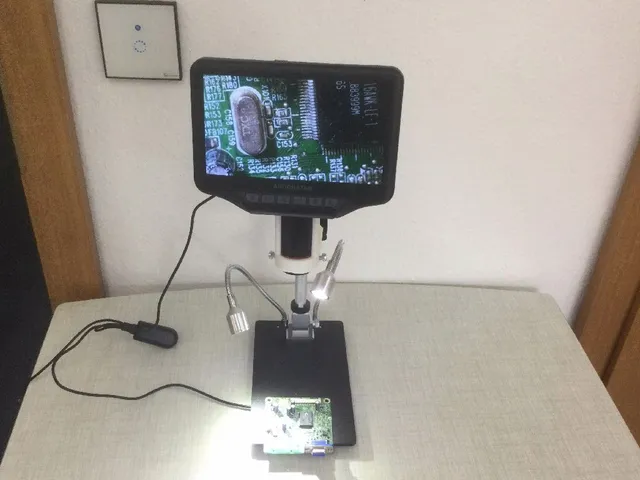
Overview Even if this mount is specifically for the Andonstar AD407 microscope, the mount may fit for other versions like AD409, AD302 and probably others, too. Just check if your microscope has a diameter of 35mm. If yes, this will work.I recently got an Andonstar AD407 Microscope, which is a great device, but it can be improved.Since I wanted to mainly use it for soldering, it was required to maximize amount of working space between the lens and the work surface. There are several solutions out there, but none fitted my needs, so I made my own one.My main concern was mounting the microscope. Screwing against the lens side to secure the monitor and having all the weight of the display as a lever routed directly to the lenses housing wasn't what I wanted. Just think about pressing buttons on the display and the force is all on the tip at the lens as the microscope itself acts as a lever. Fixating the device at the top end of the microscope was also not a practical option, as it reduces the work space below the lens by around 80mm.So I created an support structure the entire device can sit on. The rim next to the display is used as a perfect resting point. Due to the opening you can adjust the focus just as before without putting any pressure or stress towards the lens housing.Requirements:1x M5 10mm for mounting the rotating arm using the plug part. You can use up to 20mm screws here. Even longer ones are possible, but they will stick out of the arm.1x M5 Nut.2x M5 10mm for fixating the microscope. Longer ones are possible. You cannot use the original ones here due to the beefy form factor. Just let the original screw at their original metal ring location and they work fine.Printing:These are the most important parts:AD407ExtensionMount50.objAD407ExtensionMount70.objAD407ExtensionMount100.objAD407ExtensionPlug.objThe number defines the arm length in millimeter measured from rotating center to rotating center. The total length is 44mm longer. Of course you only need to print one mount part and the plug part.Installation:The fixation screws can be used as before if you with, but the construction is stable without. You need at least M5 10mm screws. I suggest to drip a drop of hot glue to the screw tip. This prevents scratching the microscope.You need to tap the four screw holes. I used a manual thread cutter for the job, but you should be able to use a warm/hot screw to perform the same job. Preferable is of course a real thread cutter. For stability and the threads you should print with at least 3 outer walls. To avoid a meltdown, when using hot air, I suggest to use ABS or other thermal resistant plastics. PLA should work, but I would stay on the more secure side.The assembly itself is easy. You need at least one M5 10mm screw and a M5 Nut. For the fixation additional two M5 10mm screws are required. Push the Nut into hex shaped hole on the arm. If the hole is to tight, use a screw from the other side to pull it in, but it should be in quite easy if your printer is calibrated properly.Since the cover plug just needs to be hand tight, you can glue the screw into the cover. That way no tool is required to remove/attach/extend the arm later on, when needed.Place the arm onto the metal ring of your Andonstar microscope mount and push in the plug plate from below. Twist it, until it is flush with the surface. Do not over tighten the screw. There is no need to. It is mostly there to prevent the arm from rotation.Even without screw and plug part the arm and microscope sit well in the extender. The screw/plug solution is more to secure everything during transportation or while shuffling stuff around on the desk.As final step insert the microscope into the mount. You can use the screw holes at the top or at the bottom to prevent the microscope from rotating, when twisting the focus wheel, which is accessible through the opening. I used a bright white, so the focus handle is a giving a nice contrast.Additional Bonus PartsI also added additional arm extender, which can be used as a replacement or extension of the microscope mount. You can chain link them together in any number and they are designed to be collapsible on top of each other. Please note that the first one cannot collapse backwards over the stand, as the vertical adjustment wheels are to big.The parts are:AD407ExtensionArm50.objAD407ExtensionArm70.objAD407ExtensionArm100.objAD407ExtensionPlug.objAgain, the numbers define the arm length in millimeter measured from rotating center to center. The total length is 44mm longer. Per extension arm you need one plug to fixate it. If you want a longer single extension you can use the FreeCAD FCStd file and change the value Arm Length in the spreadsheet.If you don't like the huge mounting part, you can also use these ones with all the negative stuff of the original ring. At least you will gain around 10mm clearance per extension part in addition to the longer arm.Additional Andonstar tips and tricksYou can mount the base plate at 180°. That way you have plenty of room under the microscope for bigger stuff like PC main boards, but you need to put some weights on top of the former work plate to keep it stable.Even if you use the metal work table in the normal orientation and especially when you mounted it backwards, the power plug used for the lights is annoying. There also is a simple solution to fix that, which does not even require soldering.Unplug the device and turn it the bottom side up. Remove the two Phillips screws at the small electronics case, which you rotate by 180° and screw it back on. Make sure you don't break or clamp the tiny wires. Now the power connector can be plugged in at the bottom of the work plate and therefor does not take any additional room on your desk. No clue why this isn't default.Source file:As always I included the FreeCAD source file, so everyone can do modifications the easy way. Open the spreadsheet and change the values to your needs. Most useful here is "ArmLength", which gives you full control about the length of the extension.Please note that you may need the RealThunder branch version of FreeCAD.
With this file you will be able to print Andonstar AD407 Extender and Raiser Arm (AD407,AD409,AD302) (Customizable) with your 3D printer. Click on the button and save the file on your computer to work, edit or customize your design. You can also find more 3D designs for printers on Andonstar AD407 Extender and Raiser Arm (AD407,AD409,AD302) (Customizable).