Anathema Cosplay Staff from World of Warcraft
pinshape
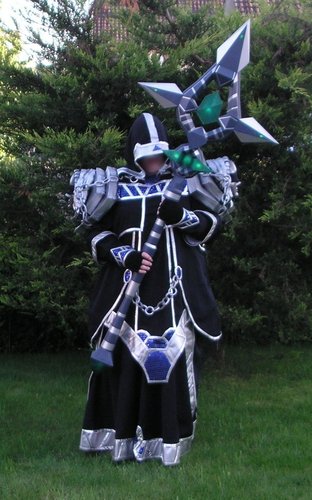
I have created this stunning staff for cosplay at an event called “JapanAniManga night". The designing, printing, building, and painting process took around half a year to complete. It measures almost 1.8 meters in length, and I'm particularly proud of the special detail - the green crystals that glow beautifully at night due to hollow LEDs inside. The staff was my first ever 3D project, and I had never worked with a 3D program before. I used Google Sketch Up to draw the entire design from scratch. To make it happen, I bought an Ultimaker2 for this specific project, which meant I also had no experience with 3D printing at that time. As a result, some parts may need slight adjustments after printing to fit together seamlessly. I had to sharpen certain edges, use glue, and do some additional fine-tuning to put it all together correctly. Inside the lower part of the staff is a carbon rod with a 1 cm diameter and a length of 1m, which significantly enhanced its stability. To make the staff durable enough to carry around all day, I had to create extra fixations and glue them inside the staff. On the assembly process itself, I built the staff from bottom to top after printing all parts (see the picture with named parts). In component 2, I placed a screw through the cover and secured it with a small nut. I glued a small magnet to the lid, allowing me to close it and keep it closed. Inside that lid is a 9V battery, connected to the 14 LEDs placed throughout the staff's crystals. Component 9 was particularly tricky to fixate and required a lot of glue since it held the entire upper part of the staff. After component 8 and 9, I made the upper part of the staff in halves, so I could install all power lanes and LED's inside them first. Component 9 features 6 small LEDs in three pairs of two, while Number 18 has a large 8 mm LED with a 360° beam angle. Number 16 (printed twice) and Number 21 use six small LEDs together. To secure all wires in place, I used a bit of glue. After placing all the LED's and cables, I glued both halves together. For printing tips: since it was my first 3D project designed by myself, I had to make quite a few adjustments after printing. I had to readjust some corners of printed parts that sometimes raised themselves during printing, using a heat gun where needed. I also patched up the pieces where I glued them together and ground off excess glue to make them look neat. To protect the crystals (1, 9, 16, 18, and 21), I painted them with liquid silicone before painting the rest of the staff's surface. Then, I applied a transparent matte finish on the entire staff to protect it from scratches and other damage. The print settings for each part are included in their titles, and some parts require additional supports.
With this file you will be able to print Anathema Cosplay Staff from World of Warcraft with your 3D printer. Click on the button and save the file on your computer to work, edit or customize your design. You can also find more 3D designs for printers on Anathema Cosplay Staff from World of Warcraft.