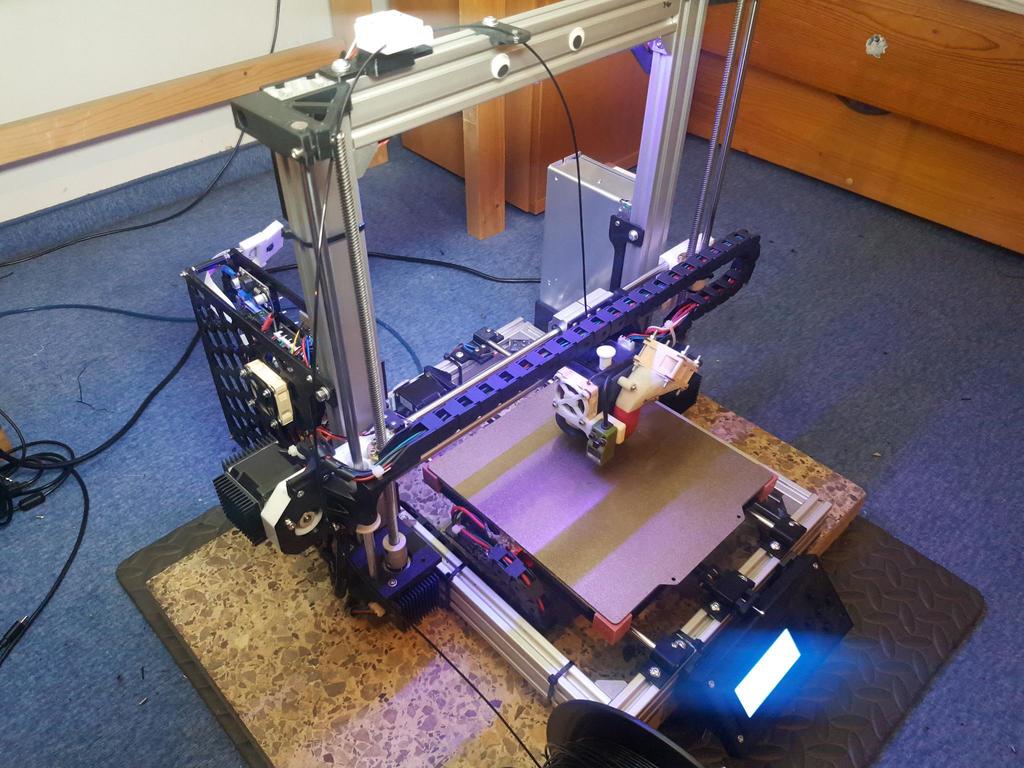
AM8 / Anet A8 X & Y Drag Cable Chain Mounts
prusaprinters
<p>Why use drag chains on your 3D printer? They reduce strain on the cables and especially the ends, increasing their lifetime. They also prevent the cables from snagging somewhere, or tangling - which can lead to failed prints. Overall, they look nice and increase reliability.</p><p>These drag chain mounts can be attached to an AM8 (<a href="https://www.thingiverse.com/thing:2263216">https://www.thingiverse.com/thing:2263216</a>) / Anet A8 stock X carriage, and the Y aluminium 2020 extrusion frame.</p><p>The print bed has to be rotated 90°, such that the cables come out on the left side.</p><p>The chain these mounts are designed for has an outer cross section of 17mm x 15mm, and an inner cross section of 10mm x 10mm. Link length is approximately 19mm, and 25mm is a comfortable bend radius. Total length is 26 links ( + end pieces) for the X chain, and 14 links ( + end pieces) for the Y chain. Nylon is prefrerred, as is slides easily and is very robust. You can also of course print your own chains if you really want to.</p><p>The cable inside the drag chains should be somewhat loose, such that they do not rub against any side. The cables must be secured at both ends of the chain using zipties, to provide strain relief.</p><p>A small clamp is used to guide the cable trunk down at the X motor.</p><p>Additional parts required:</p><ul><li>Drag chain(s), as specified, e.g. <a href="https://www.amazon.de/gp/product/B0859BQSQW?tag=thingiverse09-20">https://www.amazon.de/gp/product/B0859BQSQW</a></li><li>Various cables, heatshrink and solder if you have to extend the existing wires</li></ul><p>Nuts and bolts needed:</p><ul><li>4* M3 x ~30mm bolt</li><li>8* M3 x ~10mm countersunk bolt</li><li>3* M3 x ~10mm bolt</li><li>11* M3 nuts</li><li>2* M4 x ~12mm bolt</li><li>1* M5 x ~8mm bolt</li><li>1* M5 2020 slot nut</li><li>5* small ziptie</li><li>Some washers if you use longer bolts</li></ul><p>For assembly, refer to the photos as well as the instructions.</p><h3> </h3><h3>Print Settings</h3><p> </p><p><strong>Rafts: </strong>No</p><p><strong>Supports: </strong>Yes</p><p><strong>Resolution: </strong>0.2mm</p><p><strong>Infill: </strong>>= 40%</p><p><strong>Filament: </strong>Any PLA / PETG</p><p><strong>Notes:</strong></p><p>For orientation, refer to the corresponding image. Some supports are required.</p><p> </p><h4>Y Chain Assembly</h4><p> </p><ol><li>Assemble / shorten a drag chain to 14 links, plus the two end pieces. Invert the smaller end piece, such that both openings are on the top.</li><li>Remove heated bed surface.</li><li>Attach the top and bottom Y mounts to the drag chain, using two M3 countersunk bolts and nuts per side.</li><li>Thread all heatbed cables though the drag chain.</li><li>Screw the top Y mount to the left side of the heatbed, such that the long side points to the back. Most aftermarket beds have a 3mm hole in the correct position, but you might have to drill one. Use a M3 bolt and nut.</li><li>Leave a bit of cable to form a loop next to the heatbed and fix it to the top mount using a ziptie.</li><li>(Optional) Glue the axle of the smaller end pice to the next one, to limit motion to the downside only.<br>7.5 (Optional) While you are at it, cover the solder connections of the bed with some glue as well.</li><li>Screw the bottom mount to the underside of the left horizontal extrusion using an M5 bolt and a slot nut.</li><li>Thread the cables uder the extrusion and plug them into the mainboard.</li><li>Ensure some slack in the cables and then fix them to the bottom mount using a ziptie.</li><li>Screw the heatbed back on the Y carriage.</li><li>Verify the drag chain does not collide with the frame, and that the cables dont scrape on the inside of the chain.</li></ol><p> </p><h4>X Chain Assembly</h4><p> </p><ol><li>Assemble / shorten a drag chain to 26 links, plus the two end pieces. Invert the smaller end piece, such that both openings are on the top.</li><li>Attach the top and bottom X mounts to the drag chain, using two M3 countersunk bolts and nuts per side.</li><li>Screw the bottom moving mount to the two rightmost extruder carriage bearing block holes, using two replacement M4 bolts.</li><li>Thread all hotend cables though the drag chain.</li><li>Leave a bit of cable to form a loop next to the extruder and fix it to the bottom mount using a ziptie.</li><li>Screw the top mount against the outside face of the X motor mount using four M3 bolts.</li><li>Thread the cables between the X motor and the frame and plug them into the mainboard.</li><li>Ensure some slack in the cables and then fix them to the top mount using a ziptie.</li><li>Fix the clamp to the top mount using two M3 bolts and nuts.</li><li>(Optional) Fix the cable trunk in the clamp using a small ziptie.</li><li>Verify the drag chain does not collide with the frame, and that the cables dont scrape on the inside of the chain.</li></ol><p> </p><p>Category: 3D Printer Parts</p>
With this file you will be able to print AM8 / Anet A8 X & Y Drag Cable Chain Mounts with your 3D printer. Click on the button and save the file on your computer to work, edit or customize your design. You can also find more 3D designs for printers on AM8 / Anet A8 X & Y Drag Cable Chain Mounts.
