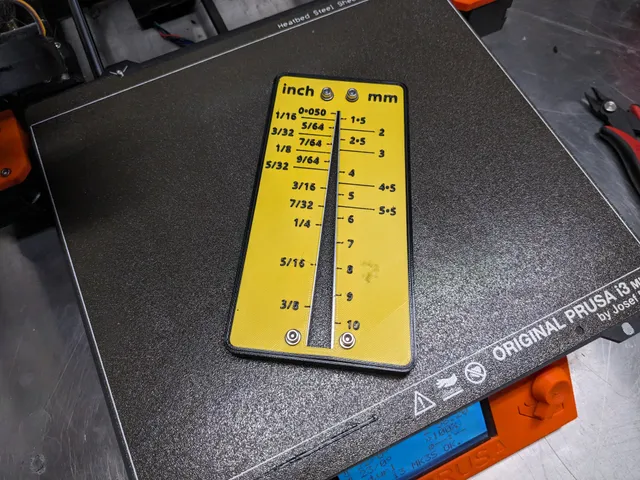
Allen (Hex) Wrench Gauge/Sizer - Inch and Metric
prusaprinters
If you collect tools for the home shop, you may start to accumulate a bunch of loose Allen wrenches (also called hex wrenches or hex keys, but I'm going to go with Allen wrench for this print). Or maybe you have just been using various sizes of Allen wrench, and somehow they ended up in a loose pile on your bench. My shop has way too many loose Allen wrenches, and although I could sort them (slowly!) by measuring with a digital caliper, I created this print to speed up the job.In addition to the 3D printed parts, this also requires :two aluminum strips; 1/8" X 1/2" X 140mmfour M3 X 10mm SHCS with washers and nutsThe odd measurements on the aluminum strip are because I purchased a 3ft length of 1/8 X 1/2" aluminum strip from a local big box store. I have included a drawing with measurements in both inch and metric. As of Dec. 23, 2023 I have also included a drawing for metric size strip (2mm X 10mm) - see Note below.Note : [Dec. 23, 2023] Update added for metric size aluminum (aluminium?) strip :This update applies to countries where aluminum strip is commonly sold in 2mm thick X 10mm wide size. This requires that all of the parts be altered slightly to accommodate the slightly smaller strip size (also included is a drawing - see photos - for the metric aluminum strip). Please note that I have not printed this metric version, so of course I have also not tested it. However, it is essentially the same as the one I printed, so I have high confidence that it will work just as well.Assembly, Calibration, and UseNote: the holes in the two printed parts are filled with a sacrificial fill in order to enable printing of the Base without supports, and to improve the print integrity of the Plate. I recommend opening up the holes by piercing them with a razor knife (see photos), and rotating the knife blade to carve out the fill. Do this for both sides of each hole to ensure a clean hole. The instructions below assume you have already done this.Insert the four hex nuts into the holes in the bottom of the Base; push them in as far as possible.Prepare the aluminum strips according to the included drawing (see photos). Note that the holes in the strips are intentionally oversize - this is to allow for some adjustment of the strip position.Place the aluminum strips in the pocket of the base, with the holes in the strips aligned with the holes in the base.Place the Plate onto the base, and insert a screw and washer into each of the two holes on the left (inch) side. Tighten the screws loosely - just enough to holed the strip in place. Adjust the position of the strip on the left (Inch) side so that it is just visible through the V-hole in the Plate, and then tighten the two left side screws to hold the plate securely. Note that there are slots in the bottom of the plate - this is so that a small screwdriver can be used from below to adjust the strip position.Insert a screw and washer into each of the two right side (mm) holes, and tighten the screws loosely as before - just enough so that the strip is held but still moveable. Calibration #1 : Using a screwdriver from below, push the right side strip top position as far to left as it will go. Insert a 1/16" or 1.5mm wrench into the V slot, and slide the wrench upward until the wrench position (top “corner” of the hex) corresponds to the wrench size, moving the top of the strip as necessary to get the wrench to fit. Tighten the top right screw firmly but not tightly (yet).Calibration #2 : Insert a 3/8" or 10mm wrench into the bottom the V slot, and using a screwdriver from below move the bottom of the right hand strip as far to the left as it will go. The slide the wrench upward until the wrench position (top “corner” of the hex) corresponds to the wrench size, moving the bottom of the strip as necessary to get the wrench to fit. Tighten the bottom right screw firmly but not tightly (yet).How to use (and calibration check) : Check the calibration with various size wrenches by inserting each wrench into the V slot and sliding the wrench upward until it stops; the mark next to the stopping point is the wrench size.Assuming that the calibration check in Step 8 is OK, tighten all four screws tightly (but do not over-tighten!). Print InstructionsPrint in PETG using the 3mf files provided; otherwise :Base :0.2mm layer height2 perimeters10% rectilinear infillPlate :0.2mm layer height2 perimeters0% infillprint in two color via filament switchingCADThe OnShape 3D CAD files for this are here :https://cad.onshape.com/documents/fa2aa4a1eb8b57beeaea3386/w/178a1c727a6ced77f4c883e9/e/f0fdada57583265e016e3a1b?renderMode=0&uiState=65874a66ab775a68fa2f2564
With this file you will be able to print Allen (Hex) Wrench Gauge/Sizer - Inch and Metric with your 3D printer. Click on the button and save the file on your computer to work, edit or customize your design. You can also find more 3D designs for printers on Allen (Hex) Wrench Gauge/Sizer - Inch and Metric.
