aircraft phone holder
prusaprinters
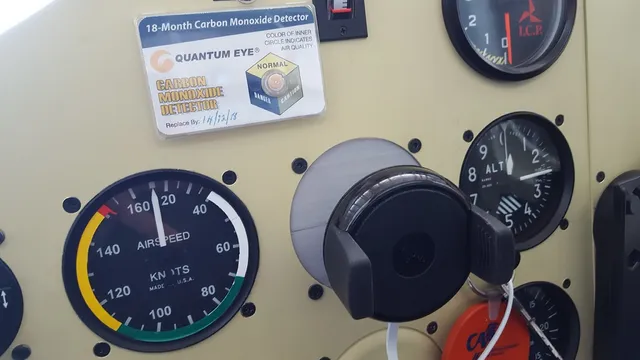
A cellphone wireless charger mount to install in a standard 3 1/8" aircraft instrument panel cutout. This is designed around this wireless cellphone charger https://www.aliexpress.com/item/Proelio-Wireless-Car-Charger-Phone-Holder-for-iPhone-8-X-for-Samsung-Galaxy-S6-S7-S8/32844712249.html and this USB power supply https://www.aliexpress.com/item/9V-12V-24V-to-5V-DC-DC-Step-Down-Charger-Power-Module-Dual-USB-Output-Buck/32847583351.html. Other wireless chargers will work without modification so long as they have a 17mm ball/socket attachment. [Edit 13 Oct 18: Seems that this USB charger causes radio interference. :( I'll be looking for a new charger and redesign this Thing for it. Don't make this!] NB: this USB board requires a heatsink on the large chip if you draw more than 2A. The charger draws about 1.5A, so you will need the heatsink if you ever plan to use both sockets at the same time. Heatsinks are attached by self-adhesive pads. I didn't trust this, so I tied the heatsink to the PCB using some braided copper wire (this also helps as an extra heatsink) which is twisted together and soldered. You will also need 4x M4x20 screws (I used countersunk because the panel itself is countersunk), 4 x M4 nuts, 2 x 2x8mm self-tapping screws, some wire and perhaps a connector, and a short USB-to-micro-USB cable. Solder wires to the pads on the USB board, and cable tie back to the board for strain relief. Connect to fused, master-controlled 12V supply (e.g. the back of the cigarette lighter socket). Mount the USB board to the phone holder using the self-tapping screws. Put M4 nuts in the recesses in the back of the holder, hot glue if necessary. Mount the holder in the panel (V1 could be done through the hole in the panel itself, if access to the back is difficult) using M4 screws. Unscrew all the way the plastic nut that holds the air-vent or whatever other attachment to the back of the phone holder. The attachment ball part should then just pull out of the socket. Keep the nut. Put the plastic nut over the ball on the panel, push the socket onto the ball, and tighten the nut. Plug in the micro-USB cable. V1 has the USB at right angles to the panel face, and is in two parts to facilitate printing the USB board mount. V2 is a perhaps-better design that I haven't actually printed... it is single-piece, and has the USB board at 45 degrees. If you're modding, you might want to consider moving the ball position off-centre, so that the phone is higher or lower. I positioned the USB board to the right of the holder, so that it is still accessible when there's a phone in the holder, to plug in a second phone. Print Settings Printer: Zonestar D810 Rafts: No Supports: No Resolution: Not very important... I printed with a 0.6mm nozzle Infill: 10% Filament: Generic PLA, but any material should be OK Notes: For a really tidy finish, sand and paint to match the panel. How I Designed This =================== Source files are available at https://cad.onshape.com/documents/0dd6ca1b7623843c27ef70ce/w/8f8fe8e6980fc34b522d1c62/e/82cb1932d05c0e0afc6d705e or search Public Documents for "aircraft phone holder" Included is a model of the power supply board in case anyone wants to mod this design. NB that the dimensions on AliExpress are different from my actual board. This model matches my board. You can find the source file for this at https://cad.onshape.com/documents/7309e7ad40b994db5d44ddc1/w/d488abce5bddbed7b52ff2ce/e/6ac6dd71d4985a995bd19593 or search Public Documents for "USB dual charger" Category: Mobile Phone
With this file you will be able to print aircraft phone holder with your 3D printer. Click on the button and save the file on your computer to work, edit or customize your design. You can also find more 3D designs for printers on aircraft phone holder.
