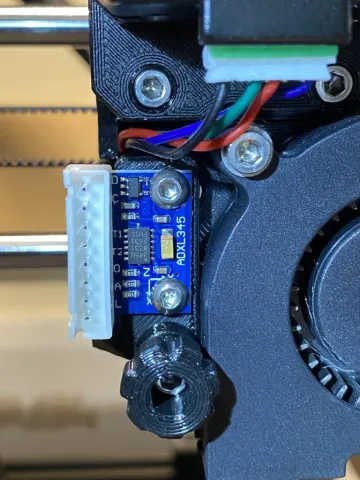
ADXL345 Mount for Bear Extruder
prusaprinters
ADXL345 Mount for Bear ExtruderA mount that allows you to attach an ADXL345 accelerometer to the Bear Extruder for calibrating Klipper's Resonance Compensation (aka Input Shaper).This mount works with many of the commonly available generic ADXL345 accelerometer boards. It attaches to the Bear Extruder (v2, but v1 should also work) using the nut that is used to mount the fan duct. I attach the ADXL345 to an RP2040 board, which then attaches, via USB, to the Raspberry Pi running Klipper. This lets me quickly set up for Input Shaper calibration without messing with the Raspberry Pi. In addition, the USB cable can be quite long, so there are no issues with wire length.As with all my designs, CAD source is included.PartsThe mount was designed for a Beta version of the Bear Extruder v2. I will update if necessary for the release version of this extruder. It should work (not tested) with Bear Extruder v1. The mount is designed to work with the fan duct knob that is an optional component shipped with the Bear Extruder v2. If you don't have this, you should also be able to just use an M3 screw. You can put a washer on there if you want, but it isn't necessary to tighten this down much, so the washer is optional.I designed the mount for some ADXL345 boards that I found on Amazon.com. HiLetGo GY-291 ADXL345 (Amazon.com)Teyleten Robot GY-291 ADXL345 (Amazon.com)Many of the clone ADXL345 boards out there use this same form factor. If you need support for another board, I have included the CAD files.Note, I do not recommend the Adafruit ADXL345 boards. These boards were designed with a passive level shifting circuit so that they can be used with I2C on 5V systems. However, this level shifting circuit greatly reduces the length of wires you can attach. In addition, they use M2.5 mounting holes with a different spacing, so my mount will not fit without modification.The mount uses two heatset inserts. These are the M3 x 5 x 4mm heatsets that are used in Voron printers and many other projects, and are commonly available. You can use heatsets from McMaster Carr, but be aware their diameter is a little larger, so you may want to tweak the hold size in the supplied CAD file.To attach the ADXL345 to the mount, I use two M3 x 0.5mm 6mm length screws. 8mm will work as well. Round head or socket head will work. In the US, these are available from:McMcmaster.com, part number 92095A179Bolt Depot, part number 7218Amazon.com and many other places.Check the Bear extruder instructions for the screw you need for the knob. At the time I write this, it is an M3 x 0.5 length 18mm socket head cap screw. These are available from:McMcmaster.com, part number 91292A029Amazon.com and many other places.You may also be interested in the RP2040 case and the heatbed mount - see the section on Related Designs below for links to those. I am using JST-XH connectors on the RP2040 cable and in the ADXL345. You can find these on Amazon. If you buy a kit, make sure it includes the 8 pin version of the connector, both male and female versions. Pretty much any connector with a 2.54mm / 0.1 inch pitch will work. There are kits that have the wires pre-crimped, which is very convenient - however, the wires are pretty short.AssemblyInsert the heatset inserts into the mount using a heatset press or soldering ironSolder the JST-XH (or whatever connector you choose, to the ADXL345 boardAttach the board to the mount using the M3x0.5x6mm screws.Unscrew the fan duct knob/screw, and remove the fan duct. Attach the mount using the knob/screw. Attach the wire from the RP2040 using the cable with the JST-XH connector.Attach the cable to the RP2040AttributionThanks to Grégoire Saunier for sharing the extruder cover and fan duct knob designs which I used to ensure that everything fit correctly. If you have one of the Prusa MK3 printer series printers, I highly recommend you check out Grégoire's excellent enhancements to this printer:Bear Frame Upgrade 2.1Bear Extruder and X Axis (BearExxa) - This is v1; hopefully by the time you are seeing this, v2 will be released.Check out Grégoire's Patreon page and consider becoming a sponsor.Related DesignsAs mentioned above, I designed this case to use for calibrating Klipper's Resonance Compensation on my Prusa MK3 printers with the Bear mod. If you have an MK3, I have uploaded a heatbed holder for an ADXL345. If you have the Bear Extruder, I also have an ADXL345 holder for that.Magnetic (Heatbed) Mount for ADXL345 AccelerometerCase for Adafruit QT PY RP2040 (to control ADXL345)
With this file you will be able to print ADXL345 Mount for Bear Extruder with your 3D printer. Click on the button and save the file on your computer to work, edit or customize your design. You can also find more 3D designs for printers on ADXL345 Mount for Bear Extruder.
